• Skip to main content
  • Skip to primary sidebar
  • Skip to footer

  • Home
  • About
  • Gallery
  • Classes
  • Trips
  • Books
  • Blog
  • Contact
  • Sign Up For My Blog

Blog

Quilt Float Revisited

February 7, 2021 4 Comments

Before I jump into this week’s “topic”, I just have to share an email I received from Peg:
“This is a great post. I do have a question. Can’t you simply measure the diagonal of the raw edge blocks, average them, and cut your squares that size plus 1 1/2?”

My response? – I wish I’d thought of that!!! So, instead of laying out 2 blocks and measuring the space between their points (as in last week’s post):

you’ll get the same results by simply measuring the diagonal of an unfinished block:

Either way the result is 8 1/2″ for these 9 patch blocks and 1 1/2″ can be added to that, resulting in 10″ squares that will be cut on both diagonals! Thanks Peg!

*******************

And now for this week’s topic!

A number of quilters have recently asked about my Quilt Float system. It’s not a medieval torture device, but rather a great way to make quilting a large quilt less stressful.

The time to revisit this topic has arrived! I wrote my original post back in 2012. Many of you weren’t reading my blog back then, so this is for you 😊 – or for anyone who’d like a refresher.

The idea behind this contraption is to “lift” the weight of the quilt so that it doesn’t pull and drag as we quilt large projects. It works with any sit down machine. My studio is finished so I can’t hang things from the ceiling, but if you sew in an unfinished basement, you could easily hang the chains from nails in the rafters and avoid the support structure altogether.

To “build” your Quilt Float I’m reposting portions from that first post in 2012 here, along with some updated photos. It begins with helpful set up hints for quilting large projects:

“Before we get to the actual frame, there’s a few tips I’d like to share. If your sewing machine is in a cabinet – great. It is also helpful to have some support to the left of the machine. If you don’t have any, placing an adjustable ironing board there is a good solution.

If you don’t have a cabinet you will want to find a way to avoid “sewing on a mountain”, ie: with the machine perched on top of a table or desk. Even table extenders don’t solve this problem with a large quilt because pins and folds of quilt get caught on the edges. My best suggestion is to place a card table in an “L” against your kitchen table or a banquet table. Then set the machine on a tv tray in the inside corner with enough magazines to make the bed of the machine flush with the tables.

Now you’re ready to float the quilt. All of these supplies can be purchased at your local hardware store.”

2 Lengths of Chain (approximately 18” long – links should be 1 ½” long)

2 Bull Nose Clips (1”)  These can be found with office supplies. They are inexpensive and will clip and unclip the chain together very easily to adjust the height of the floating quilt.

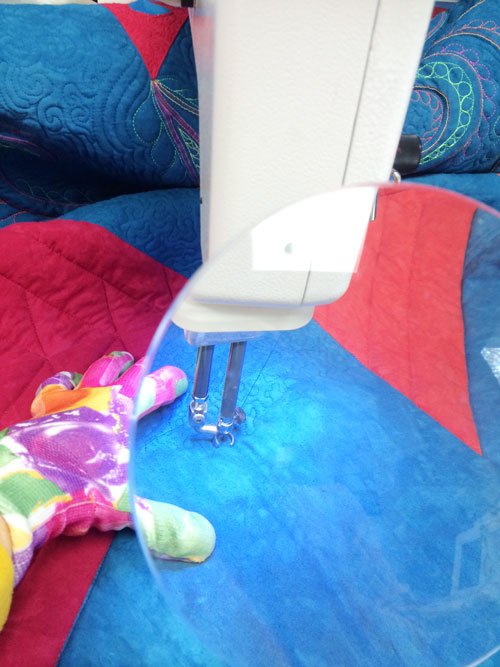
2 Spring Clamps (6” long) These are plastic, fairly inexpensive and have holes in the handle ends for attaching the chains. They squeeze to open.

2 Slide Clamps (36” long)  Both the old fashioned “C” clamps that screw to tighten or the deluxe new ones that pump tight will work.

Choose the best quality clamps you can afford. I took my husband shopping and thus I own the Cadillac of clamps, but I did wait until they were on sale. They are very easy to use! It’s important to have a hole in the bar at the non-clamp end for a rod or bolt to go through.

1 Top bar – you’ll want the “Quilt Float” positioned about 1 ½ feet behind the sewing machine. Depending upon your space, you’ll need to choose a “top bar” option:

1. If your table/cabinet is less than 6’ wide and more than 1½’ deep you’ll want to place the clamps on the sides (as in the clamp photo above). For this arrangement you’ll need: 2 bolts and 2 wing nuts that will fit through the holes at the ends of the Slide Clamps, and a length of aluminum slat that measures at least a foot longer than the width of your table/cabinet, with holes at even intervals along the length (mine had no holes so my husband drilled them to fit my table – he also painted it black 😊).

2. If your table/cabinet is more than 60” wide and less than 2 feet deep, you’ll want to place the clamps along the back of the table. For this arrangement you’ll need to buy a ¼” diameter Steel Rod (4’ long). This is the arrangement I used at retreat:

The rod will slide through the hole in the end of the long clamps.

And that’s it! Attach your support frame to the table, place your quilt under the machine, reach back and grab a handful of quilt with the spring clamp (as in the photo at the top of this post. Voila – your quilt is floating and the process of quilting will be much more enjoyable. I guarantee it!

And just out of curiosity – are any of you using a Quilt Float of this design? Please comment or email me at .

Ricochet Quilting

January 17, 2021 8 Comments

In November I posted about the fun I had using rulers to quilt our new, king size bed quilt. After finishing it I wanted to machine quilt some more – can you believe it!?!

We have a friend who is going through a particularly difficult time right now. He recently showed quite a bit of interest in my quilting, so I decided to go through my pile of unfinished class projects, layer one with plush fleece, and finish it to keep him warm this winter.

This ricochet method will work well with a walking foot on a domestic machine, but I had fun using it with a ruler on my mid-arm. I know quite a few quilting friends who have purchased the ruler foot for their home sewing machines, along with the necessary quilting rulers, but they have been hesitant to try them out. I highly recommend jumping in – but do it on a lap sized or smaller quilt 😊.

The lap sized top I chose was in my favorite warm shades of orange and brown, and was made up of oodles of half square triangle blocks.

I could have gridded the entire quilt on my home sewing machine with a walking foot, but this time I decided to have some free-motion ruler fun! I quilted all the long diagonals on the quilt with my channel ruler, connecting the corners of the blocks “free-motion”.

Each time I completed stitching the diagonal of a square, I’d slide the ruler down to the next intersection and continue the quilting line.

Now here’s the fun part – when I reached the edge of the quilt I simply repositioned the ruler on the perpendicular diagonal and “bounced” up in this new direction, as if the stitching was ricocheting off the edge of the quilt. If you are using a walking foot on your home sewing machine, the quilt would simply need to be rotated in the new direction.

In this photo I was quilting down from the upper right and am now positioned to quilt up and to the left.

I continued to bounce around the quilt in this manner and only had to stop and restart 4 or 5 times to complete the quilt. In a matter of a few hours it was done! I trimmed the fleece around the quilt at 1″, and folded it up to make a nice soft self-binding.

And here’s the quilting from the back. I think the quilting looks great on the fleece.

We gave it to our friend and he seemed quite pleased! What a blessing to be able to give a gift of love and warmth. I know so many generous quilters who make quilts out of love for others and I’m sure you all understand the joy that comes from giving a gift from your heart! Praise the LORD!

Bending Threads II

August 2, 2020 4 Comments

I actually have two topics to share this week. So before I delve into a follow up post to the bobbin work from last week, I really need to tell you about the upcoming fundraiser auction for the Wisconsin Museum of Quilts and Fiber Arts. It takes place this week and begins tomorrow – Monday, August 3rd!!!

This image has an empty alt attribute; its file name is wmqfa-for-blog.png

I’m excited to be on the auction block – or at least for my work to be 😁. Here are the details of what I’m offering:

“You and three friends can participate in a 6-hour workshop provided by Chris Lynn Kirsch and held at the Wisconsin Museum of Quilts & Fiber Arts.  Enjoy the day learning a new technique, improving a skill, or having a fun and creative experience with friends, led by an award-winning quilter and teacher.  Select from Chris’s workshop offerings, found on her website: https://www.chrisquilts.net/classes/.”

I know there will be many other great items up for auction – and all the proceeds benefit our museum. So please join in on the fun! I apologize that the link in the image above doesn not work. Here’s the actual link to the site: https://www.wiquiltmuseum.com/calendar-of-events

Bending Threads and Bobbin Work

In response to last week’s post, my dear friend Evelyn sent me some wonderful photos and information about her experiences with bobbin work – and you’re gonna love it!

Evelyn has been featured in quite a few of my posts. She has been a blessing to me in so many ways. She was the friend who taught me how to make my Japanese jacket, inspired my “A View From My Window” challenge, she acted as my agent to get me teaching opportunities in Alaska and Arizona, she has used my “Crossing” technique in a variety of fascinating quilts, and is infamous for her part in our Quilt Sissie kidnapping adventure. If you have a little spare time, you may want to read some of those previous posts. Simply click on the subject of each one above to be linked to them.

This was her response to last week’s Bending Threads post:

Hi Chris, I’m sending photos of some of my bobbin embroidery quilts to use on your blog if you want to.  I’ve taken a close-up and a full quilt picture of each one.  I still have about 30 bobbins with the “thread” on them.


“I’ve tried lots of different threads.  It’s the only way to use decorative threads that won’t go through a machine needle.  The easiest to use is perle cotton, size 8, but I’ve also used sizes 5 and 3.  It’s great for metallics, too, or even multi-strand floss.  In most cases, I do the embroidery through a single layer before sandwiching, but it can be done as part of the quilting. 
I wanted the basket in this wallhanging to show up better, so I outlined the basket on the right side, then turned it over and stitched the lines to make it look woven.
“

“One of the first pieces I used the bobbin embroidery on was this multi-technique vest.  I used size 3 perle cotton to make the spider webs. You can’t get much thread that size on a bobbin and you have to loosen the bobbin tension more than with most threads.”

“This cotton and metallic thread made a nice filler in the open spaces of this wall hanging.  I traced the design on paper, then pinned it to the back and sewed through the paper.”

“I made this quilt in a workshop on ways to make and use circles.  I used metallic cord to highlight parts of the circles, and a satin cord in the border as part of the quilting.”

“I used a top thread in the color of the background to make this one look more like hand sashako.”

“Bobbin embroidery can be used on bed quilts, too.  My quilter echoed the same motif in the border.”

Almost a week after Evelyn sent me these wonderful photos, I received this message:

“This quilt is hanging in my large living/sewing room staring at me and I forgot it.  It’s called “Cycles to Fit the Stages of Life.” Cycles, Fits and Stages was the name of the challenge for a show and I took it literally.   The spokes are bobbin embroidered.”

Delightful! All of these quilts make me want to go do more bobbin work. I hope they’ve inspired you too. Thanks Evelyn!!!

**********************

And remember to go to the museum auction site: https://www.wiquiltmuseum.com/calendar-of-events, and support our wonderful fiber art museum!

Bending Threads

July 26, 2020 6 Comments

I’ve played a bit with bobbin work over the years, and have even taught a few classes on this fun technique.

Recently we held a small challenge in our ThreadBenders group entitled “Thread Bending”. The idea was to make a small whole cloth quilt using stitching only – no piecing or appliqué.

A while back I’d begun a class sample to show the students in my Open Lab class how to stitch from the back of a layered quilt sandwich, directly on the motifs in a fabric with a large print. My back was covered with beautiful butterflies.

I decided this would be a great piece for the challenge. By placing a decorative thread in the bobbin, and changing it for each portion of the motif, lovely butterflies appeared on the front.

Once the decorative outlines of the butterflies were stitched, I turned the quilt to the front, filled in more of each butterfly with free-motion stitching in thinner, bright colored threads, added my own funky flower, and then quilted with echoing and spiraling.

I have learned over the years that red quilts are difficult to photograph – and this quilt was no exception. The colors are as bright and cheery as you can see in the detail photographs, but the intensity of the red background overpowers the background stitching, so I toned down the intensity to allow the quilting to show in the full view above. I hope you get the idea 😁.

If you decide you want to play around with bobbin work I highly recommend making a sample sandwich to experiment on, as getting the tension correct takes a bit of fiddling.

Purchasing a separate bobbin case for the non-drop-in bobbin machines can be very helpful. Mark it for bobbin work, and feel free to adjust the tension to get the right look on the quilt top. Sometimes I skip the tension spring on the bobbin altogether.

Drop-in bobbin machines are a little trickier. Begin by threading as usual and checking the top often. If the thicker threads don’t work, try not putting them through the spring and see what happens.

If you’ve done any bobbin work in the past, I’d love to see a photograph or two! Send them to me at:

Added Shadows

March 25, 2018 3 Comments

A few years ago I made a quilt using an orange/yellow pointillism fabric, silhouetted with black.

I loved the way the pointillism fabric added depth. I loved the color, I loved the silhouette of the tree. I was pleased with the moon. It was exhibited in a number of shows and I shared it in many lectures.  It hangs in our home every Autumn. But something never seemed quite right.

Recently I pulled it off the shelf as I was packing up for a lecture in a nearby town. I got the feeling I should hang it on the design wall and stare at it for a bit (which was impractical – as Trey was napping and I really needed to use the time to prepare for the talk). All of a sudden it hit me –

Why hadn’t I noticed this before? Why hadn’t anyone mentioned it to me?

I threaded the machine with black and began rapidly free motion stitching horizontal “wavy” lines on the lake. A few moments later – SHADOWS!

Here’s the before and after, side-by-side pictures, for comparison:

I’m so glad that when a quilt is finished, one can always change their mind and add a bit more quilting!

Now I love it even more   😀 .

Have you ever added to a quilt long after it was “finished”? I’d love to hear your story. Please comment to this post or email me at .

******************

And here’s a little extra about last week’s post :-). You may remember I shared pictures and stories about Bears Paw quilts. I asked for readers to send me pictures of their bears paw quilts and Donna responded with this email:

“After reading your last blog entry about the bears paw quilt, I thought I’d send you a picture of my quilt.  It’s not really a bears paw quilt, it’s what I started in your “Scrap Happy” class at WCTC a while back, but it does sort of have giant bears paws in it.”

It definitely has bears paws on it and it’s wonderful! Thanks Donna!

To see the original post about the Scrap Happy class I taught at a retreat go to: https://chrisquilts.net/?p=7287

********************

And one last item for anyone who lives in the Milwaukee/Madison area. This coming week is a special one and my church, Calvary Baptist Church in Watertown, WI, will be presenting a “Walk Through Jerusalem” on the evening of Good Friday. It’s a wonderful family event! Come anytime between 5:30 and 8pm. The address is 792 Milford Street.

If you’d like more information, please watch this invitation from our Pastor!

https://www.facebook.com/calvarywatertown/videos/1574850162568361/?t=0

Maybe I’ll see you there  🙂

Silly Goose

January 8, 2017 17 Comments

So here’s a fun way to begin the new year – sharing pictures of my latest quilt! A few weeks ago I mentioned that my most recent contest quilt had been accepted into the New Quilts From an Old Favorite contest at the National Quilt Museum in Paducah, KY. The judging is completed and I’m now free to share my quilt with you. The traditional block the museum chose this year was Flying Geese. While at the AQS show in Paducah this past Spring I got my idea. It’s called Silly Goose, and the label reads: “There’s one in every crowd. She just can’t follow the leader or the rules. What a silly goose!”

flying geese variation

It was great fun creating the crazy, silly-ness in the solo silly goose.

I used stretchy metallic fabric once again. You may remember my first experience with that in “40 Wonderful Years” (click here for that post). It was a challenge to sew on, but the stretchiness gave the trapunto a shine I loved. The only color I couldn’t find in a Spandex™ type fabric was orange, so I tried polar fleece. Another non-traditional quilting fabric. It is a little fuzzy, but I was pleased with the results.

Next, came the quilting. That was even more fun! I chose to free motion embroider designs on the background fabric in neon thread, before I layered and trapunto’d the top. This allowed the embroidery to lay on top of the poofy areas.

machine embroidered trapunto

The effect was just what I was looking for.

Once begun, the quilting took on a life of it’s own, and it was a joy.

This was followed by fused crystals in the small amount of space that wasn’t yet stitched.

WooHoo! I hope you can see the joy I have in playing with fabric, color and design. The Flying Goose exhibit will be hanging in the National Quilt Museum during Quilt Week this Spring. Then it will travel for two years to many shows across the country. All the quilts will also be featured in a book, published by the museum. It’s always fun to have a quilt travel and visit places I have yet to see.

I praise God for the opportunities and joy He’s given me through quilting!


Comfortable Quilting Tips

October 30, 2016 6 Comments

This past week our son had a few well deserved days off of work – which meant grandpa and I had some time off from child care. Mike decided to make good use of the time, and beautiful weather, making fuel for our wood-burner.

lumberjack-mike-2016

And I was able to finish my current competition quilt! The deadline is this week, so the timing was perfect! I had previously machine quilted about 1/3 of the project, and the time had come to do the free-motion background fillers. I placed the quilt under my HQ Sweet 16 and hooked it up to my “Quilt Float” system (for details on the Quilt Float, click here and then here). That’s my #1 suggestion for making quilting more comfortable!

comfortable-quilt-float

The clamps hold the bulk of my quilt and carry the weight, so everything moves easily under the needle. This works for domestic sewing machines as well as mid-arms, and it makes the entire process so much less strenuous!

You may have noticed the magnifier arched in front of the machine. It is one of my favorite new tools and my #2 recommendation for making quilting more comfortable. It has a “goose-neck” arm attached to a heavy duty clamp for easy positioning, and it increases my visibility so much now that my eyes are over 60  :-). I purchased mine in Paducah a few years ago, but I did find it on-line at jabetc.com

comfortable-quilt-mag2

Don’t you just love my quilting gloves? I got them in the gift shop at the International Rose Gardens in Portland, Oregon last year when Wendy and I took a group of quilters to the Sisters Quilt Show (click here for information on our next adventure). Quilting gloves make moving the quilt so much easier, and are #3 on my list of recommendations for making quilting more comfortable.

So, I began to quilt, but I still couldn’t seem to get comfortable. I tried adjusting my chair height (elbows should be even with the table top), but that didn’t help. I scooted the foot pedal around, but that too wasn’t working. What was wrong??? I finally stopped long enough to analyze the situation and realized the chair was cutting into the back of my legs. I’m not sure why I hadn’t had this problem before (could it have something to do with that age thing again?), but it was bugging me now – and I needed to do something about it – fast!

It occurred to me that I needed to raise my feet off the floor. I found a sturdy, 3″ tall cardboard box in the attic and it did the trick! It was especially nice to have both of my feet on the platform. I felt much more balanced and a whole lot more comfortable. Thus, “raising the floor” is tip #4.

comfortable-quilting

You might have noticed there are small blocks of wood under the feet of my sewing machine table. This is my husband’s method for protecting the carpet, and it did raise the table about 1″, exacerbating my problem. Since I’m 5′ 6″ tall and this worked for me, I bet “raising the floor” could really be helpful for quilters with shorter legs.

Do you have any additional quilting comfort ideas to share?

**********************************

Last week Marla responded to my post about Slow Stitching with a picture. This is what she said:

“I love this slow stitching movement.  I started slowing down the process almost a year ago.  Sometimes life gets in the way of our quilting, and we become frustrated by not producing all the quilts we’ve designed in our minds.  I have started doing more handwork and improvisational piecing with minimal planning.  It’s very satisfying and quite beautiful.  I’ve attached a piece of embroidery on felted wool, all improvisational except for the leaf shape.”

Marla Morris-Kennedy slow stitching

It’s lovely, Marla. Thanks for sharing.

I’m hoping to try my hand at “slow stitching”, but it may need to wait until I’m past my “fast chasing after grandchildren” phase of life.

A Lunch Bunch Quilt – Part 2

September 13, 2015 Leave a Comment

This past weekend was the Madison Quilt Expo. It was a great show! I’m inspired, and exhausted 🙂 . I’ll post about that soon, but this week I want to continue the lunch bunch quilt story:

Last week I introduced you to my Lunch Bunch blocks and the idea for using them in a bed-sized “Log Cabin Quilt With Attitude” (if you’re new to the blog this week, please click here for the original post). Once I made all the wonky log cabin blocks, I stitched them into columns, and decided it would be a great idea to layer and quilt these columns individually, rather than make and quilt the entire top.  It was so enjoyable quilting the long skinny pieces!

Lunch Bunch Quilt column

Once all the columns were quilted, I connected them with the “Reversible Quilt as You Go” technique I used in my grandkid’s quilts. (click here to read that post).

I decided to use 2 different backing fabrics on the columns, this made the back of my quilt quite interesting.

Lunch Bunch backYou may remember that the blocks were all squared up to 10 ½” in width, so that they’d fit together into the columns, but the lengths were all different. As you can see, this left me with a very unusual lower edge. Sharon showed this bottom edge effect in her book, and I like it! But how does one bind such a quilt? That will be the “topic of the week” next time. I’ll show you the finished front then too.

Don’t Forget the Block Stack Challenge!

I’ve had 2 pictures of exhange blocks sent in. Others emailed that they didn’t know if they’d have time. There is no time limit and no one seems to have an abundance of time. So, if you are at all inclined, please send a picture of your blocks. It may be a ways off into the future, but you just might get yours together and win. Here is the challenge once again:

Do you have a stack of exchange blocks just waiting to become a quilt? I’d like to challenge you to send me a picture of your stack of blocks (feel free to arrange them any way you like – thrown all over the room, or in one tall stack, or artistically draped, or… ???). I’ll then post the pictures (without naming names) and challenge each participant to put them in a quilt. The first one to actually make their blocks into a quilt will get their name and photo in the blog, along with a wonderful prize of my choosing!!!

  • Page 1
  • Page 2
  • Page 3
  • Go to Next Page »

Primary Sidebar

Archives

Recent Posts

  • London ~ and More
  • Designed For a Purpose
  • Squirrel Quilts and More
  • Vintage Appliquéd Arrows and More
  • Fascinating Tidbits

Recent Comments

  • Karen Ann Moore on London ~ and More
  • Cheryl McLean on London ~ and More
  • Sue Halpern on London ~ and More
  • judy raddatz on London ~ and More
  • Joanne Corrigan on London ~ and More

Categories

Footer

My Guide

Whatever you do, do your work heartily, as for the Lord rather than for men.

—  Colossians 3:23

Contact Chris!

  • Home
  • About
  • Gallery
  • Classes
  • Trips
  • Books
  • Blog
  • Contact
  • Sign Up For My Blog

Copyright © 2026 · Chris Quilts · Website by Adunate · Privacy Policy