Before I get to my “topic of the week”, I’m sure there are a few of you who’d like to know what name we chose for our puppy 😁. Thanks for all of your great suggestions last week. Mike and I really liked the name Noah, but he’s already hearing the command “no” a lot lately and we were concerned it might be confusing to have a name so similar to a word he won’t want to hear. We went back and forth for 2 days trying to find a name we agreed on. Since Mike is a big doggie person, and the two of them will be best buds, I gave in and agreed to the name he liked best since before we met the little guy. So, meet Koda (it means friend or bear):

He’s sweet, funny, and oh so busy; but I still think we should have named him Puddles! He turned 8 weeks old today and, in the 3 days since we took this photo, his floppy ear is sticking up just like the other one. He’s growing fast.
And now … on with the post!
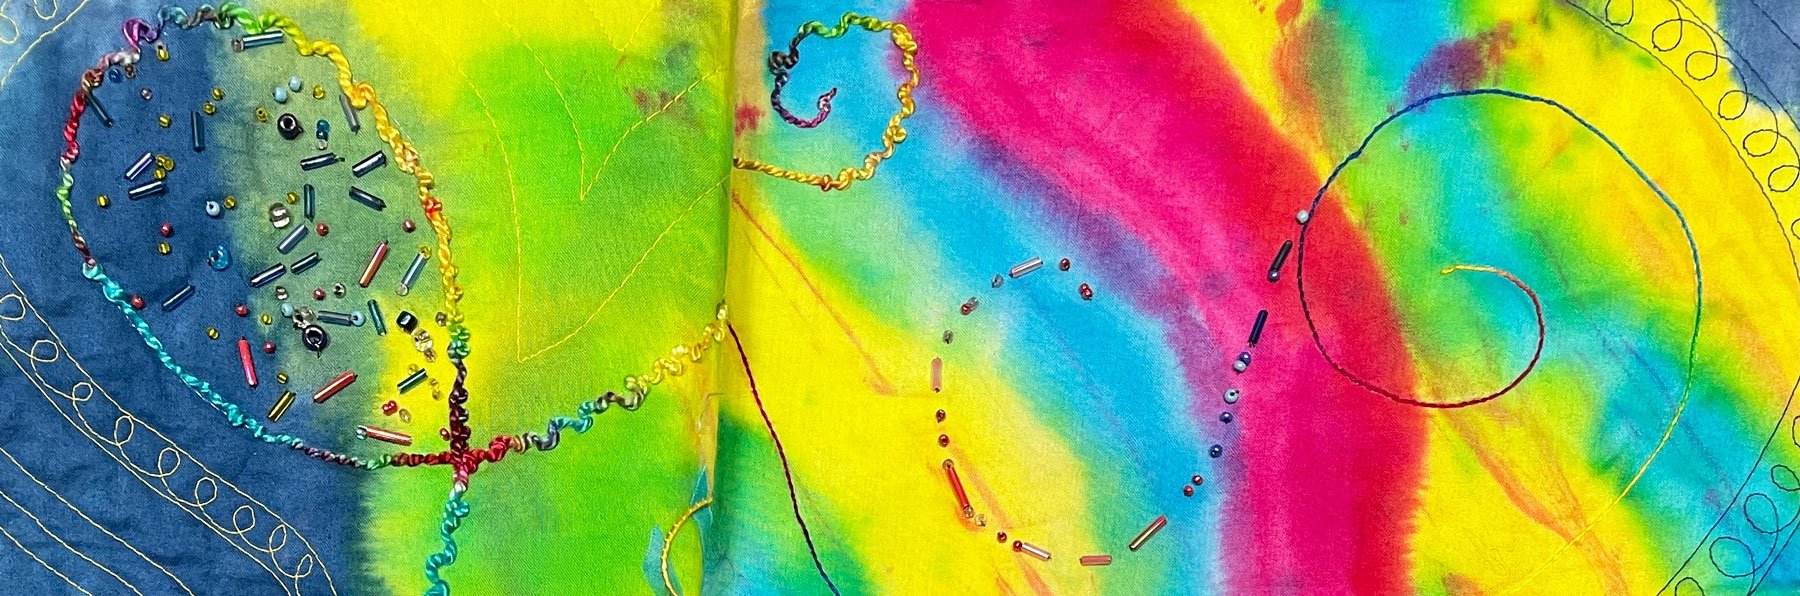
I’ve been creating fiber art for many years and I often add beads to my projects.

I know many of you have taken my classes on this topic, so what I share today may sound familiar – but an email from my friend Nancy caused me to think it was worth repeating:
“Hi Chris, I have been looking through a lot of my magazines and there is one that I really liked a lot. It is the American Quilter Magazine. To be specific the April 23, 2007 issue. The article is titled “Well Behaved Beads”. I did one medium sized beaded wall hanging. And I really liked adding the beads. I thought to myself I would like to do that again. I started reading the article and had another thought, Who wrote this really neat piece about beading? I checked back to page 82 and there and behold the author is CHRIS LYNN KIRSCH! WOW!!! I like your idea. I really need something to keep my beads in place, with no train, boat, car, or no great-grandchildren around. So thank you for writing the article. Now I have a bigger motive to start a beaded quilt. Take care! Nancy”
Trying to pick up tiny beads that are sitting on a table, with a tiny needle, which is tethered by a thread to your work, can be aggravating. Years ago I came up with a way to make those beads behave and have them a lot closer to my work surface. These techniques are included in my book “Where Do I Start With Fiber Art” along with other beading tricks and information (click here to purchase a copy of that book).
The magic tool is clear mailing tape! And it’s really quite simple:
When the Lord dropped this idea into my brain, I was working on a project that was using a mixture of beads. I decided to sprinkle the beads on my quilt, near the area I wanted to bead, and placed a 2″ length of mailing tape over the loose beads. This held them to the quilt so they couldn’t run away. Once my needle was threaded and I was ready to begin, I rolled the tape back onto itself so a few beads came to the top.

I was then able to touch the tip of the needle to the hole in a bead and – it hopped right on! I stitched it to the quilt and continued unrolling and beading until I was done, or I had to stop.
If I stopped before I was finished beading that area, I simply rolled the tape back down against the quilt to capture the loose beads and went about my business until it was time to bead again.
Hint: If it’s going to be more than a couple of hours before you get back to the beading, I recommend rubbing the beads off the tape and into a container as they will get sticky if left on the tape too long (ask me how I know 😊).
After beading in this fashion for a while, a new idea hit! I could use the tape to keep the beads behaving and precisely where they’re needed by wrapping the tape around my finger:
1. Wrap a piece of mailing tape, sticky side out, around the forefinger of your non-dominant hand (i.e. left, if you’re right handed).
2. Pour the beads onto a flat surface and dip your taped finger into them.

3. Knot your thread and bring it up through the quilt where the bead needs to go, touch the tip of the needle to the hole in a bead and it will hop onto the needle. Attach that bead to the quilt and repeat.

Voila! Beading can be done in the doctor’s office, at kid’s sporting events and even in a moving vehicle. One of the best advantages of this technique is that the beads are close to the work area and so, as the thread gets shorter, the beads are easy to reach.
I hope you’ll give it a try! Please send comments or photos if you do.
Thanks for the reminder Nancy!

Linda Frautschy says
I love adding beads to my work and the sticky box is a game changer. It is a box about 4” square and 1/4” high. Both cover and base are sticky, one side white and the other black. The beads for a project can be put in the box and that is where they stay until you are done. They can easily be picked up on a needle and the box can be closed when not in use.
Lisa Giesfeldt says
Great refresher, Chris. Thanks.
Jodi Grzeczka says
Awesome ideas! I have not started using beads on my quilting yet, but now I know how I will do it! Koda is a perfect name for that little bear! So cute!!! Hint: raw beef leg bones and yak cheese chewies are perfect for the little jaws! Ask me how I know! LOL!!!
Karen Moe says
Let us know when you will be teaching another class in adding beads to a quilt. I have tons of beads and need some ideas on how to use them on a quilt.