• Skip to main content
  • Skip to primary sidebar
  • Skip to footer

  • Home
  • About
  • Gallery
  • Classes
  • Trips
  • Books
  • Blog
  • Contact
  • Sign Up For My Blog

Blog

My New Arrival

February 21, 2021 14 Comments

At the last quilt retreat my older sewing machine was giving me some trouble. It’s been having issues for a while and I keep struggling along. My friend Cathy told me I really needed a new machine and that thought started to percolate. A while later I told Mike about my machine issues and he responded “get a new one”. Now what quilter would let that suggestion go unfulfilled??? So I called Wendy at Sew Much More in Waukesha and that afternoon we had a new member of the family! Wendy recommended the Bernina 770 Quilters Edition, and that’s what Cathy had recommended also. My friends know me well 😊.

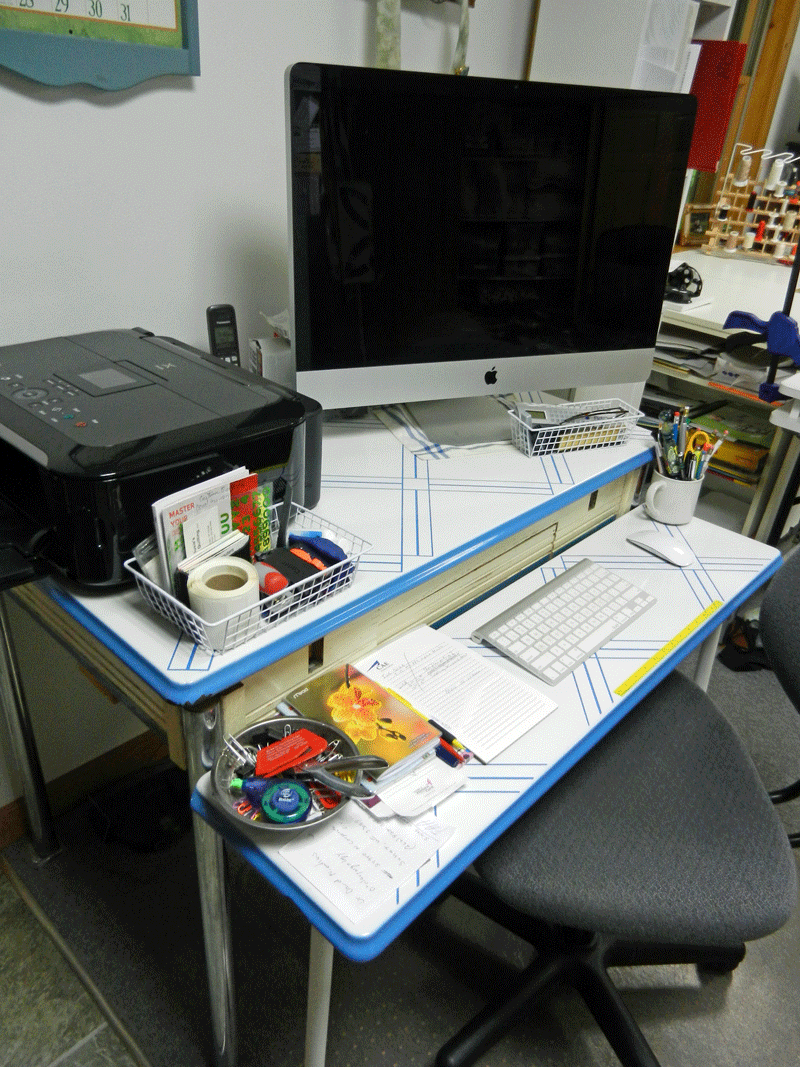
I’d like to say it dropped into my Tracey’s Table and I was ready to sew, but that wasn’t what happened. The machine was less than 1/4″ too wide to fit into the well on my table. My dear husband was able to enlarge the opening to fit and I was so grateful (even though it delayed my using the machine for 2 days). It was worth the wait.

Since I’d finished my most recent challenge quilt, I was between projects. But I really wanted to sew! So I pulled a stack of scrappy blocks out of my UFO bin (click here for the post about these blocks) and laid them out on the floor. Last week we had Barb Eckmeier do a Zoom lecture on Sashings and Cornerstones at Patched Lives quilt guild, which inspired me to do more than just sew the blocks to one another. I chose my sashing fabrics, cut some strips and squares,

and I was finally sewing.

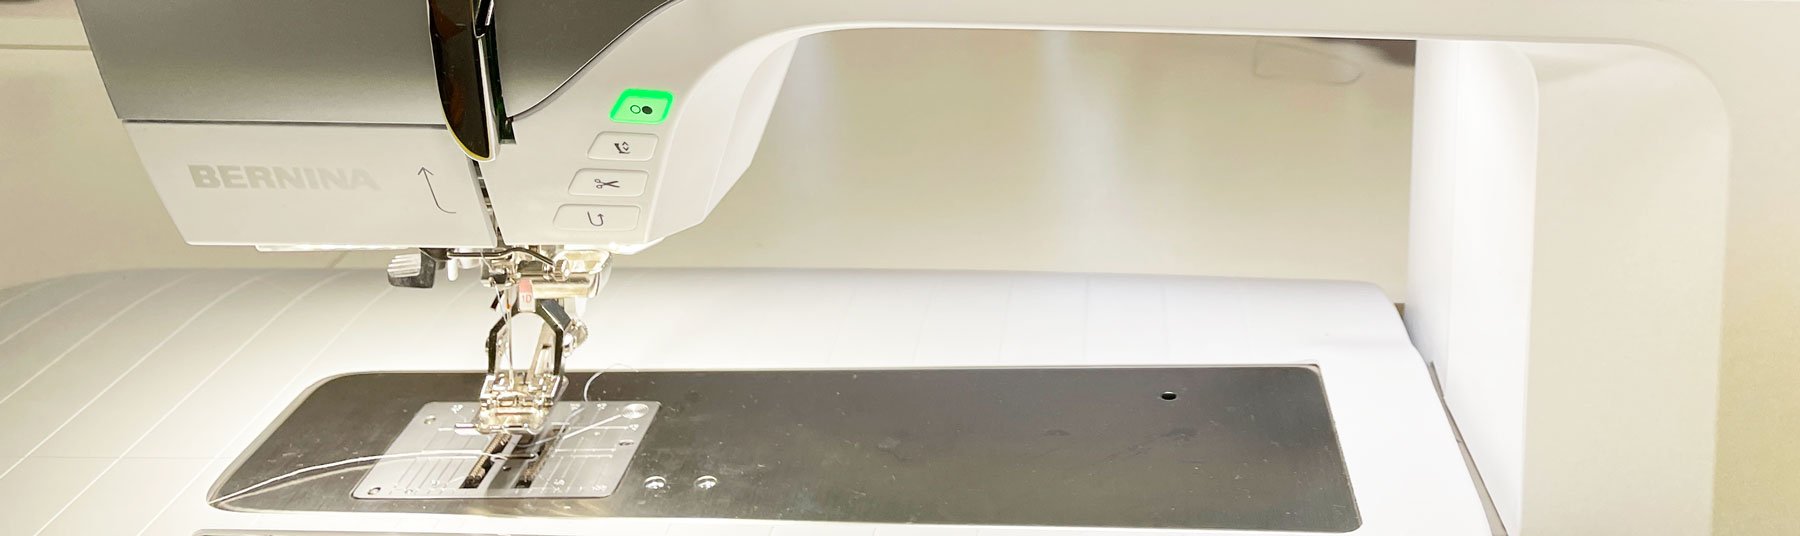
I’m loving this new machine. It hums along quietly and the lighting is excellent. It has an 11″ opening, a built in “walking foot” (even feed), and the extra large bobbins are icing on the cake.

All this and my specialty feet from my old Bernina actually fit this new one. Hooray! I especially love the simplicity of the face panel.

The basics are all there without having to go into the computer screen: stitch width and length knobs, needle position, needle up/needle down, etc., all there and easy to find. I am getting used to the computer options – and I’m looking forward to my first class!

And did I mention it has a stitch regulator? I didn’t think I wanted it, and I’m not very good at it, but I’m keeping an open mind. I’ll let you know how that goes 😄.

My machine is calling, so it’s time to go and sew. See you next week!

Closet Clean-up

November 1, 2015 12 Comments

Two years ago I wrote a blog post entitled “Magazine Issues” in which I shared my frustration with my “collection” of old quilting magazines. My system was to put them in boxes and shove them in the bottom of the closet. From there I started just stacking them on the boxes:

mags-2

(to read that post click here!). Many quilters responded to that post with great suggestions on how to organize my mess, but as of 3 days ago it still looked like this photo, plus 2 more year’s accumulation! Ugh!

A few months ago we had a professional organizer speak to our guild. She helped me face the fact that I hadn’t looked at a single one of these magazines after they found a dark home in the closet. Obviously I don’t need them. What I do need is space! I’ve cleaned and organized most areas of my sewing room a time or two in the 11 years we’ve lived here, but THAT closet had not been cleaned, in fact, it just kept getting more and more stuff shoved into it. I finally reached the point that no more would fit, and I had new stuff piling up in the rest of the studio with no place to put it. Since I just finished my 5 month long competition quilt, and the room was closing in on me, I decided enough was enough. Now what did that professional say I should do???

Oh yeah! Pull everything out of the area you want to organize (that way you can’t quit half way 🙂 )

cleaning my sewing room closet
I didn’t think to take the picture until after I had folded my medium/large quilts and re-filled a shelf with them – progress already!

I emptied the closet during the kid’s naps last Thursday. When Trey woke up I went upstairs to get him, that’s when Mike came home – looked at my studio – and asked me who I was mad at (it was a fast and furious mess). I guess the answer would be me, for letting it get so out of hand.

Since I hadn’t looked at a single old magazine, I decided it was time to “release” them. Most of my friends already have a lot of magazines of their own, so I “bit the bullet” and dumped them in the recycle bin. Actually, there were so many, and they were so heavy, that half will have to wait until next recycle day (the boxes in front of the bin).

closet clean mags gone
The recycling doesn’t get picked up until Thursday. If anyone wants them, let me know and I’d be happy to pull them out for you to pick up.

Well, yesterday I had an entire rainy, “non-babysitting” day, and this is what my studio looked like after one trip to the store for bins, and before Mike took me out to dinner to celebrate a hard day’s work:

cleaning my sewing room closet

And here’s the pile of stuff that’s going to my guild’s rummage sale:

cleaning my sewing room closet

There are still a few odds and ends to be put away, but many of my closet bins now have breathing room in them. Ahh! Next, I need to clean up the rest of the room once again. I think I’ll take a week off. And, oh yeah, there’s another challenge quilt I was thinking of making  😀 !

Cleaning does make one feel virtuous, but a person can only clean so much before they deserve a reward!

PS I still love quilting magazines. So, for a short while now, I’ve been much better about what I do with my new issues. I read them, copy anything I want out of them, and place the issue on the “share” table at my next guild meeting. This way I don’t have to “clean it up” later, and my friends benefit.

Re-Purposing

June 2, 2013 3 Comments

After last week’s post about Mary’s well organized sewing room, Lorraine Bahr sent me this email message:

“Chris, Just read your blog about how your friend Mary organized the closets in her quilt studio.  Thought you would enjoy seeing how I resurrected an outdated cabinet, gave it new life and now use it to organize my studio.

card catalog repurposed

Several years ago the high school in the district where I taught was going “digital” and was sending the old card catalog cabinet to the dump.  I asked to have it delivered to my house instead.  I gave it a fresh coat of paint, labeled the drawers, and now have it as a conversation (as well as an organizational) piece in my quilt studio.  Enjoy the photos below.”

card catalog repurposed

Here’s a detail shot. Lorraine is not only organized, but has an exciting color sense! Thanks for sending the pictures Lorraine!

Lorraine Bahr cabinet close up

Mike and I love to go antiquing and have done a bit of repurposing of our own. We came up with my favorite quilt related project prior to my new studio being built. When I wrote my first book our desk top computer sat atop a big, old desk and the keyboarding was so awkward that I ended up with a pinched nerve in my neck and a mid-evil looking traction device for a few weeks (it attached to a door and no – I’m not including pictures :-)). We knew we needed a computer desk, but didn’t like any of the modern ones available. So we decided to go antiquing and see what we could find. At the Columbus Antique Mall we found a pretty 1940’s enamel table in good condition. It had 2 leaves attached to the inside of the table that pulled out and into position with an ingenious use of springs. I asked Mike if he could remove one of the leaves and permanently attach it at the right level to make an ergonomically correct keyboard platform. He figured it out and I’ve been pleased with it ever since.
repurpose old table new computer desk

Have you had any quilt related adventures in re-purposing?

The Saga Continues

It seems Quiltilly’s story hasn’t quite reached it’s end.

A short while after Evelyn and Quiltilly’s reunion, Chris received this message and some pictures from Evelyn:

“Poor Quiltilly was quite traumatized from her kidnapping ordeal, so we invited a new quiltsissy, Quiltimae, to keep her company.  They wanted to play with Blue Bunny, but she wasn’t in a playful mood.

May 3

So they went out into the sunshine, climbed the lilac bush, and listened to the birds sing.

Mae-1

They sat in the violet garden until Quiltilly felt much better.  She needs to stay here to make regular visits to her psychiatrist, so she won’t be going on the cruise to the Baltic.

Instead, Quiltimae will accompany Evelyn on her first traveling adventure.

Mae-4

She is very excited to be going to all the capitols of Scandinavia as well as stops in Germany, Estonia, and St. Petersburg, Russia. She will be keeping a journal and will have lots of pictures to share with Quiltilly when she returns.

Bon Voyage Quiltymae! Since this is a similar cruise to the one Wendy and Chris are leading next May, we will be very interested to learn all about Quiltymae’s first travel adventure.


Ladies of the Lake

May 26, 2013 2 Comments

I met Mary Van Grinsvin at a PTO meeting when our sons were in middle school and we decided to volunteer to be co-presidents. We soon discovered that we both were quilters. We enjoyed some fun times together, but then our sons headed off to different high schools after which Mary and her family moved away. She and her husband recently retired to a beautiful home on a lake in northern Wisconsin and she became connected to a quilt guild in Minocqua. As fate would have it she volunteered to co-chair the program committee with Glennes Youngbauer, another quilter I had known years ago through a guild in the Milwaukee area. I’ve run into both Mary and Glennes at quilt shows over the years and was so pleased when they invited me to teach for the Ladies of the Lake quilt guild last weekend. It is a very talented and friendly guild and both workshops were a lot of fun (at least for me they were :-)). Silly me, I forgot to get my camera out during the classes, but Mary did send me a picture of some of ladies and the Mariner’s Compasses they made in class.

Mariners Compass quilt classNot only were the classes a blessing, but I had a wonderful time staying with Mary and Greg. Their home is lovely, but what blew me away was her studio.

quilt studio

What wonderful natural light and everything is so neat (she did admit to picking up a little before I arrived). Mary is an organizational genius and after seeing her storage closet, I knew I had a blog topic to share.

quilt studio

She had her shelves built with 8″ between them and she places each of her projects in a bin. She found these bins through a medical supply company and had to order 100 of them. She has used 64 so far and sent one home with me. Doesn’t this inspire you to get organized? It certainly has given me the organizing bug.

After class each night we had a bit of time on the lake. A ride in Greg’s new boat was a joy on Saturday and on Sunday Mary and I chased a loon while kayaking. What fun!

kayaking quilters

kayaking quilterThanks Mary for a delightful weekend!

Mary-V-and-me

The Quiltilly Conclusion

To refresh your memory – last week Quiltilly ran away and got into some mischief. Upon her return she decided to hide because she knew Chris wasn’t too happy about her nose ring!

While Chris looked high and low for that naughty Quiltilly, Quiltanna felt it her responsibility to expose her hiding place (the fishbowl of scraps):

KK-P13q-fishbowlAfter climbing out everyone talked it through and the Quiltsissies were back to having fun. So much so that they were found hanging from the rafters.

L P13q-rafter-hangingIt was at this point Chris realized how much Tilly’s missing hand hindered her and she decided to do something about it – a cup hook fit the bill handily!

M P13q-new-handAll too soon this little adventure was reaching a conclusion. Evelyn was heading to the Baltics for an exciting cruise and she really wanted to take Quiltilly along. Chris invited her to lunch (Wendy wasn’t able to be there) and Evelyn arrived with the ransom in hand. She was a bit reticent to hand it over, but Chris was happy to take it:

R-P13-paying-ransomOoooh! Diamonds!

S-P13-diamonds

Joy only a Mom can display!

T-P13-Tilly-handoff

But Evelyn wasn’t too sure about the hook!

V-P13-a-hookThe Quiltsissies served a yummy lunch and afterwards Chris sent this note to Wendy:

“Diamonds! And they’re batiks! We’re rich! Evelyn and Quiltilly were happily reunited and excited about their trip to the Baltics next week. Only wish you and Quiltina could’ve been here. All’s well that ends well!”

and they all lived happily ever after.

The End

PS Chris received this note a few hours later:

“We had to drive thru almost  blinding rain but Quiltillie and I are safe at home.  Quiltillie cried all the way.  She has been thru such an ordeal.  I was so glad to rescue her from the clutches of her kidnappers.  I’ll probably have to take her to a psychiatrist.”

Perhaps not everyone lived happily ever after :-(.


A Future Quilter

February 24, 2013 10 Comments

My granddaughter, Sommer, is almost a year old and growing fast. She is a joy and a very easy baby to care for, which is a blessing since Mike and I still watch her 5 days a week! About a month ago she was playing with toys in the middle of the studio and I was choosing fabrics for a quilt. When I had settled on just the right ones I left them in a pile near my stash and went to answer the phone. Sommer was just starting to do a bit of crawling at this time and when I turned around she had crawled over to the fabrics and was reverently petting them one by one as if to say “great choices grandma”!

Well, she caught onto the crawling thing quite quickly and a few days later I just happened to have the camera nearby when she decided to do some exploring. She’s really into “open” and “close”. I hope you’ll indulge me:

“Sommer, whatcha doin?”

Future Quilter

“Grandma, I think there’s fabric in there!”

Future Quilter

“Oooooh pretty!”

Future Quilter“Just look at it all”!

Future Quilter“Gotta touch it …………….. and there’s more over there!”

Future Quilter“Flannel and fleece!”

Future Quilter“It’s so soft. Wanna feel it Grandma?”

Future QuilterAnd I did, so the photo shoot was over. Do you have any pictures of your kids or grandkids enjoying fabric that you’d like to share? Please email them to me at . I’d love to see them and it might be fun to share them on a future blog.


Quilt Floating 2

April 1, 2012 5 Comments

Last week’s post explained what quilt floating is and the supplies required. This week’s post is about putting it all together so quilting the quilt can be as much fun as making the top! (for those who missed last week’s post, just scroll down to read all about it)

There are 2 different ways to construct the frame, depending upon your machine/table set up. Both are described here.

Side Mount: If your table/cabinet is less than 6’ wide and more than 1½’ deep you’ll want to place the clamps on the sides. To do this clamp the Slide Clamps to the table/cabinet on each side about 1½’ behind the sewing machine.

Attach the aluminum slat to the holes in the clamps with bolts and wing nuts.

***

Back Mount: If your table/cabinet is more than 60” wide and less than 2 feet deep, you’ll want to place the clamps along the back. To do this clamp the Slide Clamps to the table/cabinet along the back – about   3 1/2’ apart.

Then slide the metal rod through the holes in the clamps (this is shown 2 pictures down).

Attach one chain to each Spring Clamp by opening an end link, inserting it through the hole in the clamp and closing the link.

Place the end of one chain over the top bar and Bull Nose clip the chain to itself so the Spring Clamp is at a good height (this can be easily adjusted depending on the size of the project). Repeat for the other chain/clamp.

Place the quilt under the sewing machine needle in the area you want to begin quilting.  Be sure that you have the bulk of the quilt behind the machine.

Grab a bunch of the quilt even with the right side of the machine and about 3’ back on the quilt, raise it up and grab it with the right clamp.

Repeat behind the left side of the machine with the left clamp and you’re ready to begin quilting. As you progress across your quilt simply unclamp and reclamp as seems necessary.

I hope many of you will find this helpful and will let me know how it works for you. Please feel free to share this information and/or forward my blog to your quilting friends!

Quilt Floating

March 25, 2012 5 Comments

Free Motion machine quilting a large quilt on a home sewing machine can be a bit daunting. A few years ago I developed a system that makes free motioning a bit easier. I’ve been sharing it with my classes, but decided now to share it on my blog so that more quilters might benefit. I call the process Quilt Floating and it’s my way of suspending the weight of the quilt instead of fighting it!

There’s quite a bit of information to share, so I’d like to do it in two installments. This week I’ll be sharing the concept, supplies and basic information. Next week’s post will include the specific set up instructions for all who are interested.

Here’s a picture to give you an idea of what Quilt Floating looks like:

Before we get to the actual frame, there’s a few tips I’d like to share. If your sewing machine is in a cabinet – great. It is also helpful to have some support to the left of the machine. If you don’t have any, placing an adjustable ironing board there is a good solution.

If you don’t have a cabinet you will want to find a way to avoid “sewing on a mountain”, ie: with the machine perched on top of a table or desk. Even table extenders don’t solve this problem with a large quilt because pins and folds of quilt get caught on the edges. My best suggestion is to place a card table in an “L” against your kitchen table or a banquet table. Then set the machine on a tv tray in the inside corner with enough magazines to make the bed of the machine flush with the tables.

Now you’re ready to float the quilt. All of the supplies can be purchased at your local hardware store *.

2 Lengths of Chain (approximately 18” long – links should be 1 ½” long)

2 Bull Nose Clips (3/4”)  These can be found with office supplies. They are inexpensive and will clip and unclip the chain together very easily (not in the picture).

2 Slide Clamps (36” long)  Both the old fashioned “C” clamps that screw to tighten or the deluxe new ones that pump tight will work. Choose the best quality clamps you can afford. I took my husband shopping and thus I own the Cadillac of clamps, but at least I waited until they were on sale. They are very easy to use! It’s important to have a hole in the bar at the non-clamp end for a rod or bolt to go through.

2 Spring Clamps (6” long) These are plastic, fairly inexpensive and have holes in the handle ends. They squeeze to open.

1 Top bar 6’ long or long enough to fit the width of your table/cabinet. You’ll want the “Quilt Float” positioned about 1 ½ feet behind the sewing machine. Depending upon your space, you’ll need to choose a “top bar” option:

1. If your table/cabinet is less than 6’ wide and more than 1½’ deep you’ll want to place the clamps on the sides. For this arrangement you’ll need: 2 bolts and 2 wing nuts that will fit through the holes at the ends of the Slide Clamps and a 6’ piece of aluminum slat with holes at even intervals along the length.

2. If your table/cabinet is more than 60” wide and less than 2 feet deep, you’ll want to place the clamps along the back. For this arrangement you’ll need to buy a ¼” diameter Steel Rod (4’ long)

*If you quilt in a basement with exposed rafters you will only need the chains,  bull nose clips, spring clamps and a couple of nails!

Next week we’ll put it all together!

Window View Challenge Deadline Extension!

On another note – I’m having a lot of fun playing with new techniques on my “Window View” challenge. I’m thinking it would be a good idea to have an extra week or 2 to “get ‘er done” and so I’m changing the deadline from April 1st to  April 15th. I’d appreciate getting a picture of your finished project by then for posting on that week’s blog.

If you haven’t checked out the pictures of the current views, please click here. If you were thinking of participating, but needed more time, send me a picture of your view and jump on in!

Project Creep

January 14, 2011 8 Comments

After posting the pictures on Monday I pulled everything off the shelves/counters and decided to really clean and organize. In class yesterday at WCTC, Cindy shared the expression “Project Creep” (referred to as PC from now on :-). She said this is when you begin doing something small (fix sewing table) and it escalates step by step into lots of work and, usually, a fair amount of unplanned expense. BINGO! She hit the nail on the head. Then Jean added that the good part is we feel so virtuous once it’s done. I’m almost there :-)!

Mike did a wonderful job repairing my table. We took the old tv to the recylcing center and in it’s place I now have a 19″ flat screen that weighs almost nothing and has a great picture, but it needed to be elevated. So Mike and I had to go antiquing (one of our favorite pastimes) and we found a great “explosives” crate with dovetail joints. It was only $25. Do I hear “project creep”? Its a handy place to keep all the essentials close at hand and provides space under the tv I didn’t have before.

But the tv was still too low, so I raised it up on an old wood case my dad (a retired dentist) inherited with his first practice. It was meant to hold the plastic teeth used to make dentures, but I discovered its a perfect place to keep my button collection! Now the tv is at the right level and I’m much more organized!

Next………threads!

My threads had been in “Matchbox Car” cases and I used to love the organization they provided, but I found I was always opening, closing and flipping boxes to find what I needed. Thus, I had to hit the store for a plastic drawer unit that went where the microwave had been. I love the ease of finding threads now! More “PC” expense, but that virtuous feeling is making it all worthwhile.

The microwave is now at the end of the counter, the counter and shelves are dusted and organized and I’ve only got that small (relative term) pile of stuff left in the middle of the room I really don’t know what to do with.

I plan to have that gone by lunch. I wonder if it’s going to cost me any more “PC” cash??? 

Thanks to Cindy and Jean for their input. Anyone else have a great organizing/storage tip they’d like to share?

(a 2pm addition to the original post)

Eureeka!!! The pile’s gone, the carpet’s vacuumed and it’s only 2 hours past lunch. Talk about feeling virtuous. I think I need a cup of tea and a piece of dark chocolate :-)!

  • Page 1
  • Page 2
  • Go to Next Page »

Primary Sidebar

Archives

Recent Posts

  • London ~ and More
  • Designed For a Purpose
  • Squirrel Quilts and More
  • Vintage AppliquĂŠd Arrows and More
  • Fascinating Tidbits

Recent Comments

  • Karen Ann Moore on London ~ and More
  • Cheryl McLean on London ~ and More
  • Sue Halpern on London ~ and More
  • judy raddatz on London ~ and More
  • Joanne Corrigan on London ~ and More

Categories

Footer

My Guide

Whatever you do, do your work heartily, as for the Lord rather than for men.

—  Colossians 3:23

Contact Chris!

  • Home
  • About
  • Gallery
  • Classes
  • Trips
  • Books
  • Blog
  • Contact
  • Sign Up For My Blog

Copyright © 2026 ¡ Chris Quilts ¡ Website by Adunate ¡ Privacy Policy