• Skip to main content
  • Skip to primary sidebar
  • Skip to footer

  • Home
  • About
  • Gallery
  • Classes
  • Trips
  • Books
  • Blog
  • Contact
  • Sign Up For My Blog

Blog

Bending Threads

July 26, 2020 6 Comments

I’ve played a bit with bobbin work over the years, and have even taught a few classes on this fun technique.

Recently we held a small challenge in our ThreadBenders group entitled “Thread Bending”. The idea was to make a small whole cloth quilt using stitching only – no piecing or appliqué.

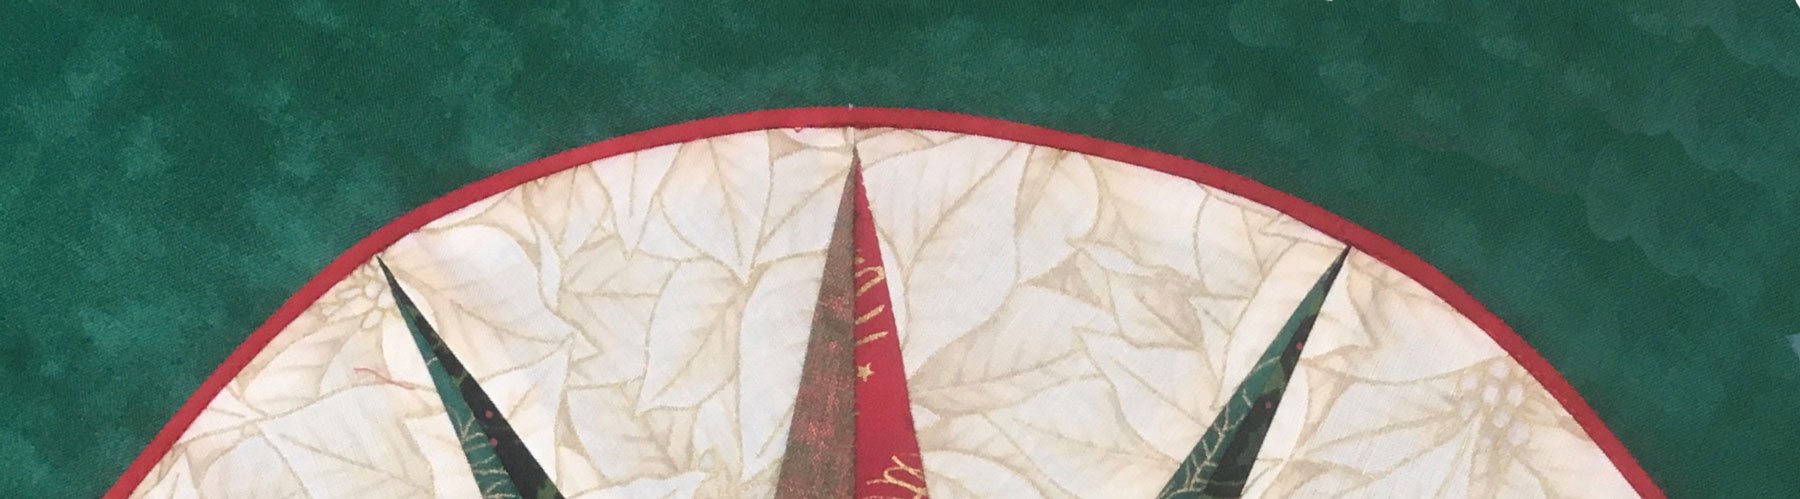
A while back I’d begun a class sample to show the students in my Open Lab class how to stitch from the back of a layered quilt sandwich, directly on the motifs in a fabric with a large print. My back was covered with beautiful butterflies.

I decided this would be a great piece for the challenge. By placing a decorative thread in the bobbin, and changing it for each portion of the motif, lovely butterflies appeared on the front.

Once the decorative outlines of the butterflies were stitched, I turned the quilt to the front, filled in more of each butterfly with free-motion stitching in thinner, bright colored threads, added my own funky flower, and then quilted with echoing and spiraling.

I have learned over the years that red quilts are difficult to photograph – and this quilt was no exception. The colors are as bright and cheery as you can see in the detail photographs, but the intensity of the red background overpowers the background stitching, so I toned down the intensity to allow the quilting to show in the full view above. I hope you get the idea 😁.

If you decide you want to play around with bobbin work I highly recommend making a sample sandwich to experiment on, as getting the tension correct takes a bit of fiddling.

Purchasing a separate bobbin case for the non-drop-in bobbin machines can be very helpful. Mark it for bobbin work, and feel free to adjust the tension to get the right look on the quilt top. Sometimes I skip the tension spring on the bobbin altogether.

Drop-in bobbin machines are a little trickier. Begin by threading as usual and checking the top often. If the thicker threads don’t work, try not putting them through the spring and see what happens.

If you’ve done any bobbin work in the past, I’d love to see a photograph or two! Send them to me at:

A Very Different Puzzle Quilt

July 12, 2020 3 Comments

The past few weeks I’ve had the wonderful opportunity to make a quilt for a very special little man. Remington was born to my cousin’s daughter Kate and her husband Ryan. You may remember a quilt I made for their first child, Jenny. I pieced it with Minky and did a post about it back in May of 2018. Click here to read that post.

I decided to make an I Spy quilt for Remington, using a pattern I’ve made quite a few times. The first quilt I made using this pattern was not an I Spy. It was back in 2010 when I used it to make a patriotic quilt. While searching my blog for this photo, I found it was part of a post I did on how to photograph quilts. I still use the same technique. If you’re interested in it click here.

So, on to the story of Remington’s quilt. I dug through my stash of conversation prints and picked out some fun ones.

I then chose an aqua fabric to use as border/sashing squares. Squares of each fabric were cut for the sashing and alternated between the blocks, along with the aqua fabric, to create the interlocking puzzle effect.

The sashing piecing takes a bit of concentration, but I think it’s worth it.

I quilted 1/4″ inside the outer edge of each puzzle piece, along with a simple rectangle at the center of each block.

The border is quilted with the words “Remington’s I Spy Quilt”, and “Made With Love by Aunt Chris”; filled in between with words for the items to look for in the quilt.

This border portion contains the words “Frogs”, “Cars”, and “Stars”

It’s all done in cursive (because that’s easier to quilt – and I think kids should learn it 🙂).

I backed it all with Minky (ultra plush fleece), which has been folded to the front to create the binding. The Minky I chose has a star design in it, and this is the quilting of the puzzle blocks from the back:

I wasn’t able to deliver it in person because of the pandemic, so I mailed it off to him and got a wonderful thank-you call from Kate a few days later. I hope to visit Remington and his family sometime soon.

What a joy to be able to make something special for someone special!

Puzzled No More

June 28, 2020 16 Comments

The most recent “large” challenge for our ThreadBenders group was entitled “Colored by Emotion”, and these were the rules:

“Everyone randomly draws one color from a bag, which contains the 12 colors listed on the color wheel:  Yellow, yellow-orange, orange, orange-red, red, red-violet, violet, blue-violet, blue, blue-green, green, yellow-green.  (There will be two copies of each color in the bag since we have more than 12 members).  Then everyone draws three emotion slips out of another bag and chooses one emotion of those three.  Everyone makes a quilt based on these two pieces of information.  You may use black, white, and the color you draw as well as all the tints, tones, and shades of your color.  No gray. At least 50 percent of the quilt should be your color. Due at the February 2020 meeting.”

At the original meeting I drew the color violet, and the emotion I chose from the bag was puzzled. I’ve mentioned in previous posts that I love all kinds of puzzles, so this was an easy choice. As I pondered what to do, a design didn’t come springing to my mind. So I surfed the internet and was intrigued by a number of pieces of clip art with swoops of jigsaw puzzle pieces… but, still, nothing was coming together in my head.

As I often mention, my faith is a huge part of my quilting inspiration, so I decided at this point to pray that this quilt would glorify God (I don’t know why I don’t do this first 😊). Shortly thereafter I realized that the swoop of pieces needed to be swooping towards something – and that something needed to be the cross.  

I backed a variety of violet fabrics with fusible web, and began cutting out jigsaw puzzle pieces and placing them on a background of white fabric, grading from larger and darker in the lower left, to smaller and lighter as they tumbled upward.

At this point I pinned a paper cross in place, and added purple and black tulle strips to emphasize the “swoop”.

More tulle strips were added, and I planned to leave plenty of white background for intense quilting to give the quilt a modern look. Fortunately at this point I read the rules and realized “at least 50% of the quilt had to be my color”! The solution? Cover the entire quilt with a layer of the purple tulle.

This would make my quilt “legal”, and yet still give it a modern look. Plus, wherever the tulle had multiple layers, it intensified the shading. I left the paper cross under the tulle, and layered the entire piece with backing and batting. It was now time to mark my quilting designs, but how does one mark on tulle???

I decided to free-motion quilt around the puzzle pieces and the cross while I thought about it, and as I did an idea began to form. Now that the major motifs were quilted through to the back – I could make my marks on the back and quilt from behind. I didn’t want to get the quilt wet to erase the marks, so I used a Frixion™ “heat erase” marker.

I’ve avoided this tool because of removal problems in the past, but I made an exception this time because I was using it on the back (to read my previous post on this topic click here). I designed feathered rays that would radiate from the cross; and the marker showed up well.

You’ll notice I had to move the basting pins from the front to the back to avoid broken needles while quilting.

I quilted from the back of the quilt with a very light violet colored thread in the bobbin, filling in with echoing around the feathers.

There was a large area of background that needed more than just echoing, so I quilted some jigsaw puzzle lines from the back too.

When the quilting was done I trimmed the tulle away from the cross, removed the paper pattern, and bound it all with more violet fabrics.

Thus the only pure white area was in the cross. I decided to call my quilt “Puzzled No More”. The label reads: “My life was a purposeless puzzle until I met Christ at the foot of His cross, and now I’m Puzzled No More”.

It was a fun adventure, I learned a lot, and whenever I look at it – I smile!

The ThreadBenders entered 8 of our quilts in the AQS Ultimate Guild Challenge contest this year, but the Grand Rapids show has been canceled 😔. So I’d like to invite you to do a virtual tour of this exciting group of quilts by going to our site. Please click here to view all the quilts!

Completing a Quilt-as-You-Go Tree Skirt

June 14, 2020 3 Comments

Now that my compass stars are attached to the background wedges with piping, it’s time to layer each wedge and quilt it. I stitched in the ditch down the centers of the compass star points, echoed around the compasses, and filled the green background in with free-motion holly leaves and berries.

Next I grabbed the pattern, laid it on a wedge, and trimmed each wedge to size (the Olfa™ pattern weights saved me from a lot of pinning).

I put the wedges together with contrasting fabric, and the reversible quilt-as-you-go technique I’ve written about in previous posts (click here for the technique). Then I bound all the way around with bias binding in the green fabric. I used red bias binding to finish the opening and the center “hole”.

At this point I felt it needed a bit more color and spark, so I made five turned and quilted squares (they look a little like pot holders),

I added them between the outer scallops, stitching them in place in the ditch along the green binding.

Here’s a back view, with the top corner of the square hand-tacked in place:

And it’s done! In plenty of time for Christmas!

I hope some of the techniques I shared in this project will be helpful to you!

Appliquéing a Circle with Corded Piping

June 7, 2020 6 Comments

For quite a while now I’ve been telling the students in my Mariner’s Compass workshops that I would do a blog tutorial on a fun technique for using corded piping to attach circles to a background. Once I made my 60 degree compasses – I knew it was time!

To begin you’ll need 1 1/4″ bias strips – last week’s post should be helpful concerning this – click here if you’d like to access it again.

You’ll also need cording to fill the piping. Cordings like this are sold at your local craft store in a variety of sizes. People also use yarn, drapery gimp, perle cotton, etc.. It all depends on the size you want your corded piping to be. For this project I used rayon rattail because I had a bunch leftover from a previous art quilt challenge and it was just the right size (it’s being red, like the cording I was making, was a happy coincidence).

Corded piping can be made using a piping or zipper foot for your machine. I find that the zipper foot can be a bit squirrely, and many machines don’t come with a piping foot. For this project I grabbed the buttonhole foot that came with my old Bernina (foot #3). It worked like a charm.

My cording was just the right size to fit into the groove on the left. I folded the bias strip in half and inserted the cording into the crease. Then I placed it under my machine and adjusted my needle to stitch snuggly against the cording.

With the needle down I ran my thumbnail along the cording to make a nice crease (a great tip I learned from Ricky Timms), And gently continued to crease the fabric as I sewed:

Once I had made enough corded piping for my needs, it was time to trim. I absolutely love Susan Cleveland’s “Grooving Piping Trimming Tool”. It will trim a 1/4″ or 1/2″ seam allowance almost effortlessly.

The corded portion fits into the groove on the bottom of the tool, the excess fabric is trimmed with a rotary cutter, then the strip is simply pulled under the tool to trim the next portion – quick and easy!

Since I had six circles to pipe, I need a lot of piping:

When the piecing of my compasses was complete, I trimmed the seam allowance around the outer edge to 1/4″:

I removed the first 1 1/2″ of stitching on the corded piping and placed it, raw edges even, along the right side of the compass. I made sure my beginning/ending join wouldn’t be on top of a seam. I began stitching 1 1/2″ from the end of the piping, leaving the end free for the joining step, and sewed it on with the same foot to keep everything in place. You’ll be sewing on top of the previous stitching.

When I reached the start, I stopped stitching 2″ from the beginning stitches, cut the piping 1″ past the end of the beginning tail, and removed 1 1/2″ of the corded piping stitching to expose the cording, as I did with the beginning tail.

Next I laid both ends in place so I could trim the cording ends to butt up with one another (be careful not to snip the fabric when you do this – ask me how I know ?).

Fold in a 1/4″ hem on the beginning tail.

Lay the bias strip against the circle, place the ending bias strip evenly on top of it, and allow the cording ends to meet (butt).

Fold the strips in place and pin.

Finish stitching the piping to the circle.

Fold the seam allowance to the back of the circle so the corded portion sits at the outer edge.

Pin the circle onto a background fabric and stitch in the ditch between the circle and the piping to attach it. I used the same foot for this step too.

And it’s done!

At this point I cut away the background fabric from behind, 1/4″ from the stitching to expose the paper pieced pattern, and removed all the paper.

There are so many great advantages to this technique: no hand-stitching needed, it works with any circle or other gently curving shape, and it adds a spectacular effect!

Next week I’ll share how I put the wedges together and finished the project!

Cutting Bias Strips

May 31, 2020 5 Comments

Last week I did a “show and tell” about my new Compass Star tree skirt. Both the piping that attaches the stars to the background, and the binding we’re made with bias strips. I have a favorite way to cut bias strips and I can’t believe I haven’t shared it before.

When I learned to sew, way back in the 70’s, the common way to make a long strip of bias was to cut a rectangle of fabric, mark parallel lines the width of the desired strips, sew the short ends together, offsetting the marked lines by one, and then hand-cut on the line all the way around.

It made a lot of bias, but sections of the length had oodles of seams, some quite close together. I never cared for that. So here’s my technique:

Open the yardage on the work surface, with the selvedges top and bottom . Lay the 45° line of a long ruler parallel to the selvedge at the bottom,

and with the long edge of the ruler in a place that will allow a nice long length of bias.

As you can see my ruler wasn’t long enough to complete the strip, but it was quite simple to cut half way up and then slide the ruler to cut the remainder.

I set aside the lower triangle, and folded the bottom selvedge edge towards the upper left:

until the freshly cut edge lies on top of itself:

Then I determined my strip width and aligned that line of my ruler with the cut edge, being sure to cut perpendicular to the fold at the bottom (my strips will be cut at 1 3/4″),

Cut as many strips as needed in this way.

Here they are unfolded. You’ll notice that the ends are all at 45 degrees when using this technique.

To join the strips: place one, right side up on the work surface, and position the second strip, right sides together and perpendicular as in the photo (I think of it as a right angle “7”), overlapping to form 1/4″ dog ears.

Stitch from the corner of one dog ear to the same spot on the other end.

Then press flat.

I like to chain stitch all the diagonal seams until the strips are all connected.

That’s all there is to it. In next week’s post I’ll demonstrate how to make corded piping from bias strips and use it to “appliqué” my compass stars to the background.

12 Pointed Mariner’s Compass Stars

May 24, 2020 9 Comments

A few weeks ago I posted about what I was stitching on during our time of isolation. One of the projects I shared was a twist on my Mariner’s Compass technique inspired by my friend Mary Ellen. I made three of these compass stars while on retreat in the beginning of March:

Then I made 3 more while I was “safer at home”:

The drafting is almost identical to the technique I use in my Compass Capers book (click here to purchase a copy).

Compass Capers, by Chris Lynn Kirsch

I begin with a circle of paper, but this time I fold it into sixths instead of the traditional eighths. Then, as in the book, a few marks are made, and I connect the dots! Here’s an example:

By connecting the dots in different ways, many different stars can me made as is evidenced in the 6 compass stars above. I then cut them into wedges and paper piece them.

Once my compass stars were made I decided they would be beautiful in a tree skirt (our current skirt is 44 years old and has seen better days). To do this I taped together newsprint until it was a good size for a tree skirt. I folded this large piece into sixths, laid a compass star at the outer edge of the paper and drew an arc to fit. These 6 wedges were cut apart and I was ready to cut my background fabric, batting and backing.

I decided to use a “quilt-as-you-go” technique for putting the skirt together. This meant I could layer and quilt each wedge individually which made things much easier. And this is the finished tree skirt (I know it’s not a Christmas tree but, c’mon, it’s May 😄):

I used a number of different techniques while putting this project together and I’ve decided to do tutorials on them in the next few posts. Stay tuned 😊!

Mending With Boro

May 17, 2020 2 Comments

It turns out I have one more “Japan trip” post in me. It’s actually about the origin of sashiko – which began as a type of mending – and I hope you find it interesting.

While in Japan I enjoyed wearing the jacket I made with my friend Evelyn prior to the trip.

When I returned home, after washing the jacket, I discovered a tear along the bottom edge of the lining (I must have caught it on something).

I could easily have patched it and nobody would have been the wiser, since it was on the inside of the jacket. But I’ve been fascinated by “Boro” mending ever since learning about it in Japan, and I thought it would be fun to give it a try. For a site with the history on this ancient utilitarian technique and how it grew into the sashiko stitching we know today click here.

I bought this lapel pin while on my trip to Japan and was told it was an actual piece of vintage boro.

So I cut a rectangle of blue fabric, stitched and turned it so there were no raw edges (not typically done in boro, but I just couldn’t help myself):

Pinned it in place.

Chose a thread and began to stitch!

Because of the thickness of the fabrics, I had to do a stab stitch, but I think it adds to the effect and I’m loving the results (bottom center on the back of the jacket).

Wow! A way to mend that’s fun! Then, a few weeks after mending my jacket I had another “boro” style mending adventure. This past February I went to a wonderful reunion in Florida with a group of my cousins (before everything was shut down). Deb, Kathy and I found a shop with fun clothing and we all purchased similar shirts.

Mine has been worn and washed a number of times, and the last time I noticed a 1″ hole on the right front. I have no idea how it got there, but something had to be done. Since it was a t-shirt knit I decided to add lightweight fusible interfacing on the inside and then I blanket stitch appliquéd a leaf on the front, and added stitching similar to the shirt embellishment.

I’m rather pleased with the way it turned out.

This might just cause me to like mending. Have you done any creative mending? It takes a bit of imagination, but I recommend you give it a try!

Face Mask and Surgical Cap Update

We would like to thank everyone who has helped with our Mask and Cap project over the past 2 months. To visit our updated site and read the latest news click here.

Gina has compiled a list of all of the hospitals and organizations who have benefitted from your generosity these past 2 months. Click here to read this very exciting list!

  • « Go to Previous Page
  • Page 1
  • Interim pages omitted …
  • Page 33
  • Page 34
  • Page 35
  • Page 36
  • Page 37
  • Interim pages omitted …
  • Page 77
  • Go to Next Page »

Primary Sidebar

Archives

Recent Posts

  • The Indiana Heritage Quilt Show ~ 2026
  • Bird’s Eye View
  • The Birds
  • Sew Much Creativity
  • A Last Minute Baby Quilt

Recent Comments

  • Kathy Wuhrmann on The Indiana Heritage Quilt Show ~ 2026
  • Doris Ast on The Indiana Heritage Quilt Show ~ 2026
  • judy raddatz on The Indiana Heritage Quilt Show ~ 2026
  • Jeanette Bussard on The Indiana Heritage Quilt Show ~ 2026
  • clkquilt on The Indiana Heritage Quilt Show ~ 2026

Categories

Footer

My Guide

Whatever you do, do your work heartily, as for the Lord rather than for men.

—  Colossians 3:23

Contact Chris!

  • Home
  • About
  • Gallery
  • Classes
  • Trips
  • Books
  • Blog
  • Contact
  • Sign Up For My Blog

Copyright © 2026 · Chris Quilts · Website by Adunate · Privacy Policy