• Skip to main content
  • Skip to primary sidebar
  • Skip to footer

  • Home
  • About
  • Gallery
  • Classes
  • Trips
  • Books
  • Blog
  • Contact
  • Sign Up For My Blog

Blog

A Quilt From One Grandma to Another

August 11, 2024 2 Comments

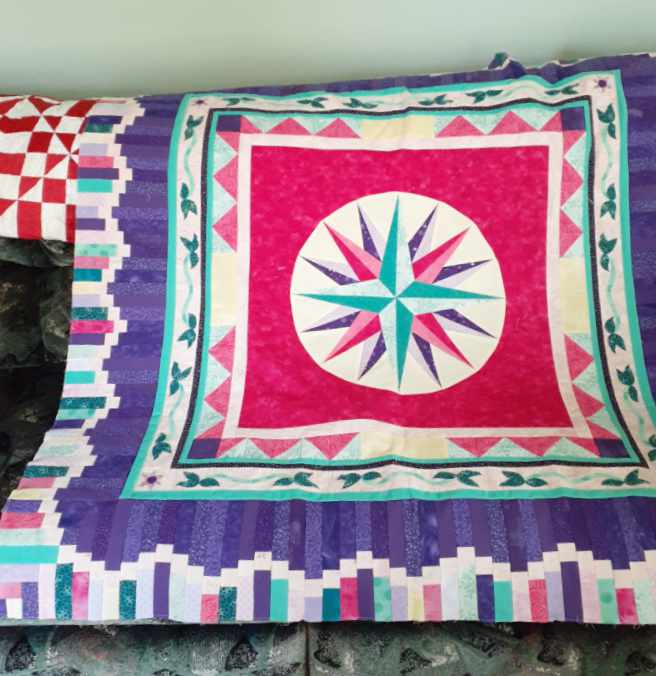
While we were in Vancouver, Washington for Hanna’s graduation I had an unexpected quilt adventure. Hanna’s Aunt DeeDee was kind enough to host the graduation party ~ and it was lovely. Towards the end I was talking with DeeDee and her husband Bert about the quilt I made for Hanna (click here to read that post), and they mentioned they had a number of quilts made by Bert’s grandmother. Bert then directed me to a lap quilt hanging in the hall. It was made from flannels and looked like it had been loved and washed – a lot! I began my “speech” about the importance of making a label for the back of the quilt (Mike always laughs because he know when this is coming), so future generations would know the quilts history. As I did this I checked the back for any type of signature. Wow ~ was I shocked to discover my label on it!!! That’s when I remembered making a quilt for Hanna’s grandma Bobbi, DeeDee’s mom, when she was going through chemo many years ago.

What a joy to know Bobbi had used and loved it so much! The conversation that followed was delightful, and once DeeDee knew the story she gave the quilt to Hanna.

Isn’t it a blessing to know that a work of our hands has been appreciated by the recipient? I’m so pleased that this quilt means something to Hanna, and that she will continue to love it as her grandma Bobbi did.

****************

And one more thing…

The AQS quilt show in Grand Rapids is only a month away – and the ThreadBenders Progressions quilts will be there!

English Paper Piecing plus Celtic Appliqué

August 4, 2024 4 Comments

Last Spring I was one of the judges for the Mukwonago Crazy Quilter’s show. The quilts that won Best Machine Workmanship and Best of Show blew me away. They actually amazed all of the judges. Later we discovered they were both made by the same quilter. The piecing, appliqué and quilting were all done equally well.

I was surprised to realize I’ve known their maker, Sandy, for years, but I’d never seen any of her quilts. So I emailed her to express my appreciation for her work, and to ask if I could share her quilts here. She agreed 😃! This is her Best of Show winner ~ Moonglow:

Her combination of the fussy cutting in the piecing, along with celtic appliqué is spectacular. And the geometric white/black print fabric makes my eyes dance across the quilt. Here’s a detail pic:

And, if you think the quilting in the blocks is great, wait until you see the background quilting:

Sandy commented about Moonglow: “This prize winning English Paper Pieced quilt (EPP) uses two of the block designs from Liz Oner’s Dawn to Dusk pattern. I added the celtic motifs and Yvonne Carrillo did the wonderful longarm quilting.”

The Best Machine Workmanship award went to Jardin a la Monet, and Sandy’s comments follow.

“Jardin a la Monet is my version of Liz Oner’s EPP Vignettes. It has won several ribbons and also best quilting done by my friend Mary Francis. Designer/quilter Liz teaches EPP at Blue Bar Quilts in MIddleton, Wisconsin, and offered this as a BOM. I enjoyed adding the hand appliquéd bias tube, celtic designs. I had purchased the theme fabric quite a few years ago in Colorado having no idea what I would use it for. All I have left of the 5 or so yards are schnibbles!”

These are two of her earlier pieces from the mid-90s. Poinsettia:

and Curvy Lines:

This next quilt is “an original wallhanging made for a Kaffe Challenge at the Keeping Up with the Jones Quilt Shop in Brodhead called Red Sky at Night“:

Don’t you just love how Sandy has come up with her own unique style, and the wonderful way she puts it all together?!? This was her final comment in our email chain:

“I love playing with celtic designs and appreciate the talents of Mary Francis and Yvonne Carrillo which complete and compliment my work. I want to give a shout out to Liz Oner (she’s on google and instagram) for introducing me to EPP. I have followed your blog for a long time and love your artistic creativity! Happy summer, Sandy”

Thanks Sandy! And a happy summer to all of you too!

Birmingham Weave Signature Blocks

July 28, 2024 4 Comments

I’m so excited about our upcoming trip to the Birmingham Quilt Show in England. We leave this week!!! As you may remember, I’m not one of the “leaders” of this trip, I’m just one of the lucky travelers, but Kristi was kind enough to invite me to come up with a small project to add to the fun (she knows I love to do that sort of thing). So I began noodling on what the group might like to do.

In a previous post I told you about my Liberty fabric from the 80s (click here to read that post).

I chose to use the smaller pieces that didn’t become part of my tote bag in a pre-trip friendship block exchange. This was the signature block we’ll be exchanging (the participants didn’t need to use fabric from Liberty):

And four of these squares make a fun “pinwheel” block:

These blocks come together with sashing between them to make a modern looking basket weave design:

I sent the instructions to Kristi, and she emailed them out prior to the trip. Anyone who wanted to participate could make the needed number of blocks, sign each one, and bring them along to exchange. After the trip they can then be made into a table runner, tote, small wallhanging, or ???.

I’ve done numerous friendship block exchanges in the past and here are photos of just a few of the resulting projects:

A table runner from our Baltic Cruise:

A tote bag from a riverboat cruise in France:

And an Irish lap quilt:

It will be fun to see what these blocks become. I love using my friendship quilts and reflecting back on fun trips and dear friends. I actually have a lecture all about my collection of signature/friendship quilts I call Friendship Quilts Then and Now. If your guild would find that interesting, please click here for all the information.

While I’m away I’ll still be posting by scheduling some “topics of the week” I’ve already written, and I think you’ll enjoy them. Hopefully I’ll figure out how to do it 😊. Please understand if it doesn’t go well, and you don’t hear from me for 2 weeks. I’m looking forward to writing the “post-Birmingham” posts I’ll share upon my return!

**************

Also…

A friend recently wrote to me asking for information about laundering a vintage quilt. A few years ago I did a post about my method for washing any quilt.

If this is something that interests you, please click here.

A Cigar Box Mariner’s Clock

July 21, 2024 8 Comments

I love a good challenge or two. The project in this week’s post pulls together two challenges in a weird and interesting way. I hope you enjoy reading about it. Here’s the story:

Last summer my friend and fellow Fiberista Kay, helped with a moving sale for her mother-in-law. While shopping I was intrigued by a tower of vintage cigar boxes. After the sale I asked if they had all sold, and when she said “no”, I asked her to bring them to our next meeting (these are just a few of them).

Years ago at a quilt show in Oshkosh, I roomed with another teacher who does amazing bead work. At that time she was embellishing cigar boxes ~ and I was in awe. Lisa Binkley is an amazing beader and quilter. Here is the top of just one of her boxes:

She is into many other fiber adventures now and you can follow her on Facebook by clicking here.

So why not turn a cigar box into a piece of fiber art with fabric, quilting, or ??? I challenged the group, and they said they’d take the challenge, but wanted time – so it’s not due until November.

Then it was decided that the next small challenge in my other fiber art group, ThreadBenders, would be called “Repurpose”, and was defined as: “repurpose something non-quilting to make a piece of fiber art”. This one was due in June.

I’d been wanting a clock above my sewing machine, and had purchased a small “clock works” for that purpose. A cigar box was certainly “something non-quilting”, but could it be made into a clock? And what about all those old watches I’d set aside when mom and I were making her jewelry trees. Hmm…

A traditional mariners compass has 16 points. During the pandemic I figured out how to fold a circle in a way that allowed me to draft a compass with 12 points like a clock (to read the post about my tree skirt click here) Hmm…

So I drafted one small enough to fit in the box,

stitched it up in pretty fabrics, made a false back to allow for the clock works, and adorned the box with the broken watches. It fit perfectly above the window!

And now I know when it’s time to take a break while stitching. I even did a bit of beading on a piece of wool felt and glued it to the outside of the box, even though that will seldom be seen 🙂. The lid had broken off of the pocket watch hanging on the inside of the clock (with it’s gears showing). So I used the peyote stitch I learned when making cuff bracelets back in 2013 to attach it to the piece of wool, and glued it to the front of the box.

The lid had begun to fall off, so the finishing touch was to glue a piece of fabric in place as a sort of “hinge”.

What fun to repurpose something old to be something useful! I can’t wait to see what the other Fiberistas do with their cigar boxes.

Bee Quilting

July 14, 2024 3 Comments

After teaching for a delightful group of quilters at the Quilters Plus guild in Glenwood, IL this past week, I needed to drive back to the motel where I was staying in Indiana before heading home the next day. My new friend Sandy told me to take a different route there because of traffic at that time of day. She sent me by way of a quilt shop which was supposed to have closed before I got there, but the lights were on because they were holding a class. Hooray!

I’ve been in many quilt shops and had started to believe that racks and racks of bolts were the only way to set things up. But Bee Quilting changed that. It is a VERY UNIQUE quilt shop in Munster, Indiana.

As I entered I found quilted mats on the floor.

I loved that they were displayed where they were meant to be, but that wasn’t really unique. There were loads of notions, books and patterns all around.

And that’s as it should “bee” 🐝. So what was so different? The fabric display! Instead of having row after row of bolts ~ a square of each of the fabrics they carried was hung from a ring on the wall!

Then I met Meghann, who co-owns the shop with her mom. I asked where the idea came from and she gave her mom complete credit. She said their customers like it because they can lay out fabric for their projects in a way that gives them a better feel for how the fabrics will work together, rather than stacking bolts.

Plus, it’s a lot easier to carry things around! Truly a unique idea!

The bolts are stacked in a very orderly fashion in the back, away from the customers, and once a quilter has found the fabrics they want, Megan can go back and pull just what is needed for cutting. This leaves plenty of display room in the shop for other things.

I wish I’d had a project in mind to choose fabrics for ~ I’d like to put this concept to work. But alas, I’m a 3 1/2 hour drive from Bee Sewing. In case you’re wondering where Munster is, simply find Lake Michigan on a map and look down to the very bottom tip.

To visit their website click here.

Maybe it’s on your way to somewhere ~ like the AQS show in Grand Rapids that’s coming up. If you make it to the show, don’t miss the Ultimate Guild Challenge competition – the ThreadBenders “Progressions” quilts will be there (click here to read about them, and here to read about how I made mine)!

**************

And one more thing…

My friend Sue commented to last week’s post about diagonally seaming a quilt back. She included a recommendation that I wanted to share, in case you missed her comment. Here it is:

“With the availability of 108″ fabric (which by the way MUST BE WASHED BECAUSE IT SHRINKS, WITHOUT FAIL!!!) method Number One using two layers of fabric probably isn’t as useful as it once was. Unless you have 42” fabric you really, really want to use.
Method Number Two, however, can be particularly useful, particularly for smaller quilts.
Sue from Aunt Susie’s Machine Quilting”

So, remember to wash your large quilt backings!!!

Thanks Sue!

Diagonally Seaming a Quilt Back

July 7, 2024 8 Comments

The first big vacation my husband and I took together after the kids were born was to England in 1989. Dad and Mom watched the kids and we had a wonderful time. I was a beginning quilter and really had my heart set on shopping for fabric at the Liberty store in London. It did not disappoint. The store itself was beautiful and the fabrics were lovely. When I finally decided on my favorite and asked for a meter to be cut, Mike responded with “We didn’t come all this way for 1 meter, what else do you like?” So I happily left with 3 meters of lovely cotton in a purple bag. Every so often I’d take them out and pet them, then put them away. They were “too special to use”. Over the years I’ve collected some additional small pieces of Liberty fabric too (and they all went in the purple bag).

So now I’m signed up for a trip to the Birmingham quilt show and I decided it was time to finally use my “Liberty” to make a tote bag (so I won’t feel guilty buying more 😊). I chose a favorite pattern and added a few fabrics to the three original larger pieces in the bag (the remaining small pieces will be used in a pre-trip project ~ watch for them in a future post).

Years ago I was gifted a tote bag that I’ve used many times. I loved it so much I bought the pattern, and was delighted to discover that is was written by my friend Linda Marcou! It was time to pull it out and use it for my Liberty tote.

I needed to start by making a quilt 37 1/2″ square.

The burgundy color piece of liberty would make the perfect lining, but it was only 36″ x 40″. Could I use my friend Lori’s trick from a post a few weeks ago (click here to read that post)? I gave it a good press:

Cut the diagonal:

Slid the halves in place:

and discovered the answer was “no”. My original piece was too small. But Lori had mentioned that a diagonal strip could be added to make it a bit bigger.

After figuring this out my friend Sue, of Aunt Susie’s Longarm Quilting here in Watertown, just happened to send me the instructions she uses for diagonal seaming the back of a quilt. They are originally from John Flynn. This may make some of you go cross-eyed, but I’m putting it in this post for those who find it helpful ~ AND for me to refer back to when I can’t find these instructions elsewhere 🤣. If this isn’t for you, please just scroll down to read about finishing the tote at the next ***.

**************

At first read I was a bit confused. Then I reread the part on the diagram in the upper left that said it was two layers of the backing fabric, both facing up. OK ~ but how much backing fabric do I need to do this? As I pondered this question I received a second email from Sue with the answer, and here it is:

John’s method for diagonally piecing a quilt back from one piece of fabric is the most efficient way to make the back whenever the width of the quilt back is 1 1/2 times (or less) the width of the fabric you want to use. For example, if the width of your back fabric is 44″, use John’s method whenever the width you want your back to be is 66″ or less. If you are using fabric that’s 60″ wide, use John’s method whenever you want your quilt back to be 90″ or less.

John has come up with a formula to figure out how much fabric you’ll need to diagonally piece the back. It looks like scary math at first, but if you simply plug in your own numbers (and use a calculator 😁) it’s really quite easy. Here’s the formula:

and here’s the example that will help to make it all clear:

We want to know how much 44″ wide backing fabric to buy, so WF will be 44″, and LF will be the answer to our equation.

Let’s say your quilt top equals 48″ x 60″, and you want your quilt back to be 51″ x 66″.

In the formula LQ = 66″ and WQ = 51″

When all the numbers are plugged in for this example the equation looks like this:

At this point I grab the calculator and find that 66 x 7 = 462. The fraction on the lower right means 462 needs to be divided by 37. I grab the calculator again and find that 462 divided by 37 = 12 1/2.

The last step is to add: 66″ + 12 1/2″ = 78 1/2″. I’d round up to 80″. This is just under 2 1/3 yards, so I’d purchase 2 1/2 yards just to be safe 😊.

Thanks so much Sue, I think many of us will find this helpful.

**************

It was too late for me to use this formula for my current project, so I added a 6″ strip to the triangles and the lining was ready.

I layered it with a piece of batting, and stitched strips on “quilt-as-you-go” for the outside of the tote.

Once the quilt was quilted and bound

it was stitched into a tube,

the straps were added, the entire piece was folded, fronts sides together, and stitched along the sides.

When I chose the layout for the outside of the tote I had envisioned the outside looking like the photo above, with the burgundy on the inside of the bag. When the “tricky” sewing and folding was done, I was surprised to find the inside of the bag looking like the previous photo, and the burgundy fabric was lining the side pockets.

The outside of the tote ended up quite different from what I’d imagined, but I love it!

Now it’s ready to be packed for our adventure in Great Britain!

Delightful Wool Embroidery

June 30, 2024 5 Comments

Before I jump into this week’s topic, I wanted to share some information. One of the participants in our upcoming trip to England, Wales, and The Festival of Quilts in Birmingham, has had to cancel. Is there anyone interested in joining us on our adventure July 31-August 11? If so, contact our coordinator Kristi at or call 262-786-6763 for more information.

And now for this week’s post!

Last year I began working on a kit I’d purchased at the Great Wisconsin Quilt Show in Madison. Isabelle’s designs are whimsical and very original. I couldn’t resist taking one home.

I began stitching on it with Hanna when we went to Hawaii last December. We worked on our projects in our cabin at night.

Last week I attended a “stitch day” at my friend Kathy’s home, and I finished it!

Now to find the perfect frame!

I really love Isabelle’s designs and hope she’s vending at the Great Wisconsin Quilt Show again this year so I can purchase a few more of her lovely kits. I recently discovered her Facebook page. If you’d like to visit it you can search for: Atelier D’Isabelle.

Maybe I’ll see you in her booth in September!

*****************

And… I just have to post a few photos students have recently shared with me of class projects they’ve finished/used!

Louise took my Mariners Compass class a while ago and didn’t have a plan for the compass she made Then she participated in a Round Robin challenge and decided to make her compass the center block. Here’s the quilt.

She was thrilled – and rightfully so!!!

A few days later I received an email from Diane who took my Architectural Repliqué class in Florida last winter. Each student makes a small sample house block in that class to learn the technique, once done they’re ready to dive into the project of their dreams. Each time I teach this class I make a sample block along with the students. Back in 2015 I did a post on all the blocks I’d made over the years (click here for that post), and I’ve made more since then!

Usually students keep their blocks as samples, but sometimes they become something more. Diane used hers as a label on the back of a wedding quilt!

What a wonderful idea! Thanks for sharing the photo Diane! These quilts make my teacher’s heart so happy 😊.

I’d Rather Meander Than Mend

June 23, 2024 7 Comments

Should quilters have to mend? They should if the cover on the pontoon boat is getting old and in need of repair! When we put the boat in the lake this past May, there were seven areas that needed patching – ugh. Fortunately my old Bernina is quite portable. We ran an extension cord from the boat house and the “fun” began.

After a few inches of stitching I broke a needle. I called a yarn shop in the nearby town of Horicon. They didn’t sell sewing machines needles, but the owner said she would run home and see if she had any! I love small town America! Mike and I made the short trip to Horicon to get the needles from this dear woman, and we grabbed lunch at a brat stand (as in bratwurst) too, before we headed back to the cottage to try again.

The cover was heavy and stiff, and the tears were in the middle of it (of course).

I thanked Mike for taking photos and then suggested he put the phone down and “help”! With both of us rolling the cover under the arm of the machine, and quite a bit of pushing and pulling, we got ‘er done! The stitching isn’t pretty, but I think it will hold.

The weather was beautiful, and I have a sense of accomplishment, but I can’t wait to get back to quilting in my studio.

******************

And one more thing…

My friend Sue recently emailed to ask how to search for a topic on my blog. If you’ve struggled with this too, this information should help:

When on a computer make sure you are on the main blog page by clicking on “blog” in the menu at the top. The “search” box should appear on the upper right.

If you’re on phone or tablet, do the same thing to assure you’re on the main blog page (here’s a screenshot from my phone):

then scroll all the way to the bottom of that page. This will take a while (usually through about 8 previous posts), but at the end a “search” box will appear (here’s another screenshot):

I wish the WordPress site I use for my blog would make this easier, but it is what it is 😊.

  • « Go to Previous Page
  • Page 1
  • Interim pages omitted …
  • Page 11
  • Page 12
  • Page 13
  • Page 14
  • Page 15
  • Interim pages omitted …
  • Page 41
  • Go to Next Page »

Primary Sidebar

Archives

Recent Posts

  • London ~ and More
  • Designed For a Purpose
  • Squirrel Quilts and More
  • Vintage Appliquéd Arrows and More
  • Fascinating Tidbits

Recent Comments

  • Karen Ann Moore on London ~ and More
  • Cheryl McLean on London ~ and More
  • Sue Halpern on London ~ and More
  • judy raddatz on London ~ and More
  • Joanne Corrigan on London ~ and More

Categories

Footer

My Guide

Whatever you do, do your work heartily, as for the Lord rather than for men.

—  Colossians 3:23

Contact Chris!

  • Home
  • About
  • Gallery
  • Classes
  • Trips
  • Books
  • Blog
  • Contact
  • Sign Up For My Blog

Copyright © 2026 · Chris Quilts · Website by Adunate · Privacy Policy