• Skip to main content
  • Skip to primary sidebar
  • Skip to footer

  • Home
  • About
  • Gallery
  • Classes
  • Trips
  • Books
  • Blog
  • Contact
  • Sign Up For My Blog

Blog

Tis the Season

December 19, 2021 18 Comments

Christmas is a week away and I’m enjoying the process of preparing our hearts and home for this wonderful holiday! I’d like to share some of my favorite decorations and traditions in this week’s post.

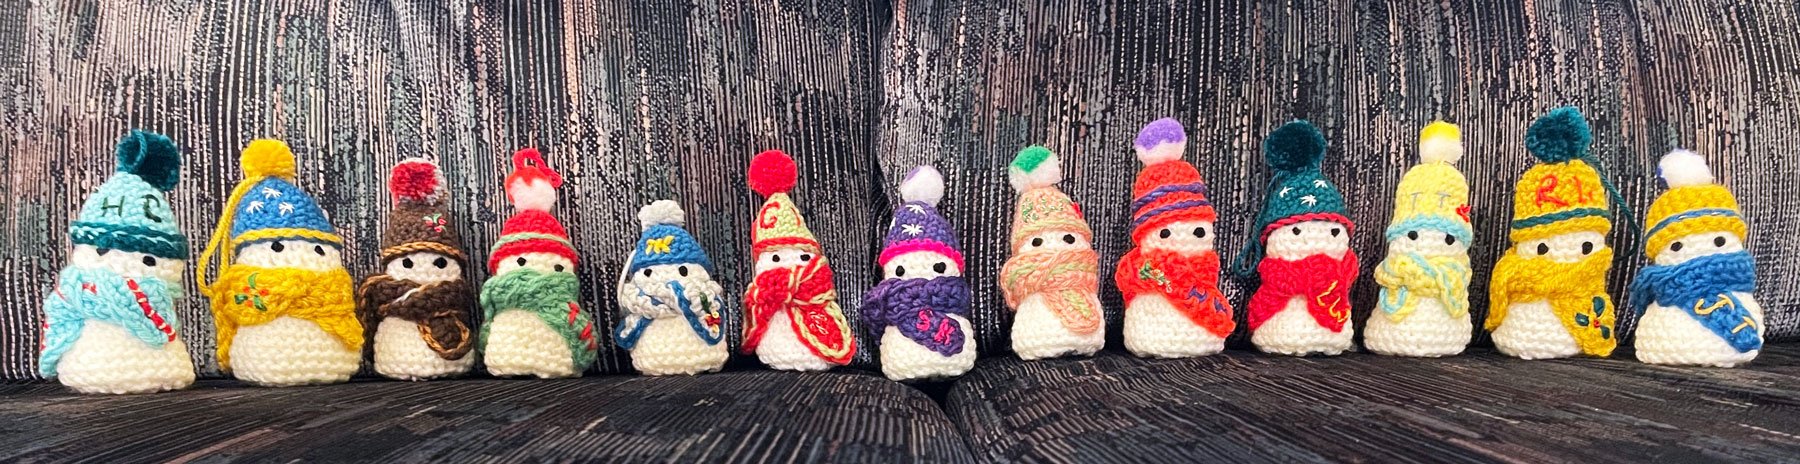
We’ll start with something new. My mom is a crochet master! I’ve posted before about the Star Wars figures she’s made for each of her great grandchildren (click here for that post). This year she decided to make each of her children, grandchildren, and great grandchildren, a snowman ornament, and I’ve featured some of them at the top of this post. Mom stitched each person’s initials on their hats or scarves, and signed their snowball bottoms with her own initials 😊.

What treasures!

I have many treasured Christmas decorations and I’m sure you do too. A few years ago Mike and I found this ornament wreath at an antique mall in Columbus, WI.

It contains many vintage ornaments and they’re so beautifully arranged! There was a tag attached that stated that if an ornament ever breaks: “pull out the pieces with a tweezers and glue in another one”. Looking at it brings me joy and I love the history and variety of the ornaments.

One of our most prominent decorations is the nativity because it helps Mike and I stay focused on the true reason for the season.

A few years ago friends of mine gifted me a vintage book:

It is lovely inside and out.

And it compliments our Christmas scene so well.

I’m not one to go in for new trendy decorations. I prefer the pieces that have memories – like all the ornaments we’ve collected in our 45 years of marriage. What fun it was to decorate our very tall tree with Sommer and Trey!

Then there’s the sled Mike spent hours of snowy fun with as a child:

My great Aunt Hazel painted this sled years ago and it has found a home on our mantle with the teddy bear Mike’s Mom had made from her old fur coat (I found the rocking horse at a thrift store for $5 😊).

And of course there’s our traditional cookie baking day with 4 generations. Hanna and Will joined in the baking fun too – all the way from Vancouver, WA!

My friends, Sharon and Margaret, will be joining me for ringing and singing for the Salvation Army this week. And then there are all the wonderful Christmas concerts we’ve attended through our church and school this season!

The tree skirt I made last year is finally under our tree and we are spending a lot of time praising the Lord for all of our blessings. A very merry Christmas from me and Mike!

Quilting Snowball Blocks

December 12, 2021 6 Comments

As I look out my window at the falling snow, I’m happy to share more of the story from my previous post about: A Red, White and Silver Christmas Quilt.

It seemed obvious to me that the snowball blocks should be quilted with snowflakes and, since no two snowflakes are alike, I did a search of free clipart and printed out 15 different ones at 6″ each.

I then scanned them into my Scan and Cut™ (click here for a previous post about this great machine), put freezer paper on the sticky mat, and was very discouraged. The flakes were so detailed, and the freezer paper wasn’t sticking very well to the mat… and I ended up with a mess that I crumbled up in frustration before realizing I should snap a photo:

I decided to tape the freezer paper around the edges for my second attempt (note masking tape), and remove all the detail lines inside each snowflake:

This worked much better!

I could now cut these templates apart and lay them in place on the quilt sandwich. Once I liked the layout I ironed the shiny side of the freezer paper, one flake at a time, in place and quilted the along the inside edge.

But first I needed to decide which machine to quilt it with. I’d layered this quilt with a very thick minky fleece and no batting. I’d done this with my birthday block quilt and had some problems with the backing “fuzz” pulling through to the front, as well as puckering. So I made a sample sandwich, put a new titanium needle in my Bernina, and did some free motion stitching.

The top thread looped in a few places and the “fuzz” bearded through from the back 😕. Then I put a new needle in my HQ Sweet 16 and had better results. Still a little bearding, but the decision was made.

This worked well!

What I became very aware of is that I’m not great at free motion quilting smoothly along the edge of paper. The snowflakes God creates are beautiful!

Photo by Alexey Kljatov

I think mine reflect the look of snowflakes beginning to melt 🤣!

I’m still having fun doing it and I plan to gift it to someone who thinks everything I do is wonderful – so I’m sure they won’t even notice my less than perfect flakes! Now to go stitch more snowflakes! I’ll share a photo of my quilt when it’s complete.

A Red, White and Silver Christmas Quilt

November 28, 2021 4 Comments

Last year I pieced 2 Christmas quilts that never got quilted. Last week I decided it was time to layer them and now they’re waiting to be finished as gifts. One was made from a lovely Christmas panel I purchased in Denmark, while on our Baltic Sea cruise.

I cut the squares apart (they were amazingly square for a panel – so often the whole thing is wonky!)

I decided to alternate them with snowball blocks and found a matching red and a pretty silver fabric in my stash!

Over the years I’ve used the “slap back triangles” method of adding corners to larger squares, but I often found this technique to be less than accurate. By using one of my favorite tools – Elmers School Glue™ – I’m getting great results! Here’s the scoop:

I cut the red fabric into squares the same size as the panel squares (9 1/2″), and the silver into smaller squares 1/3rd the finished size of the block plus seam allowance (9″ divided by 3 = 3″, + 1/2″ sa = 3 1/2″). I pressed the smaller squares into triangles:

Next I ran a thin line of glue along the fold on each triangle:

They were placed, glue side down on the 4 corners of the background square, and ironed in place to dry the glue. They fit perfectly!

Each triangle was sewn in place by stitching in the crease.

Since we’re in the season of being thankful for what we have, and not wanting to waste anything, I decided to sew a second seam 3/8″ from the first one:

Once all 4 corners were stitched it was easy to cut between the sewn lines to get 4 bonus blocks:

Once the snowball blocks were finished I alternated them with the panel blocks to make the quilt top. I didn’t have enough bonus blocks to border the top, so I improvised and added corner border sections to the top right and lower left (the squares are just laid in place in this photo).

I’ve decided to share the rest of the story when I get the quilt done, so I’d like to finish this post with some Thanksgiving thoughts.

Over the years we’ve hosted Thanksgiving dinner many times. Some years we’ve had up to 27 guests attend, but this year we shared the holiday with just my parents and my brother and sister-in-law, Kurt and Mary Sue. Mary Sue mentioned that the last time just the 6 of us had Thanksgiving dinner together was probably before we had kids! But now our kids all needed to spend time with their in-laws, leaving the six of us to have a lovely evening together.

Family is a wonderful blessing! And I’m so very grateful for mine. I’m thankful for my church family also, and many more material blessings than I can count. I’m also grateful for quilting ~ and each one of you. But my dearest joy is knowing Jesus as my Savior ~ and I’m so glad we’re entering the season that celebrates His birth!

A Covered Button Press

November 21, 2021 7 Comments

I recently visited my friend Cathy. I hadn’t been to her beautiful lake home before and I enjoyed the view, as well as all of her lovely quilts, and the wonderful furniture made by her very talented husband Tom.

In the dining room she had a small table with an odd tool attached to it. I stared for a few minutes and finally had to ask “what is it?”

Do you know?

It’s a covered button maker. It’s actually called a Hand Press, and you can purchase one online for anywhere from $60 – $200. I’m so glad Cathy showed me how it works and then loaned it to me to play with (thanks Laura for helping me carry it to the car 😊).

I’ve made covered buttons before, but the tools involved were this kit from Dritz and a hammer!

Cathy pulled out the box with the blanks for all the different sized buttons, and the press dies

And made a button before our eyes:

button back “inside” up in bottom die
bottom die placed in press
top die
fabric placed in top die
button top placed into fabric, “inside” of button up
top die in place
a little bit of muscle

And voila… a covered button!

I’ve made quite a few covered buttons when garment sewing. This is one of my favorite vests. The buttons are only for decoration, but it was fun to stitch the design from the vest onto the fabric before making them.

I’m looking forward to doing a bit of playing with the press on my current challenge quilt. Thanks Cathy!!!

Have you ever made covered buttons? Do you have a story you’d like to share… with pictures?

Vintage Travel Posters

November 7, 2021 8 Comments

The “Big Challenge” for the ThreadBenders this year had a very interesting theme and color palette. Here are the rules:

The quilt must be made in the style of the travel posters from the WPA of the 30’s and 40’s. The place is up to you- it could be someplace you’ve visited, or your backyard or wherever, but in the style of the posters. The idea is not to recreate the existing posters, but turn a place of your choice into a quilt “poster” in this style.

You may only use 6 colors, which means only 6 fabrics.  In addition you may use black and white (gray is considered a color).  If you look at the old posters for inspiration, you will see they only use approx. 6 colors.  Colors must be “tones”, like the colors used in the old posters – no brights. 

The location title must be included on the quilt, either straight across the top or bottom.  You can choose any font, but the title must be at least 80% of the width of the quilt.

The resulting poster quilts were spectacular (if I do say so myself 😃) and they have been posted to our site. I think you’ll find the variety fascinating. To see them all click here!

Typically with these challenges I take the opportunity to share my quilt’s story in a blog post – so here it is!

My mom’s family had a cottage on Pewaukee Lake, and both of my parents loved the water. My grandfather sold that cottage many years ago, so in my early teens my parents decided to purchase a speed boat. They wanted Kurt and me to love life on the water too. We all enjoyed the boating and skiing, but my parents disliked all that goes with towing a boat around on the weekends. Within a few years they decided the boat needed a home and it was time to buy a cottage of their own. They found a small cottage on a lovely lot on Lake Sinissippi (which has grown over the years).

It was less than an hours drive from Milwaukee and we spent most of our weekends there.

After over 50 years of fun on the lake I decided I needed to commemorate this important part of our lives in a travel poster quilt. Here’s the photo I took of the shoreline specifically for this project:

I chose to leave off the pontoon boat, and add a great blue heron to the quilt (in a spot I’d seen one recently, but didn’t take a photo). Once I raw-edged repliquéd the quilt top It occurred to me that this scene could be from just about any lake in Wisconsin (or many other states for that matter). What makes this shoreline special to me is the memories of all the wonderful times we’ve had there with family and friends. So I began going through photos from the past 50 years. I chose my favorites, copied them by photographing them with my phone, and placed them in Photoshop™ in an arrangement that would fit a yard of fabric:

I uploaded this entire image to spoonflower.com, and for $18 I had the perfect backing for my poster quilt. Amazing!

I finished the quilt in time for Mom and Dad’s July birthdays (Mom turned 87 and Dad 90 – and they gave me permission to share that 😊). We had a huge family gathering at ~ you guessed it ~ the cottage, and we gifted the quilt to them from all of us!

Everyone wanted to find themselves in the photos on the back, especially the kids!

The adults got in on the fun too!

Now the problem is ~ how to hang it??? At this point it’s hanging in their living room “right side out”, but I’m pretty sure it will be flipped to the album side pretty soon.

I hope you will visit the ThreadBenders site and see all of the wonderful posters!

Quilting With My Friend Lori

October 31, 2021 3 Comments

As I was looking at the Autumn quilt I have hanging in our living room (click here to learn more about this quilt),

I was reminded of the fun of having it hang in Paducah. Then I got an email from my friend Lori with a link to her current online tutorial, and many memories came flooding back.

I met Lori years ago when I spoke to her quilt guild, but we really got to know each other the year we both had an Oak Leaf and Reel quilt accepted into the New Quilts From an Old Favorite contest at the National Quilt Museum in Paducah. Lori is third from the right:

And here’s her fun quilt:

She is a talented quilter, teacher, author and dear sister in Christ – with a great website: Quilting With Lori. Like me, she’s a teacher at heart and loves to share tips, techniques and step-by-step tutorials.

While watching a recent video of hers on how to “web” a quilt, I thought “what a great technique to share!” But I knew I couldn’t have done the instructions any better, so I thought it would be a great idea to link to the tutorial on her site ~ click here .

Many of you may already use this great technique. I’ve found it saves me some ripping as it keeps everything in the proper order and I’ve not only used it for blocks, but for entire quilts. However I never thought to call it “webbing a quilt”. How very clever!

Lori has books, patterns and templates available for sale, and I think you will be amazed at how much she shares for free. Her site is a wealth of information for quilters. She also speaks and teaches for guilds, virtually and live. Click here to reach her homepage. I know you’ll enjoy getting to know Lori 😊!

A Page 38 Challenge

October 24, 2021 3 Comments

Our most recent challenge in my Fiberistas group had a unique twist. Each member grabbed an old magazine from Barb’s overflowing pile. We then turned to page 38 (that number was chosen at random), and we challenged each other to make a quilt inspired by some aspect of our page. Here’s mine:

I wasn’t excited about the block on my page, but I found the circle inside the star intriguing. We picked our pages back in December of 2019, and ideas began to rattle around in my brain. Then I went to Japan! For my newer blog readers, you can read all my posts about that wonderful quilting adventure by typing Japan into the search box on my blog’s homepage 😁.

Way back in April of 2020, with my trip to Japan fresh in my head and loads of time to quilt “at home”, I decided it was time to make a memory quilt of the trip, and started by piecing a background to display some of the pieces I made in the classes with our Japanese teachers. (Click here to read about the inspiration for this “background”).

You may have noticed I included my hand-stitched sashiko sampler in the piecing above. My next “what if” idea was to make the class samples into circles and “bounce” them over the surface of the quilt. These bird and flower samples are from the Yuzen painting class:

I loved the shibori dyeing class – and the color too!

I also included some other pieces I purchased on the trip, but I didn’t have enough circles to make a really interesting design. Then an idea struck – those circles on page 38! I only had a copy of that 1 page, and there were no “how-to” instructions, so how would I create those pieced circles??? As most of you know I’m always looking for an easy way to accomplish a task. After a bit of pondering I realized those circles could be cut from pinwheel blocks. After making pinwheels in different sizes from some of the Asian fabrics Evelyn gave me (thanks Evelyn!), I marked the circles, cut them out and added them to the collection.

It took awhile to find the right layout. I find it helpful when I’m doing this type of designing to take photos with my phone and then swipe between the options until I decide on the one that tickles my fancy. Here are three of the options I came up with:

And here’s the one I finally decided on:

I think it’s pretty, and such fun to snuggle under. I love being covered with all those wonderful memories!

All of the challenge quilts were fascinating and we finally have them posted to our Fiberistas site. To see all of the magazine pages and the quilts that resulted please click here! You’ll notice that most of us used only a small aspect of some portion of our page to inspire our quilts. I think that was part of the fun. Enjoy!

.

Easiest No-end Binding ~ Refresher

October 17, 2021 7 Comments

A few years ago I discovered a technique that I think is the easiest way ever for joining the beginning and ending tails on a binding. You don’t need a special ruler, an iron, or math. It’s done with a 2″ piece of Dritz Wash Away Wonder Tape™ (which I now keep next to my machine at all times 😊).

As I was using this technique to bind Josiah’s quilt, the teacher in me knew I had to share it once again; for newer viewers and as a reminder to the rest of you 😃. It’s the only one I’ve used for the past 3 years and I highly recommend it. It’s really this easy:

Leave an opening between your beginning and ending tails about 10″ long:

Fold one tail back to create a 45 degree angle. No math is required because you can check it by putting a square ruler in the inside corner that’s created:

Place a 2″ piece of tape along the fold and rub with your fingernail to be sure it sticks:

Remove the paper from the tape, leaving the glue strip along the crease:

Lay the other tail in place along the edge of the quilt, and over the tape on the crease:

and finger press to secure tape to this second strip:

Lift the strips to reveal the inside of the crease:

Gently pick the entire piece up and stitch in the crease:

Lay the binding back on the quilt to make sure it fits:

Once you’re sure, trim off the tails:

Lay back in place and sew this last portion of the binding to the quilt:

Voila. I just leave the tape in place since it will wash away. Turn the binding to the back of the quilt and finish as usual. I hope you’ll give it a try!

***********************

Correction!

In spite of the fact I like math ~ it was brought to my attention that I have oft repeated a counting error. Doris sent me an email after watching my Quilt as You Go lecture at the Great Wisconsin Quilt show saying that she could only come up with 6 layers when sewing the front and back sashing on, not 7. She’s exactly right and I apologize for any confusion this may have caused. Fortunately the technique remains the same 😊. Thanks Doris, for letting us know!

  • « Go to Previous Page
  • Page 1
  • Interim pages omitted …
  • Page 25
  • Page 26
  • Page 27
  • Page 28
  • Page 29
  • Interim pages omitted …
  • Page 77
  • Go to Next Page »

Primary Sidebar

Archives

Recent Posts

  • The Indiana Heritage Quilt Show ~ 2026
  • Bird’s Eye View
  • The Birds
  • Sew Much Creativity
  • A Last Minute Baby Quilt

Recent Comments

  • Kathy Wuhrmann on The Indiana Heritage Quilt Show ~ 2026
  • Doris Ast on The Indiana Heritage Quilt Show ~ 2026
  • judy raddatz on The Indiana Heritage Quilt Show ~ 2026
  • Jeanette Bussard on The Indiana Heritage Quilt Show ~ 2026
  • clkquilt on The Indiana Heritage Quilt Show ~ 2026

Categories

Footer

My Guide

Whatever you do, do your work heartily, as for the Lord rather than for men.

—  Colossians 3:23

Contact Chris!

  • Home
  • About
  • Gallery
  • Classes
  • Trips
  • Books
  • Blog
  • Contact
  • Sign Up For My Blog

Copyright © 2026 · Chris Quilts · Website by Adunate · Privacy Policy