• Skip to main content
  • Skip to primary sidebar
  • Skip to footer

  • Home
  • About
  • Gallery
  • Classes
  • Trips
  • Books
  • Blog
  • Contact
  • Sign Up For My Blog

Blog

Aloha

January 20, 2019 7 Comments

Our Hawaiian cruise was a sunny, fun and fascinating time in paradise. It may be over, but I have so many wonderful memories and I’d like to share a few with you!

Wendy and I began our trip with a few days in Honolulu simply getting use to the warmth and sunshine. By day two we were ready to walk to the top of Diamond Head.

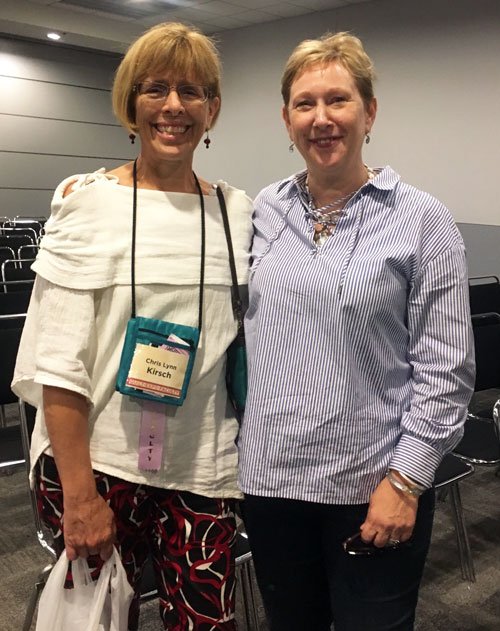
That evening the rest of our group joined us and the next morning we were on our first tour – to Pearl Harbor. It was a very moving experience.

From there we boarded the Pride of America (how fitting). There were 40 of us total and it was a fun and friendly group.

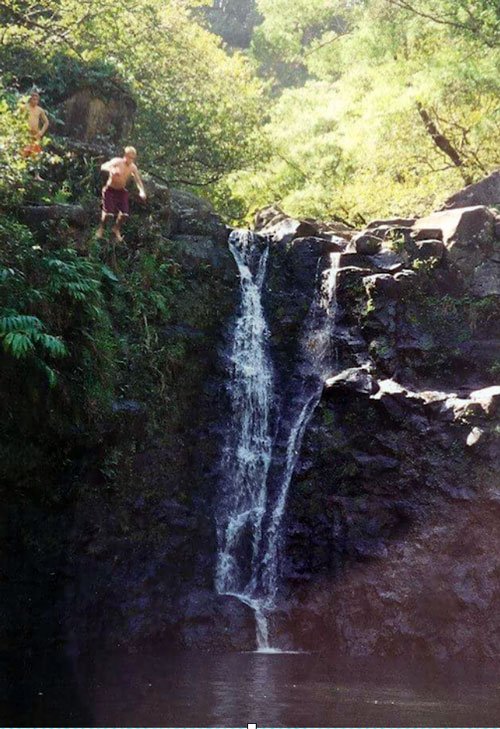
We visited 5 ports of call on 4 islands and were blessed to see volcanos, waterfalls, rain forests, sandy beaches, along with macadamia nut, cocoa and coffee plantations. This trip had it all!

Fern Grotto flat bottom boat ride in Kauai
Napali Coast

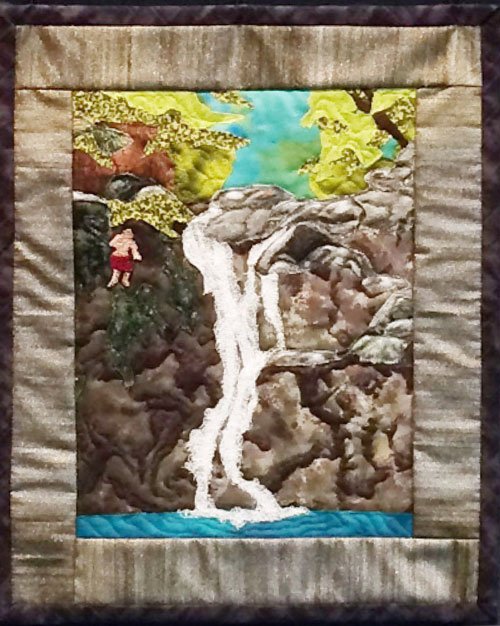
Some of us were even able to swim under a waterfall!

Not only were the flora and fauna beautiful, but we found a few quilt shops along the way:

Yellow Hibiscus – the State flower
Quiltina just can’t resist a bit of photo-bombing!

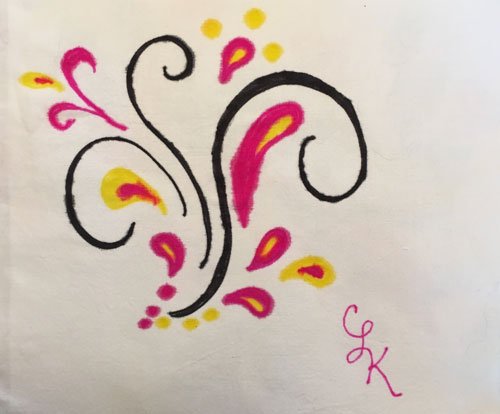
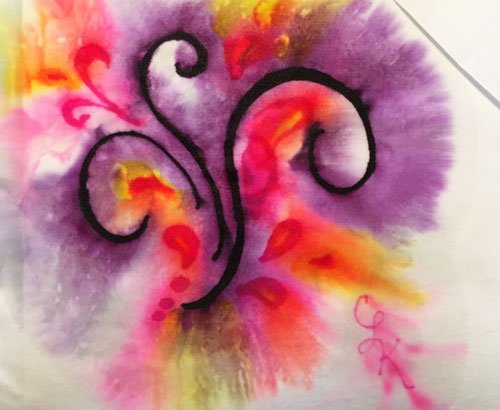
Our class time went well. All participants had great results with their Hawaiian Paintstik Appliqué projects.

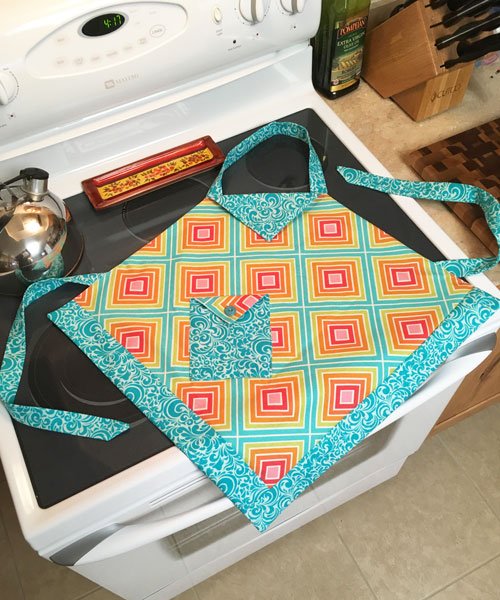
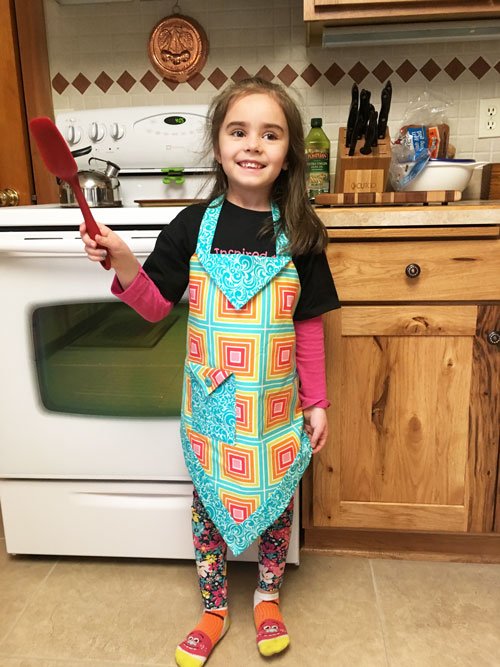
And we even threw in some extra fun – making fabric origami shirts to be kept as Christmas ornaments. A lovely reminder of the trip.

I will be sharing some additional photos and inspiration in the next few blog posts, but today I’d like to leave you with this lovely sunset view.

***********************

And one final note:

I came upon this information recently and I’d like to share it before I forget. In my free motion quilting classes we talk a lot about machine tension. In Bob’s latest email from Superior Threads he posted a great handout on thread tension, complete with easy to understand diagrams. Click here to see it – and print it out!

Merry Christmas 2018

December 23, 2018 15 Comments

Christmas is such a beautiful season and I’d like to set the tone for this year’s post with a picture of a lovely Christmas angel made from a hymnal by my dear friend Maria. 

What a treasure. Thank you Maria!

Every Christmas my friend Sharon and I like to ring and sing for the Salvation army. This year my grandson Trey joined in for the first half hour. We’ve been doing this for at least 16 years, and it’s still a bright spot in my Christmas season! 

Another tradition is cookie baking. My mom and I have never missed a year since I was old enough to help. Dad’s a big help too. His best skill is tasting our results, but he’s gotten quite good at decorating gingerbread men and unwrapping kisses with Trey. My daughter-in-law Betsy, along with Sommer and Trey, are now part of the tradition. So much fun!!!

The tree is up, the gifts are wrapped, and the house is ready for the upcoming celebrations.

For years I used to overdo and stress about the holiday preparations, but in recent times I’ve cut back to just the essentials and my focus is daily on the true gift of Christmas – the birth of our Savior – who became a man, lived a sinless life, then suffered and died to save us from our sins and prepare a place for us in heaven. 

“For God so loved the world that He gave His one and only Son, that whosoever believes in Him shall not perish, but have everlasting life” John 3:16

What a wonderful reason to celebrate! God bless us, everyone!

From One Barn to Another

December 16, 2018 10 Comments

When you say barn quilt nowadays, people often picture a wooden barn block attached to the exterior of an actual barn. I have one of those and posted about it years ago (click here to read that post).

Earlier this year I made a fabric barn quilt and entered it in a contest in which it traveled for 6 months. After I got it back I realized I had never included it in a blog post. It was a very enjoyable project and I tried a number of different techniques to accomplish my goals, so I felt it was time to share it with all of you – since it’s still the same year as I made it (by 2 weeks  :-D) ! It’s called “From One Barn to Another” and it measures 24″ square.

This was actually created by combining photographs of two different barns owned by my friends Glen and Di Lohr who live just across the road from me. Di was happy to have me do a photoshoot one sunny summer afternoon, as inspiration for a Barn Quilt challenge which invited quilters to do something innovative with the barn theme.

The majority of the quilt is the interior of their German Fachwerk barn.

Unfortunately this window didn’t look out at their more traditional Wisconsin style barn. But that didn’t stop me, I just Photoshopped™ it in,

and used my repliqué technique to do most of the work. 

The bricks created the greatest challenge for me. I certainly didn’t want to satin stitch all the way around each one. Neither did I want to use raw-edged repliqué (stitch around each brick and trim away so the mortar shows through). So I did something completely different – I thread-painted (stitched heavily in mortar colored thread) the mortar in as a wholecloth design on brick colored fabric! 

The challenge fabric we were required to use was a barn board print. I used both sides of the fabric to achieve shading in the window frame (the right side was gray while the reverse was much whiter):

Out the window I did all the man-made objects with repliqué, and the God-made objects with raw-edged repliqué (no satin stitching).

When it came to the ceiling, I didn’t have a dark enough shade of brown, so I painted what I did have:

I was pleased with the finished results. I’m going to hang on to it for a little longer, in hopes of exhibiting it in a few shows, but eventually is will be gifted to my wonderful neighbors.

Hand-made Christmas

December 9, 2018 1 Comment

We were living in Sun Prairie, WI when I first learned to quilt. After a few years of making quilts I decided selling them in craft fairs might be fun. At one of these fairs I met Jeannie. She loved quilts, but had no desire to make them, so we worked out a deal. It turned out – she and her husband made original design Santas and I already had a Santa collection 🙂 . Jeannie’s husband did the carving and she did the painting. We worked out a barter. She ended up with a number of my handmade quilts,

while I was thrilled to acquire 5 of their unique Santas (the tallest is 10″) .

Fast forward to last month when I was teaching in North Dakota. Amy was in my free motion quilting class. She caught on fast and did very well, but she admitted to me her first love was knitting. The next day she stopped by my classroom and handed me a small box with a thank you note attached. Inside was a hand-knit Santa!

Amazing! And now he’s part of the family. They may not be jolly, but I love them all!

What a wonderful gift. Thank you so much Amy!

By the way – Amy has patterns available on-line, and her work in lovely! You can see for yourself at: https://www.knitpicks.com/cfPatterns/IDP/IDP_Pattern_List.cfm?ID=K00509

************************

Also – if you’re looking for a unique, last minute Christmas gift, my daughter-in-law, Betsy, has an Etsy shop where she sells her macramé and animal sketches: https://www.etsy.com/shop/KnotsAndNubs?section_id=24967124

Her macramé is lovely: 

and she has many adorable animal sketches available (each one is 8″ x 10″):

If you’d like a sketch or painting of your own pet or favorite animal, Betsy  would be happy to work with you. You can contact her at: . 

And, for those of you who live in Southeastern Wisconsin, Betsy also has her work available at “There’s No Place Like Home” in Oconomowoc (25 S. Main St.).  She’s very talented (I’d say that even if we weren’t related, LOL)

I think hand-made gifts are the best!

A Delightful New Friendship

September 30, 2018 2 Comments

A memorable meeting took place for me at Expo this year. I hope you’ll enjoy reading about it. The story begins about 2 years ago. My friend Lisa asked me if I was on Lori Kennedy’s blog “The Inbox Jaunt”. I said “no” and she recommended I check it out. I did and I was very impressed.

Lori has a truly amazing blog. She posts daily (and I thought posting weekly was impressive 🙂 ). Her writing is well done and her photography is beautiful. Lori’s specialty is designing quilting motifs that can be broken into simple units so “normal” quilters can do them. I liked her work so much that when I read she was doing a lecture at the 2017 Madison Expo, I signed up right away.

I enjoyed her lecture and found her to be an engaging speaker. When taking lectures and workshops I like to watch for teaching techniques and styles that I can implement to improve my classes. I took many notes in her lecture.

When the talk was over she was mobbed by the crowd and, since I didn’t have any specific questions or comments, I moved on without actually meeting her.

Fast forward to this past Expo. The organizers hold a teacher “meet and greet” on Thursday after the show. It’s a delightful way to catch up with friends and get to know the other teachers. As I walked in I noticed Lori was there. We made eye contact, but she was chatting with a group, so I moved on. A short while later she came up to me and asked “you’re Chris Kirsch aren’t you?” I smiled and she told me that she, her mom, and her sisters, had been in a lecture I presented at a retreat in northwestern Illinois many (20 ?) years ago. She said my lecture had inspired her – WOW! To think that someone who’s work I admire was in some way inspired by me was such a blessing.

We had a lovely conversation and I even got to meet one of her daughters, Faye. The last day of the show I sought her out to ask if I could include her in an upcoming blog post – and to have my picture taken with her.

She said “yes” 😀 !

Lori is the author of a number of books and she writes articles for American Quilter magazine. I’m a fan, and I know you’ll enjoy her blog: http://theinboxjaunt.com/.

We never know whom we might influence in our life. I am so pleased to now know Lori as a friend!

Do you have a story about a teacher or quilter who has encouraged or influenced you in your quilting journey?

Quilted Memories – A Contemporary Twist

June 17, 2018 4 Comments

Shortly after I posted to my blog last week, Cheryl commented that she has a booklet about the Sunday School Picnic quilt.

That led me to do an internet search and I was thrilled to discover the whole story of this amazing quilt. I added the link to my post, but by then over 300 people had already read it, so I thought I’d better share the link again here for those of you who might be interested. It’s a fascinating story and well worth the read. Click here for the link.

**********************

This week I’m going to follow up on the vintage memory quilts by showing my own modern version. The majority of those antique quilts were bed sized and hand quilted. You don’t see many memory quilts like those being made today. But we still want to make quilts to commemorate people, places and events. I love to travel and I’ve often thought about making one quilt about my travels. The problem is I’ve been so many places – praise the Lord – that it seemed to be overwhelming.

Last year while planning for our Sew We Go cruise from Quebec to Boston I had a “light bulb” moment. What if I would choose one photo from each trip that triggered all the wonderful memories of the entire vacation? Then I could make each photograph into a block and …

Modular Memory Quilts was born! I gave a lecture on this “quilt”, and all the techniques I used to make the blocks, for our group while on board the Norwegian Dawn and it went over quite well (to read about the projects on that trip click here).

This block is one of my favorites from the “quilt”.

It’s from Mike’s and my first visit to Hawaii when our son, Brad, was a senior in High School. We invited his best friend along and, while stopping at a waterfall on the Road to Hana, the boys decided to climb to the top and jump!

Others were doing it and it was a real case of “monkey see, monkey do”.

To make the block I used a bunch of techniques: glue-stick raw edge appliqué, stitched cheesecloth, and even thread painting on tulle to create my jumping Brad. What fun – and what a great memory.

As you may know, Wendy and I are taking a group of quilters to Hawaii this January. We still have a few cabins available, but since this trip will fill, Norwegian Cruise Lines is requesting all the “non-spoken-for” cabins be returned to them soon. If you have been thinking about joining us – click here for all the details and instructions for signing up while you still can!


Now back to Modular Memory Quilts  🙂 .


One of my favorite parts of making Modular Memory Quilts is that each block is made, bordered, quilted and bound as a separate unit. There’s no quilting and finishing a big quilt! Then I connect them together with my own unique technique, using hair bands and safety pins (yes – really 🙂 ). This is what makes it completely modular. The blocks can be moved around; additional blocks can be added over time; other’s can be taken away; or, if the “quilt” becomes too large, it can be broken up into two separate quilts.

I was working on this project during the Madison Quilt Expo last September and, while walking through the show, I was delighted to see my friend Wendy Butler Berns had made a quilt in a similar fashion and entered it in the show (click here to visit Wendy’s website).

“Unconditional Love – Always” was made as a triptych of quilts of her children with their pets, using her Picture Image Machine Appliqué technique. She put them together with strips of fabric and buttons, so they can eventually be separated and each child can have their own quilt at some point in the future. What a wonderful idea!

Since making my travel quilt, I’ve thought of many more types of memory quilts that would work well as a Modular Memory Quilt: children’s art, grandma’s embroidered squares or hankies, workshop samples … just think of the possibilities! Here’s one – the project we’ll be making on the Hawaiian cruise is a type of “Paint-stik™ appliqué” I wrote about a few months ago (click here for that post). I made three quilts with this technique and decided to combine them “modularly”.

I’ve since made a few other of these “quilts”. Completing small, individual block quilts is quick and a lot of fun. I’m very excited about the results and I’ll be doing a lecture on these fun souvenir quilts at the Madison Quilt Expo this September. Not only will I talk about the quilts and my connecting technique, but I’ll also demonstrate step-by-step instructions for many of the techniques I used to create the blocks. Perhaps I’ll see you there!

Child’s play – Markers on Fabric

June 3, 2018 8 Comments

Oops! If you linked to this post and were looking for my recent post about aprons, I apologize for the linking error. Please click here to be redirected.

And now for the Markers post: A few years ago my friend Linda and I played around with Sharpie™ Markers, muslin and isopropyl alcohol (to read that post go to: https://chrisquilts.net/?p=6023)

A while later I decided to try it with Sommer. We colored circles:

Then added alcohol with an eye dropper:

Here are our results:

Then we tried again. Sommer drew anything she wanted (these are lighter and brighter, and make me smile):

I decided I liked the way the black bled to purple and made it the focus of my design, allowing some space between the elements:

I was happier with these results:

Have you played with markers like this? Any pictures you’d like to share?

***************************

And one more note on Sommer and crafts – our passion is not always their’s!

A few months after Sommer made her first quilt (you can read that post at:  https://chrisquilts.net/?p=9537 )  I wanted to make her an apron. She was excited and wanted to help. We pulled out a pattern I’d purchased a while ago and she picked a pretty fabric from my stash. I ended up cutting it out with my rotary cutter and she didn’t like the waiting and watching, so she lost interest for that day. The next afternoon, while Trey was napping, she helped me set up the featherweight, we pinned a seam together and she began to sew.

Three seams later she asked if she could go play. When I asked her if she wanted to work on it tomorrow or if I should finish it – she perked up and said I could finish it  😕 . So I did.

She’s happy to wear it and help me cook. Her favorite part is tasting the “gredients”.

Quilting with Difficult Fabrics

May 13, 2018 1 Comment

I’ve put Minky™ fabric on the back of a few quilts to make them extra snuggly – with good results. In fact, on my granddaughter Rainee’s quilt I put it on the back and turned it to the front to make the bound edge; and I reverse Repliquéd it into an “R” on the front of the quilt too (this is a technique in my book “Snuggle and Learn Quilts for Kids)! To read about that quilt go to https://chrisquilts.net/?p=6186 .

turned back to front binding

Recently I was making a quilt for my dear niece Kate. She and her husband are expecting a little girl in June and I couldn’t wait to make her a quilt. The problem was I chose to piece with Minky™ this time. I found the fabrics I wanted to use at Vogue Fabrics near Chicago. Minky™ is an ultra soft, plush type of fleece, and what I found there was similar, but I’m not sure that’s what it’s actually called. The pink check on the right is for the back of the quilt and the white was what I decided to piece into a star – just look at the height of that nap! What was I thinking!!!

I cut squares of a pink cotton and drew a diagonal line on the wrong side. I then placed them right-sides-together with the “furry nightmare fabric” called “fnf” from now on 🙂 , pinning intensely. I sewed on both sides of the line and cut down the middle. The nap made everything squish and squirm. I was really glad I’d oversized the squares. After trimming them down I needed to pieced these half-square triangle units into a star. That meant “fnf” right sides together with “fnf”. It was awful. I’ve sewn on velvet and this was much worse. But I refused to give up.

Done!

Once the star was finished the entire perimeter was the cotton fabric, so I could breathe a little easier and lay out all the other pink squares.

Did I mention the nursery theme is pink with stars? And Kate and Ryan are both hunters, thus the pink camo fabric (thanks Maria!) The rest of the piecing was a breeze.

What I learned is that one should never try to put a really high nap fabric right-sides-together with anything else and expect to have great results. I decided I could still use the pink checked Minky™ for the back because it wasn’t sewn right-sides-together with anything, and it worked well. To quilt the “fnf” star, I cut a heart from freezer paper, ironed it in place on the back of the quilt,

and quilted around it from the back.

It all came together and I was happy with the results. Especially when I saw the smile on Kate’s and Nonna Deb’s faces.

Can’t wait to meet this little sweetie in June. Love you guys!

  • « Go to Previous Page
  • Page 1
  • Interim pages omitted …
  • Page 32
  • Page 33
  • Page 34
  • Page 35
  • Page 36
  • Interim pages omitted …
  • Page 41
  • Go to Next Page »

Primary Sidebar

Archives

Recent Posts

  • London ~ and More
  • Designed For a Purpose
  • Squirrel Quilts and More
  • Vintage Appliquéd Arrows and More
  • Fascinating Tidbits

Recent Comments

  • Karen Ann Moore on London ~ and More
  • Cheryl McLean on London ~ and More
  • Sue Halpern on London ~ and More
  • judy raddatz on London ~ and More
  • Joanne Corrigan on London ~ and More

Categories

Footer

My Guide

Whatever you do, do your work heartily, as for the Lord rather than for men.

—  Colossians 3:23

Contact Chris!

  • Home
  • About
  • Gallery
  • Classes
  • Trips
  • Books
  • Blog
  • Contact
  • Sign Up For My Blog

Copyright © 2026 · Chris Quilts · Website by Adunate · Privacy Policy