• Skip to main content
  • Skip to primary sidebar
  • Skip to footer

  • Home
  • About
  • Gallery
  • Classes
  • Trips
  • Books
  • Blog
  • Contact
  • Sign Up For My Blog

Blog

A Future Quilter

February 24, 2013 10 Comments

My granddaughter, Sommer, is almost a year old and growing fast. She is a joy and a very easy baby to care for, which is a blessing since Mike and I still watch her 5 days a week! About a month ago she was playing with toys in the middle of the studio and I was choosing fabrics for a quilt. When I had settled on just the right ones I left them in a pile near my stash and went to answer the phone. Sommer was just starting to do a bit of crawling at this time and when I turned around she had crawled over to the fabrics and was reverently petting them one by one as if to say “great choices grandma”!

Well, she caught onto the crawling thing quite quickly and a few days later I just happened to have the camera nearby when she decided to do some exploring. She’s really into “open” and “close”. I hope you’ll indulge me:

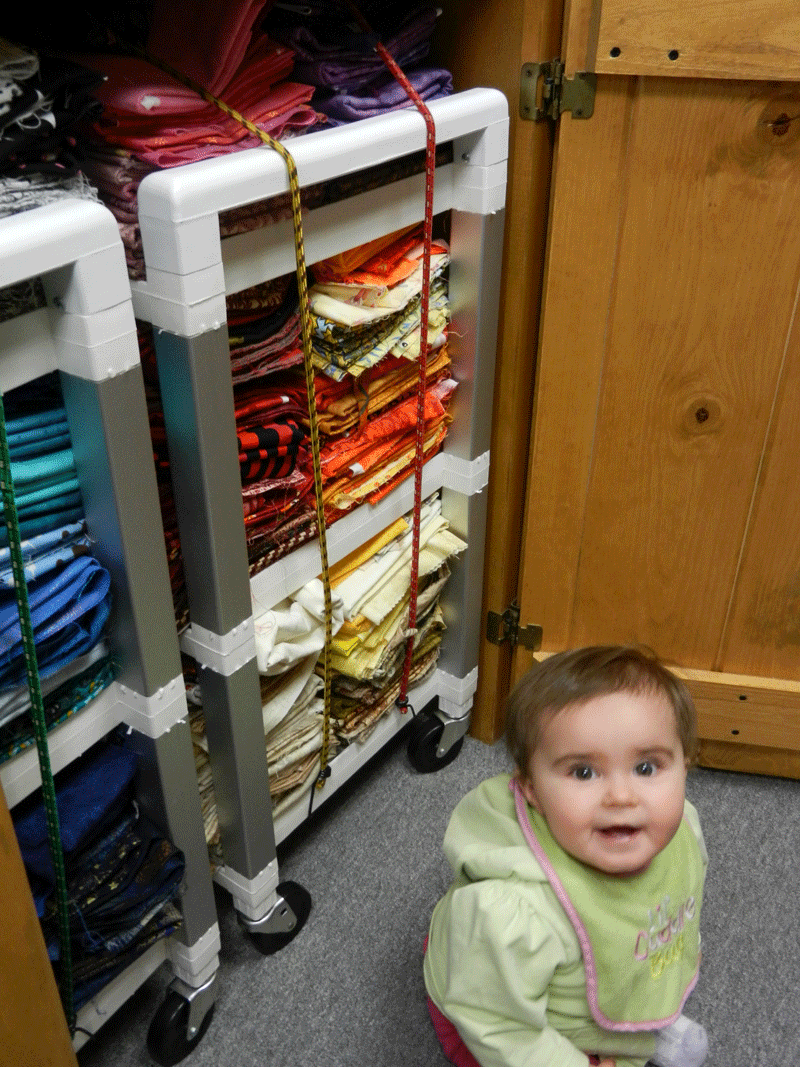
“Sommer, whatcha doin?”

Future Quilter

“Grandma, I think there’s fabric in there!”

Future Quilter

“Oooooh pretty!”

Future Quilter“Just look at it all”!

Future Quilter
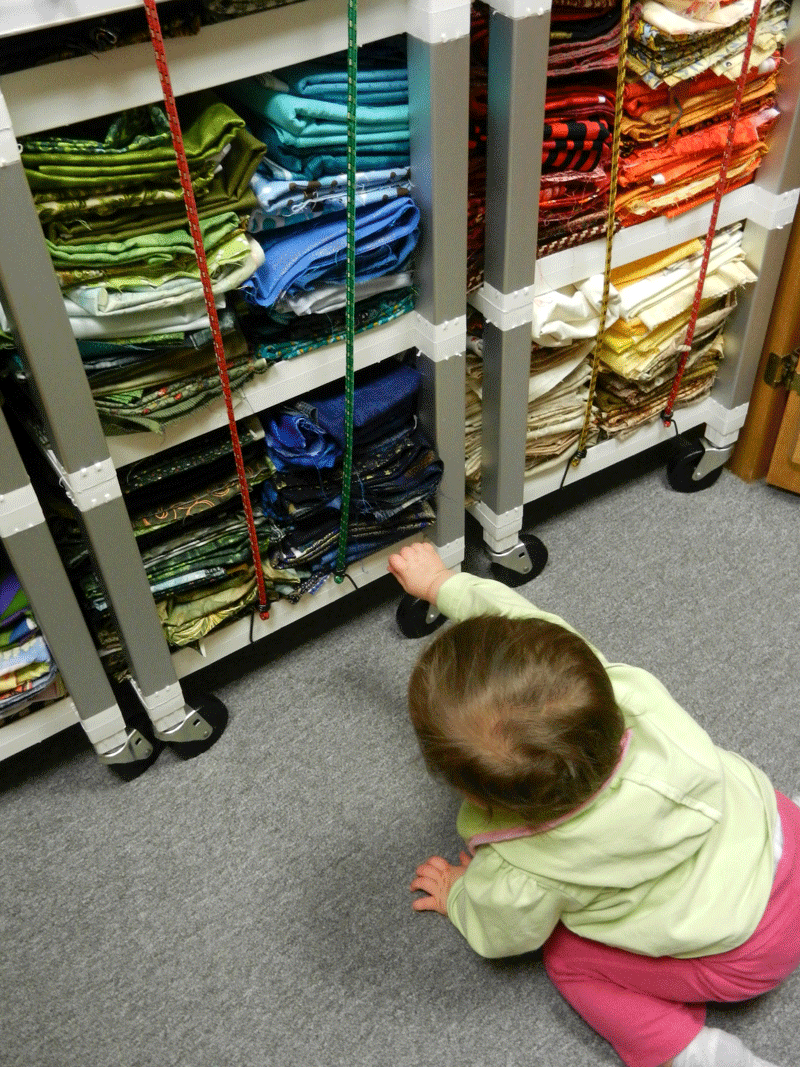
“Gotta touch it …………….. and there’s more over there!”

Future Quilter
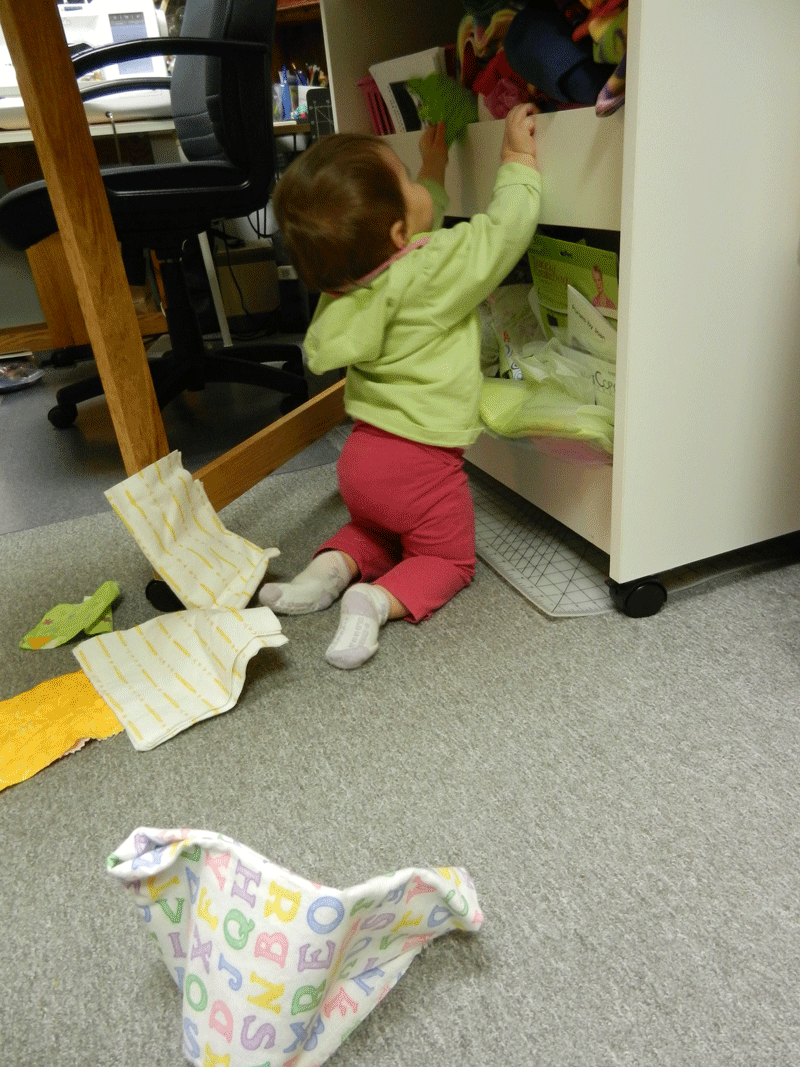
“Flannel and fleece!”

Future Quilter
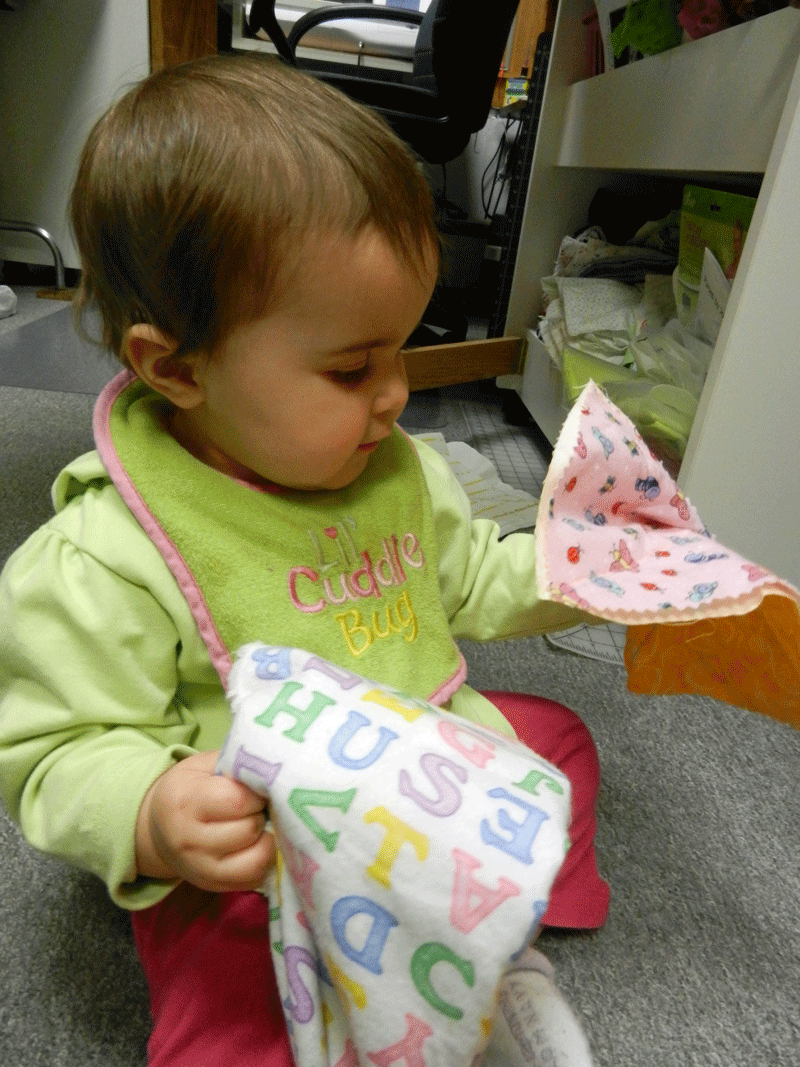
“It’s so soft. Wanna feel it Grandma?”

Future QuilterAnd I did, so the photo shoot was over. Do you have any pictures of your kids or grandkids enjoying fabric that you’d like to share? Please email them to me at . I’d love to see them and it might be fun to share them on a future blog.


Quilter Jim

January 19, 2013 5 Comments

This past September I taught my Mariner’s Compass technique at the Madison Quilt Expo. I had full classes all 3 days and I enjoyed the show immensely. Two months later I received an email from one of the 2 men who had taken my class at the show. Jim had completed the compass from the kit in class, but he had had some trouble with the outer edge:

Jims compass 1I was able to give him an alternative method for appliquéing the compass to a background fabric. Some time went by and then I received another email from Jim with a picture of his compass on the background and with a border. I was so pleased. He asked me about additional borders and suggestions for having it long arm quilted because he had never quilted anything before. At this point I encouraged him to quilt it himself (many of you will not be surprised by this :-)). We exchanged a few more emails and then I didn’t hear anything for a while.

This past week Jim sent me this photograph:

Jims mc 2Don’t you just love his smile ……. and the quilt?!? Here’s what he wrote:

“Hi Chris, I have just completed my Mariner Compass Quilt and have it hanging in my Florida Living Room. I wanted to share the image with you as I feel proud of the final quilt. You were quite right I was able to do the quilting myself and the use of the tape was very helpful.”

I was tickled and wrote right back to ask for permission to share his story and his quilt on my blog. His response:

“I would be proud to have you post my story and pictures on your blog. Maybe they will help others like myself to take the leap like I did. I really appreciate the time you took to explain how to do the tape method – it worked beautifully.”

This is what makes teaching so much fun. In case you’re curious about the tape method, it’s a simple way to mark the lines to be quilted by placing the edge of a length of masking tape along the line to be quilted, stitching along the tape and then removing the tape to be used again on the next line.

I’d like to share just one more quote:

“I made a great deal of use of your book “Compass Capers”. The book allowed me to complete the compass as your directions were quite clear and concise.”

Thanks, Jim, for letting me share your story, quilt and picture.  You are certainly an encouragement to me!

PS Thanks for all the kind words and prayers concerning the loss of my Mother-in-law. I’m writing this blog from a motel in Mason City, IA. Mom was from here and the family has brought her back for the funeral on Monday. She was a dear lady and will be missed.

PPS I can’t resist posting just one photo from my trip to Washington. Here’s Grandma with Hanna, Willy and Rainee Lynn:

Gma-and-grandkids


Have You Ever Made a Double Wedding Ring Quilt?

December 31, 2012 6 Comments

The past few days I’ve been getting back into some creative stitching by starting on a “small challenge” quilt through the Milwaukee Art Quilters. The challenge is called Objet D’arc and each participant was given a vintage double wedding ring (DWR) arc from a rummage sale find and asked to do something with it.

Double Wedding Ring arcs

I’m not ready to unveil the plan for my quilt yet, but part of it involves making a traditional DWR block with modern fabrics. The problem is I don’t enjoy curved piecing. I have a garment background and am capable of doing it, but it’s just not my favorite technique. I do however enjoy coming up with ways to avoid curved piecing! First I needed a pattern, so I did an image search, cropped a block out of a quilt photo, printed 4 copies, and outlined the arcs with a black marker.

I then cut out the curved strips and paper pieced them from my fishbowl of bright scraps!

At this point I decided to appliqué the curved edges, so I wet the seam allowances with liquid starch and a q-tip and pressed over the edge of the paper (be careful not to get the paper wet).

The next step involves clear thread. Be sure to use a good quality polyester invisible thread (not nylon – I prefer Superior or Sulky). At this point I’d like to insert a few tips on machine stitching with this thread.

1. If your machine warns you when the bobbin in nearing empty, it may not read low levels of the clear thread and thus stop you from sewing long before you reach empty. To avoid this, wind a bit of a cotton thread on the bobbin first and then wind the clear thread over the cotton thread.

bobbin filling

2. This is a very thin, strong thread and it winds very tightly on the bobbin. I’ve seen bobbins actually break from the pressure, so it’s a good idea to only fill them 1/2 to 3/4’s full.

working with invisible thread

Now back to appliqué. I pinned the arcs in place on the background fabric and stitched them down with the invisible thread and a very narrow zig zag (set stitch width and length at 1).

machine mock hand applique

This looks best when the needle pierces the appliqué piece as it swings left (in the picture above) and goes into the background only when it swings right, thus capturing the folded edge. I appliquéd all of the arcs in place this way and here’s the block:

double wedding ring

Then the paper needed to be removed by cutting away the background fabric:

It worked quite well. I don’t think I’ll ever do a bedsized DWR quilt this way, but it was fun in one block.

Have you ever made a DWR quilt the traditional way? I’d love to know how many of you enjoy curved piecing. Please comment and let me know.

What a Wonderful Time of the Year!

December 23, 2012 10 Comments

A white Christmas has certainly arrived here, with over 10″ of fresh, beautiful snow!

Add today’s sunshine and it is breathtaking!

What a blessing! I’ve been counting my blessings a lot lately and this is certainly a season for doing just that. While putting up my Holy Family quilt I realized I wanted to share some Christmas thoughts with you.

Christmas is a time for many things: cherishing our families, exchanging gifts, doing things for others, eating, singing and so much more. For most of my life these were what defined Christmas. But 15 years ago my family went through some very difficult times. During those years Christmas was hard. I wanted to have the perfect “photo greeting card family” and I didn’t and I was so sad. That was when the Lord saved me. He made me realize that this is an imperfect world and that’s why he had to be born as a man. So that he could live a perfect life, pay the price for sin and return to heaven to prepare a place for all who accept His greatest gift – Salvation!

Ever since that time Christmas has new meaning for me. It’s about celebrating the birth of my Savior. He was a servant – which gives the concept of doing things for others so much more meaning. He is the best gift, so even when life isn’t picture perfect, we have the peace and joy that comes from knowing Him.

From my home to yours – I wish you a very Merry Christmas!

“For God so loved the world that He gave His only begotten Son, that whosoever believeth in Him shall not perish, but have everlasting life” John 3:16

Feel Good Quilting

November 25, 2012 5 Comments

It’s Tuesday and I’m adding a short extra bit of information before you read about Feel Good Quilting. I have the great honor to be this month’s Featured Quilter on the National Quilting Association website. The NQA is a wonderful quilting organization. They put on a great quilt show each year and do much charitable and educational work in the quilt world. Please go to: http://nqaquilts.org/ to read all about it, then return here for the rest of the post :-)!

So now for “Feel Good Quilting”

Last summer I was very excited about purchasing my new HQ Sweet Sixteen mid-arm machine. I’ve since found that watching an infant 5 days a week really decreases time for quilting. This weekend I decided I just needed to make time …. and I did! Prior to our trip to Italy Wendy and I held a class for making a “Tuscan Sun” block and everyone was given instructions for autograph blocks to be exchanged on the trip. Well, I bordered my sun with the blocks, pinned the layers together and was ready to go. I really was in the mood for free motion fun, so I looked at the top and asked myself “what do I feel like stitching today?”

My first urge was to stitch some feathers, which I chose to place in the rays of the sun.

Then I was in the mood to “bubble” the sun’s interior.

So now how to quilt the background behind the sun? Add more rays! I took a ruler and a sliver of soap (my favorite marking tool) and I drew lines on the background that radiated from the center of the sun and then I used those lines as a guide to keep the rays shining. It was even more of a good time than I imagined it would be and because I was enjoying the process it was done almost too soon.

For the first border I decided to play with a design I hadn’t tried before. Laura Wasilowski refers to it as ME ME quilting (because it sort of looks like M’s and E’s) and it was a blast! Once again I marked some boundaries with the soap and I was off and running.

The MEME’s went through the center of the inside border, so what to do around it? I decided straight lines in yellow would work (remember I don’t need a good reason, it’s all about what feels like fun at the moment :-)). Now my Babylok with a  walking foot does a much better job of straight lines then I do in free motion, so I changed the feet and jumped in using my “3 pin technique” to prevent puckers. I’ve covered this in a past post. Click here to read about it.

All that’s left now is the outer border. How would you quilt it?

I’m not sure what I’ll do and the Packer game is about to begin, so this post will remain a cliff hanger until next week. Go Pack Go!!!


Michelangelo had UFOs

November 18, 2012 6 Comments

While in Florence we went to the Academy of Arts to see Michelangelo’s David. As we walked through the gallery leading up to this amazing work, we were treated to 4 of Michelangelo’s sculptures that were never completed. They are large blocks of marble with portions of the intended subjects carved into them and they have been titled the Prisoners because the figures look like they are still trapped in the marble. Photographs were not allowed, but I found this one of the Apostle Matthew on line and wanted you to see what one of the Prisoners looked like:

Our guide was very passionate about her subject and shared that for a long time the art community wondered why Michelangelo never completed these sculptures, even though they were begun early in his life. From this I had a revelation – Michelangelo had UFO’s! Our guide then went on to explain that over the years it has been postulated that he left them in this state intentionally because it is up to the imagination of the viewer to release them from their prisons. So…………we may need to change the way we look at our UFO’s. Are they nagging, unfinished projects that we should feel guilty about? Or are they works that are complete within and we are purposely leaving them in this state so that future viewers have the opportunity to envision them finished in a way that releases the quilts from their fabric prisons?

I do believe I prefer to think of my UFO’s as Ultimately Fabulous Opportunities and not Prisoners, but there’s a good chance some of them may remain prisoners forever.

Don’t you feel better knowing you have something in common with Michelangelo? Do you have Ultimately Fabulous Opportunities or Prisoners?

Quilts and Inspiration in Italy

November 11, 2012 1 Comment

As our group of quilters descended upon Italy we were anxious to partake in all that this beautiful country had to offer…….and we were hoping to discover a quilt shop or two along the way. Well, quilt shops in Rome, Florence and Sienna are not a common sight. We did find some wool to please the knitters among us and there was a fabric store in Florence that catered to garment designers with prices that were astounding (the first bolt I pulled out was 240 Euro/meter!!!)

Towards the end of the trip we spotted a quilt in the small, mid-evil village of Cortona.

But, upon closer examination, I’m pretty sure it was a pre-printed panel. Still it did look picturesque hanging in the narrow street.

So, what was there to tickle the fancy of quilters? Plenty! You may have already heard (or experienced first hand) the beautiful quilt designs on the floors of the cathedrals in Italy. In this we were not disappointed and here are just a few of my favorites:

If that was a bit too intricate how about this:

And just one more:

The landscapes and art work were all very inspirational, as was the architecture. While staring in awe at the dome of the Pantheon Wendy remarked that it reminded her of log cabin blocks.

This dome was built about 2000 years ago and is still standing! The oculus in the center is open and when it rains the rain comes in. It was one of my favorite sites.

While winding our way back to the bus after our visit to Cortona one of the group pointed out this empty storefront and commented that there was an obvious lack of quilters and supplies in central Italy and perhaps I should open up a shop and teach beginner classes.

I’ll have to talk it over with Mike :-)!

Have any of you made a quilt inspired by the cathedral floors in Europe? The art or scenery?? I’d really enjoy hearing about it and would love to have you email me a picture:

Adventures in Quilting

November 4, 2012 1 Comment

Our “Sew We Go” trip to Italy ended up being even more of an adventure than some of us had anticipated! Wendy and I departed with 21 quilters (and friends) for Rome on October 19th. We began our journey with wonderful weather and a delightful guide named Rudi. We toured and ate our way through central Italy and had a wonderful time. All too soon Wendy and 14 of the group had to head back home. I stayed on with 6 of our travelers for what was meant to be an extra 2 days in Rome, but hurricane Sandy had other ideas. Instead of flying home Monday, our flight was cancelled and we weren’t able to return until Friday night. We were forced to endure an additional 4 days in Italy :-).

I had intended to share insights and inspiration from the trip in this week’s blog, but I’m only half unpacked and haven’t yet begun to go through my pictures. This is probably just as well because there is another topic I’m anxious to share this week.

In a previous post I mentioned that I had been invited to be the Featured Quilter at the Slinger Quilt Show put on by the Ties That Bind quilt guild this past Saturday. Well, when I realized I wouldn’t be home until late Friday I had a problem – all 25 of the quilts I had promised to display at the show were in various and sundry locations throughout my home. So I sent my husband an email from our hotel in Rome asking if he would be willing to collect them up and deliver them on Friday. He had already been babysitting our granddaughter full time while I was away and yet he kindly agreed. All I had to do was show up on Saturday.

The guild did a wonderful job of hanging my quilts and my dear friend, Rita Rehlinger, was kind of enough to send me these pictures.

It was very exciting to have so much of my work exhibited in one place and a joy to be able to share some of my quilt’s stories. Praise the Lord!

There were many great vendors and so many wonderful quilts in the show. What an honor to be a part of it all!

I was able to talk with so many people and I enjoyed meeting each one. Thanks to everyone at Ties That Bind!

  • « Go to Previous Page
  • Page 1
  • Interim pages omitted …
  • Page 65
  • Page 66
  • Page 67
  • Page 68
  • Page 69
  • Interim pages omitted …
  • Page 78
  • Go to Next Page »

Primary Sidebar

Archives

Recent Posts

  • Spring Thaw
  • Quilting in Bloomington ~ Part 2
  • The Indiana Heritage Quilt Show ~ 2026
  • Bird’s Eye View
  • The Birds

Recent Comments

  • clkquilt on Spring Thaw
  • Mary Alice Hart on Spring Thaw
  • clkquilt on Spring Thaw
  • judy raddatz on Spring Thaw
  • Lois on Spring Thaw

Categories

Footer

My Guide

Whatever you do, do your work heartily, as for the Lord rather than for men.

—  Colossians 3:23

Contact Chris!

  • Home
  • About
  • Gallery
  • Classes
  • Trips
  • Books
  • Blog
  • Contact
  • Sign Up For My Blog

Copyright © 2026 · Chris Quilts · Website by Adunate · Privacy Policy