• Skip to main content
  • Skip to primary sidebar
  • Skip to footer

  • Home
  • About
  • Gallery
  • Classes
  • Trips
  • Books
  • Blog
  • Contact
  • Sign Up For My Blog

Blog

A Non-virtual Class

April 18, 2021 4 Comments

Last weekend was an exciting, busy time for me. Friday and Saturday were spent at a Christian Women’s retreat in Green Lake, WI. It wasn’t virtual! We actually got together and had a fantastic time of worship and fellowship. I arrived home Saturday evening spiritually refreshed… and exhausted. I fell into bed early so that I could get up Sunday morning and drive to the Wisconsin Museum of Quilts and Fiber Arts to teach my first “in person” class in a year and a half!!! What a blessing!

In 2019 I was asked to donate a class to be auctioned off at the museum’s fundraiser. Lisa purchased my private workshop and invited 3 of her friends (actually her mom, daughter and a friend) to join her for my Seminole Sampler class. Everything was of course postponed last year, but the museum is beginning to schedule classes and we were the first on the list! What a joy!

The quilt museum has a bright and organized space for classes, and the exhibit space is filled with fascinating works of fiber. It’s open with all the appropriate precautions in place. Cedarburg has many lovely shops and eateries also, and I highly recommend a road trip!

The ladies each completed many wonderful Seminole strips and they now have a “tool box” full of border patterns for future quilts.

Thanks to Lisa, Joy, Tiffany and Cary for a delightful day. And a big thank you to Marilynn too – for being there for the museum and to take care of our needs all day.

*****************

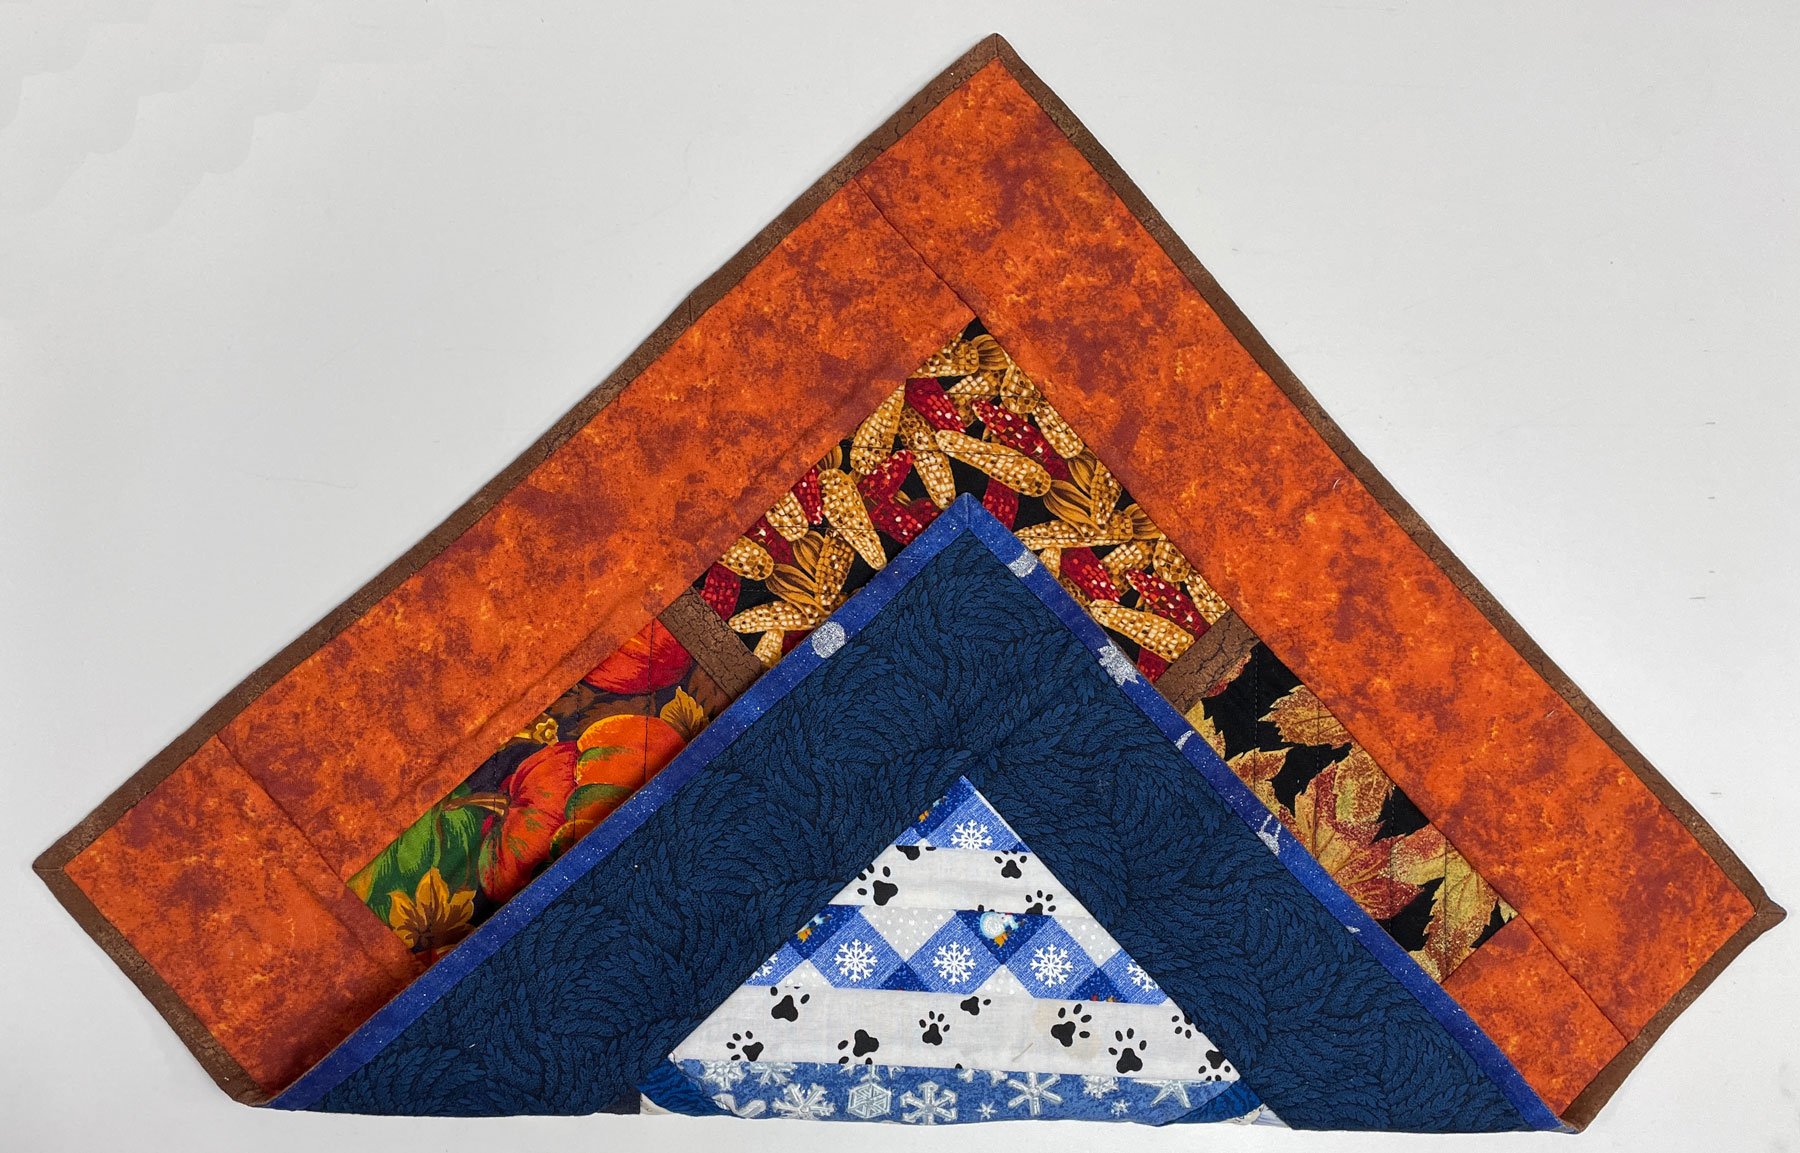
In this week’s post I’d also like to share a follow up to the “Labels in the Binding” post from a few weeks ago. Camille finished her sister Ruth’s quilt and sent me these photos:

Quilt front – quilted and bound
Quilt #2 on the back

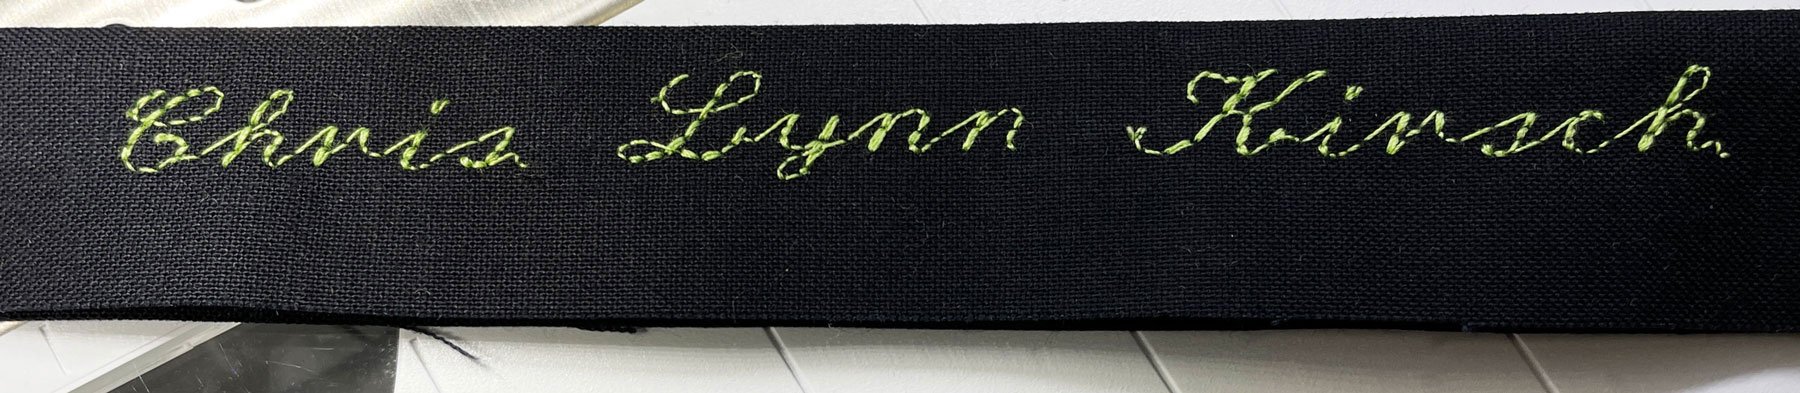
and here’s the label!

This is a portion of Camille’s email to me that accompanied these photos:

“Hi Chris, Thank you for mentioning my sister Ruth’s quilt and words on the binding project on your recent blog! She was surprised and pleased to see your article… I will definitely do words on the binding again. This was truly a learning experience. I always enjoy your blog topics. Camille”

Thanks Camille, I’m so glad we were able to see the finished quilt. I’m sure Ruth LOVED it!

Two Sided Binding

April 11, 2021 7 Comments

I came up with this method years ago when I made a small reversible table topper. There was no binding color that would look good on both sides since they represented two different seasons.

So I played around a bit and discovered a way that’s really quite easy to do! I find it works best done as a single binding.

Determine the width of the finished binding, multiply by 2 and add ¼” (ie. a ½” finished binding would be ½” x 2 = 1”; and 1” + ¼” = 1 ¼”). Choose a fabric to match each side of the quilt and cut enough strips from each (selvedge to selvedge) the above measurement in width, to go around the outer edge of the quilt. Sew all of the matching strips end to end to make a length of binding for both the front and back fabric.

Stitch these 2 long strips to each other with a 1/4″ seam allowance and press it open.

Now fold the binding in half and press again. By pressing the seam twice a sharp fold will result.

Lay the appropriate binding strip, right-sides-together and raw edges even, with one side of the quilt. Stitch in place (leaving a tail for a no-end finish). Use your binding width measurement as the seam allowance (mine was 1/2″). The distance from the edge of the quilt to the line of stitching should be equal to the distance between the two seams (note arrows below).

At the corner stop stitching at a spot a seam allowance away from the next edge of the quilt (for a tutorial on this click here). Fold the strip up at a 45 degree angle and then back down against the next edge, and continue to stitch in place.

Attach the binding all the way around.

There is nothing tricky about turning this binding to the back. Simply bring the binding around to the back (it will naturally cup at the corners),

and place the raw edge of the binding even with the raw edge of the quilt.

Fold it over flat against the quilt (the seam should lay at the outer edge of the quilt). This will create an angled corner (similar to wrapping a gift):

Carefully fold the adjacent binding over the edge of the quilt and pin/clip in place:

I like to hand-stitch the binding in place to finish – and it looks great front and back!

I hope you’ll add this technique to your “bag of tricks”. Over the years I’ve posted many tutorials on different techniques. If you ever want to find one from the past, simply type the topic into the search box on this site. If you have trouble locating what you’re looking for – please don’t hesitate to send me an email 😊. Enjoy!

********************

This week’s bonus! Jodi sent me this email:

“I had taken your class at Expo a couple years ago, and have been waiting to use it. Did a simple layer cake quilt for a friend because we both love this fabric. Decided to try the Seminole on it. Took me 2 days of piecing, but I’m LOVING it! Thank you for the inspiration!”

By cutting every other strip narrower, the size of the chain of squares down the center alternates and is more interesting. Great job Jodi – please send a photo of the completed quilt!

Labels in the Binding

April 4, 2021 4 Comments

I am a firm believer in the value of putting labels on our quilts. They may not be around forever, but then again they might, and with a label the story of the quilt lives on with it. Writing your name and the date on the back is an easy option. The other end of the scale is to hand-write the entire story of the quilt on a seperate piece of fabric and stitch it on.

But there are many other options somewhere in between. I often print my labels using the computer as I did for this Replique quilt I made for my first book:

When creating labels on the computer photos can be added:

A label can also be embellished in many ways, such as the one for this scarecrow runner I made with my granddaughter’s help:

She helped with the label too!

I wrote a post a few years back on a trick for attaching a label.

Click here for that link

Then there was the post where I simply tucked a folded corner label into the binding.

To link to that post click here! 

Recently Camille contacted me with a quilt question – and then shared a great technique! I’m sure many of you will find this interesting.

“Hi Chris, I am making a quilt for my sister. She insisted that she wanted 2 quilts, but not separate entities. She wanted one quilt design on the front and another on the back. On one side, she chose a double Irish Chain pattern using spring/summer fabrics. On the other side, there is a more modern design using winter/snow fabrics. Her idea has me flummoxed about a label. A traditional label would spoil the effect of either side. Images are included below.

Many years ago (when I could not imagine I would ever consider the technique) I saw an article about label information being machine embroidered along the length of the binding fabric. The embroidery was done with a thread that matched the fabric closely to produce a discreet but effective label. This would work perfectly to document this quilt without interfering with either of the quilt designs.

I thought you might have written about this but a search did not reveal what I am thinking about. I have not found it with web searches either. Have you run across this idea?”

Before I could respond Camille sent me this:

“Yippee! I found a binding technique similar to what I was looking for!
https://weallsew.com/quilt-binding-words/“

These instructions are on a blog from Bernina and they look very well done. I tried a sample for myself and had a great time learning how to use the alphabets on my new machine.

Now to make a quilt that I can use this technique on. Thanks so much Camille!

Have you created a label in a binding? What was your technique?

Camille’s two sided quilt gave me an idea for another post. Next week – Two Sided Binding for a two sided quilt!

*****************************

Wishing each of you a blessed Resurrection Sunday!

Risen by Chris Lynn Kirsch, 2014

From Flop to Functional

March 28, 2021 12 Comments

I’m sure you’re aware that not every project I attempt turns out well, but who would write a blog post about it? Well, as the last huge snow pile melts away at the end of our driveway

I made the decision to share one last winter story. You may ask “why would I want to share the story of a project gone wrong?” Perhaps for the lessons learned, how I turned it around, or simply because it’s nice to know we all have flops 😄. So here goes.

Over the years I have become passionate about bamboo socks, especially those hand-dyed by Wendy Richardson. I would purchase a few pairs every time I visited her booth at a quilt show.

Since I’m allergic to wool, these very warm/soft alternatives have gotten me through many winters. I love them so much that many pairs are wearing out in both the heel and ball of the foot. Because of the pandemic there are no shows to buy more (Wendy doesn’t sell them on her website).

So, during the midst of our very snowy winter I decided to dye socks. I’ve taken some classes and I love the effect of dyeing. My favorite was a class on ice dyeing Laura and I took with Cindy Lohbeck in Paducah a few years ago (click here to read that post).

Those results were great, but I usually don’t fare as well on my own and I’ve been known to say that I’d rather support those who are good at dyeing than to dye it myself. I should have stuck with that statement. But…

I found prepared for dyeing bamboo socks online and decided it was worth a try. I tend to wear blue and black jeans most often, so I decided to use those colors and make it simple. Since I didn’t plan on doing a lot of dyeing, I took the easy way out and bought Rit dye, etc. at my local JoAnns (all of you hand-dyers out there have my permission to stop reading at this point). I mixed it up and put it into squirty type bottles I found around the house.

I then set up the bin according to Cindy’s directions, soaked the socks and manipulated them for fun effects across the mesh. I even diagramed the different manipulations for future reference.

It was then time to brave the cold and I invited Frosty to help. I have found I prefer the results of dyeing with ice, but the snow was so plentiful I couldn’t resist it.

I sprinkled on a good covering of snow, squirted on the dye, and put the bin in the shed to do it’s magic. When I checked an hour later the temperature in the barn wasn’t warm enough to melt the snow or let the dye through. I was still hopeful things would work and brought it in the house for some melting time.

I was extremely disappointed when I scooped off the last of the snow a few hours later only to discover the socks were HIDEOUSLY UGLY! Barely any denim or black had reached the socks, but there were awful purply “veins” here and there over a pale gray dinginess. I couldn’t even force myself to take a photo – because I knew this would never make my blog 🤣.

Instead I went back to the store, got some more dye and overdyed them in denim blue and black. I love them!

Looking back I can see where I erred. The snow layer was too thick. The whole thing needed to be placed somewhere warm right away so the dye could melt through quickly. The snow/dye should have been removed sooner because everything got very diluted. And I’m sure there are many more. I’m really hopeful the quilt shows will return, Wendy will have socks for sale once again, and I can support a very talented artist while getting the beautiful socks I love. Until then – solid is good enough. I’m grateful for a happy ending!

I think it’s always nice to know that other people have flops too. Any of you have a story to share???

And one last thought. The photograph at the top of this post is of the cuffs of all the socks I’ve worn out. They were so pretty I just couldn’t throw them away, so I cut them off and piled them on the counter hoping inspiration would strike. I’m coming up with bupkis so far. Any thoughts???

A Quilted Theater?

March 21, 2021 6 Comments

A friend told me about an Artisan’s Market in Watertown that sells items made in Wisconsin. Mike and I decided to stop by and enjoyed the locally made woolen goods, wooden items, pottery and specialty foods (they even have fresh duck eggs!). The Artisan Market is at 111 N. 4th St. Click here for their website. I highly recommend visiting our town. Watertown boasts many delightful shops in it’s downtown, including our favorite bakery: Sweet Talkin Treats. Our favorite coffee/lunch spot is the Connection Cafe located on Hwy 19 on the west side of Watertown.

So what does this have to do with a quilted theater? Well, I couldn’t resist buying two hand-knit finger puppets, a tiger and a lizard, while at the market. I didn’t know why, but I knew I had to have them – plus they were priced at $3 each! When we got home I remembered the sweet little girl finger puppet I purchased while in Estonia. After a bit of searching, I found her and an idea struck! Sommer’s 9th birthday was coming soon and she loves to write stories. Wouldn’t a Finger Puppet Theater be “just the ticket” for her birthday? So I gathered some fun fabrics and a few sheets of plastic mesh canvas – and I was off creating!

I cut an opening in a sheet of mesh, used glue stick to cover it with batting,

and then made the cover by placing 2 rectangles of fabric, right sides together, and sewing the “opening” into the fabric rectangles, trimming it so I could turn it right side out.

I then positioned the polka dot cover on the mesh/batt theater front and fused a dark binding around the edges. To make it stand up I determined I needed to make sides for the theater while contemplating how and where to put the words “Sommer’s Finger Puppet Theater” on the project. In my stash I had a piece of chalkboard fabric leftover from a project in my second book Snuggle and Learn Quilts for Kids entitled “Rolled Up Fun”.

It’s a take-a-long toy that doesn’t require batteries 😊. I knew the chalkboard fabric would be perfect and attached it to the side fabric pieces with rick-rack. I then cut the remaining plastic mesh in half, glue sticked batting over it, and covered the sides.

In order for the theater to be folded flat for storage, I tied the sections together with pretty silk ribbon bows. And the finishing touch was to paint the words in white on the chalkboard, leaving an area open under “Now Playing” for Sommer to write in the title of her current production in chalk.

Some hearts and lacy trim were the finishing touches:

It all came together so well and, as you may have noticed, I decided the cast of characters needed to be increased. It was a great excuse to visit the Artisan’s Market one more time!

I added a fabric covered book for Sommer to compose her skits in, authored a first skit, and made a carrying tote for it all. And she loved it!

The puppets were a hit with Trey too!

Even the matching tote bag made her smile.

What a wonderful afternoon. It was a fun celebration and we felt so blessed to spend it with the kids and my parents!

Well Behaved Beads Revisited

March 14, 2021 5 Comments

Before I get to my “topic of the week”, I’m sure there are a few of you who’d like to know what name we chose for our puppy 😁. Thanks for all of your great suggestions last week. Mike and I really liked the name Noah, but he’s already hearing the command “no” a lot lately and we were concerned it might be confusing to have a name so similar to a word he won’t want to hear. We went back and forth for 2 days trying to find a name we agreed on. Since Mike is a big doggie person, and the two of them will be best buds, I gave in and agreed to the name he liked best since before we met the little guy. So, meet Koda (it means friend or bear):

He’s sweet, funny, and oh so busy; but I still think we should have named him Puddles! He turned 8 weeks old today and, in the 3 days since we took this photo, his floppy ear is sticking up just like the other one. He’s growing fast.

And now … on with the post!

I’ve been creating fiber art for many years and I often add beads to my projects.

I know many of you have taken my classes on this topic, so what I share today may sound familiar – but an email from my friend Nancy caused me to think it was worth repeating:

“Hi Chris,  I have been looking through a lot of my magazines and there is one that I really liked a lot.  It is the American Quilter Magazine. To be specific the April 23, 2007 issue.  The article is titled “Well Behaved Beads”.  I did one medium sized beaded wall hanging.  And I really liked adding the beads.  I thought to myself I would like to do that again.  I started reading the article and had another thought, Who wrote this really neat piece about beading? I checked back to page 82 and there and behold the author is CHRIS LYNN KIRSCH!  WOW!!! I like your idea.  I really need something to keep my beads in place, with no train, boat, car, or no great-grandchildren around.   So thank you for writing the article.   Now I have a bigger motive to start a beaded quilt. Take care!  Nancy” 

Trying to pick up tiny beads that are sitting on a table, with a tiny needle, which is tethered by a thread to your work, can be aggravating. Years ago I came up with a way to make those beads behave and have them a lot closer to my work surface. These techniques are included in my book “Where Do I Start With Fiber Art” along with other beading tricks and information (click here to purchase a copy of that book).

The magic tool is clear mailing tape! And it’s really quite simple:

When the Lord dropped this idea into my brain, I was working on a project that was using a mixture of beads. I decided to sprinkle the beads on my quilt, near the area I wanted to bead, and placed a 2″ length of mailing tape over the loose beads. This held them to the quilt so they couldn’t run away. Once my needle was threaded and I was ready to begin, I rolled the tape back onto itself so a few beads came to the top.

I was then able to touch the tip of the needle to the hole in a bead and – it hopped right on! I stitched it to the quilt and continued unrolling and beading until I was done, or I had to stop.

If I stopped before I was finished beading that area, I simply rolled the tape back down against the quilt to capture the loose beads and went about my business until it was time to bead again.

Hint: If it’s going to be more than a couple of hours before you get back to the beading, I recommend rubbing the beads off the tape and into a container as they will get sticky if left on the tape too long (ask me how I know 😊).

After beading in this fashion for a while, a new idea hit! I could use the tape to keep the beads behaving and precisely where they’re needed by wrapping the tape around my finger:

1.  Wrap a piece of mailing tape, sticky side out, around the forefinger of your non-dominant hand (i.e. left, if you’re right handed).

2.  Pour the beads onto a flat surface and dip your taped finger into them.

3.  Knot your thread and bring it up through the quilt where the bead needs to go, touch the tip of the needle to the hole in a bead and it will hop onto the needle. Attach that bead to the quilt and repeat.

Voila! Beading can be done in the doctor’s office, at kid’s sporting events and even in a moving vehicle. One of the best advantages of this technique is that the beads are close to the work area and so, as the thread gets shorter, the beads are easy to reach.

I hope you’ll give it a try! Please send comments or photos if you do.

Thanks for the reminder Nancy!

Museums and Quilts and Puppies, Oh My!

March 7, 2021 26 Comments

It’s been a while since Mike and I have done any traveling, but this past week we put an end to that. Mike traveled all over the world as a corporate pilot and, since he retired, he doesn’t want to go anywhere… unless he has a good enough reason.

Well, we lost our dog Annabelle in 2019.

She was a Belgian Sheepdog, and one of only a few breeds I’m not allergic to, so it took some time to find another one. The puppy we found was in Ohio and that was all the reason we needed! We both had been wanting to visit the full sized Noah’s Ark and Creation Museum near Cincinnati. We decided it was worth driving a few hours out of our way – and we are so glad we did!

You may be asking now “what does this have to do with quilting?” Just hold on a little longer and you’ll see.

The Ark Encounter was the first spot on our agenda and it did not disappoint!

It opened to the public in 2019 and Answers in Genesis strove to make it as accurate to the Bible as possible. We learned so much and it was amazing!

The Bible states that the Ark had only one door and this symbolizes Jesus as the only way to salvation!

They have a small, but lovely zoo on the property, along with a Virtual Reality ride that was a blast! For more information please click here!

The next day we went to the Ark’s sister attraction, the Creation Museum, and it was fascinating also.

The exhibits and programs were wonderful plus – there were quilts in both main stairwells!

They were beautiful, and the one with circles was incredibly intricate! Click here for the story of the quilts and their maker.

We enjoyed all the exhibits, presentations, and the 4D Planetarium show.

The next day we picked up the puppy near Akron, and headed home.

It was a whirlwind adventure and we are so blessed. The next phase is housetraining our new little boy … while coming up with a name 🤪. I don’t know why it seems so hard this time. After seeing him do you have any suggestions?

Perspective

February 28, 2021 6 Comments

A few weeks ago, when I posted about “Binding Odd Angles”, Barb commented with a question, and it’s a great segue into this week’s post:

“Hi Chris, On the Christmas Hexie you made, did you use 2 1/2 inch strips and how big did it end up when finished.  Were you able to get all the cuts out of one width of fabric.
Thanks much.”

In answer: yes, the strips were cut at 2 1/2″ and require 1 strip each of 5 different fabrics. The stripped units were cut into 60 degree triangles, and the topper finishes 20″ from flat side to flat side.

And this week’s post is about those toppers! Last week I shared my dear husband’s encouragement concerning my new sewing machine. This week he has consented to let me share this story and, as my “pins” post from January insinuated, we’re noticing many quirky differences between us now that we’re together so much.

You might remember this photo of the toppers I made at our our December quilt retreat

When we visited friends during the Christmas season, we would gift them a topper with a holiday plant.

The first one we gave was to Brad and Deandra early in the Christmas season. Theirs was made from a contemporary line of Christmas fabrics – I loved the little trees in the black print:

I was so pleased when Deandra placed it in the middle of the kitchen table. Then we had a lovely visit.

The next day Mike asked me if I was disappointed that she placed the quilt upside down on the table. I responded “no she didn’t”. He repeated that she did and we went back and forth a few times before he grabbed one of the remaining toppers and flipped it over saying “this is the Christmas side”.

I burst out laughing and said “you’re just like your mother”. He looked confused and hurt, so I apologized and shared the following story (if it sounds familiar, I do share it in my Quilt Tales lecture).

Years ago (we’re talking the 1990s) we purchased small quilt hangers to give to our parents for Christmas along with a small Christmas quilt. This gift had an ulterior motive since both sets of parents were hard to buy for (like us, they were blessed and didn’t really need anything). I reasoned I could make them wall quilts for their hanger for the different seasons. The next quilts I made for them had a July theme.

I chose to back both quilts with a log cabin cheater cloth,

and sent Mike’s mom’s to her in Iowa as a birthday gift. She called 3 days later to tell me how much she loved the quilt! I believe her exact words were “Dad hung it right away. Those little children are just adorable!”

I guess it was hard for her to tell the front from the back because there was no sleeve and, not being a quilter, she didn’t realize all the work I put into the flag side. So, I took a breath and responded: “I’m so glad you like it” 😁. We talked a little longer and after I hung up – I laughed out loud. Mike happened to be passing by and asked me why I was laughing at his mom. I told him what happened and he didn’t think it was funny. He said I should call her back and tell her the truth.

My response: “Why? She’s happy”. He rolled his eyes at me and walked away.

Fast forward 27 years. He’s now made the same assumption his mom did, and once again I found it funny. I stopped laughing when he asked me why I was kind to his mom, but couldn’t resist telling him he was wrong. Oops. So I apologized and then it was his turn to laugh. We do like a bit of good natured kidding, and what fun is life if we can’t laugh at ourselves?

***************

And… to keep you smiling… I’d like to introduce you to the Quilt Sissie’s cousins, the Flat Suzies:

Terri sent me this photograph recently along with their story:

“Hi Chris,
Your story/photo of the “Flat Stanley” dolls was inspiring to me. We have a “birthday group” of 5 ladies. We have been together over 30 years. We all belonged to the same church when we started and are quilters. Now we are spread out in all parts of the county. Most years we gather together to celebrate our birthdays. Of course this year it wasn’t possible. To celebrate a birthday January 30 in Goodman, WI, we each made a “Flat Suzy” and sent them by mail. In how the Lord works, they each arrived in the mail consecutive days (from around the country) leading up to her birthday. She knew nothing of our gathering for her birthday party and was just thrilled! It was so much fun for all of us – planning, sewing; joy, creativity and connecting with one another while not being able to physically be together. Thought others might like to hear how your blog inspired us, and in turn inspire them in these strange times.
The Lord worked through you to bless us. Thank you and the Lord’s continued blessings on you! Love in Jesus,
Terri, Susan, Charlotte, Diana and Diane”

You’re so welcome! Wendy and I are thrilled to have been an inspiration! God’s blessings to each of you too!

  • « Go to Previous Page
  • Page 1
  • Interim pages omitted …
  • Page 29
  • Page 30
  • Page 31
  • Page 32
  • Page 33
  • Interim pages omitted …
  • Page 77
  • Go to Next Page »

Primary Sidebar

Archives

Recent Posts

  • The Indiana Heritage Quilt Show ~ 2026
  • Bird’s Eye View
  • The Birds
  • Sew Much Creativity
  • A Last Minute Baby Quilt

Recent Comments

  • Kathy Wuhrmann on The Indiana Heritage Quilt Show ~ 2026
  • Doris Ast on The Indiana Heritage Quilt Show ~ 2026
  • judy raddatz on The Indiana Heritage Quilt Show ~ 2026
  • Jeanette Bussard on The Indiana Heritage Quilt Show ~ 2026
  • clkquilt on The Indiana Heritage Quilt Show ~ 2026

Categories

Footer

My Guide

Whatever you do, do your work heartily, as for the Lord rather than for men.

—  Colossians 3:23

Contact Chris!

  • Home
  • About
  • Gallery
  • Classes
  • Trips
  • Books
  • Blog
  • Contact
  • Sign Up For My Blog

Copyright © 2026 · Chris Quilts · Website by Adunate · Privacy Policy