As predicted, last week’s apron post was a popular one, even with the linking error in a number of the emails I sent out. If you read my blog early last Sunday, you may have been confused by being prematurely directed to a post about “Marker Dyeing” and not to the Aprons post. Please click here to read the Aprons post if you missed it (or if you’d like to read the comments 😊).
I enjoyed reading all of the comments and suggestions last week. Shellie asked about Sommer’s apron, and I’m not sure what I did with the pattern, but I did find a simple tutorial for a similar apron on a site called Patchwork Posse. Click here for the instructions.
This past week Sommer and Trey helped me make an apple pie while wearing their aprons (it was Sommer’s idea to put them on 😁).

They’ve grown up just a little since I first made the aprons.
Lorraine sent this message with photos:
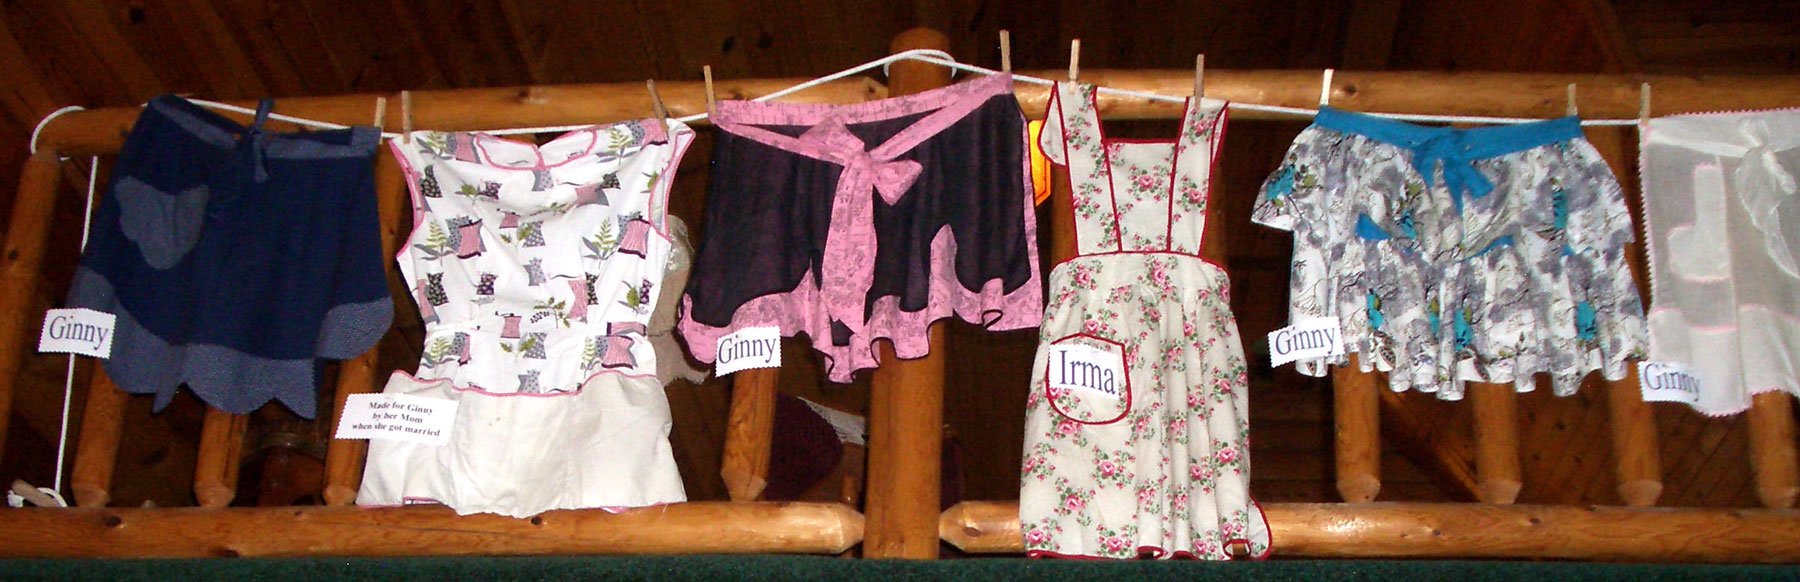
“A friend showed me how to make a child’s apron using a kitchen hand towel. I decided to make one for each of my great-grand nieces. Since I am known for my button collection I made sure that each apron was decorated with buttons. From the looks on their faces, I think the girls liked their aprons!”

And here are Reaghan and Avery wearing their aprons!

Adorable!!! Thanks Lorraine!
Then Eileen texted me with her comment and a pic of the lovely apron she made in Open Lab:
“Read your great blog today on aprons! Have fond memories of my mom’s and grandmother’s aprons, but unfortunately don’t have any of those and don’t know what ever happened to them. There is something special to me too about aprons…maybe it’s the working in the kitchen together with people we love that elicits the fond feelings. In any event, I did make this apron (photo attached) for my sister’s birthday in April 2018. You helped me with some pattern details with it in Open Lab Quilt Class at WCTC, so you had a hand in its construction too!”

I remember this apron. It’s so pretty! I’m sure Geneen loved it! Thanks Eileen!
My friend Julie sent me an email about an apron she made:
“Here is my granddaughter Ava with her apron. She loves baking with Grandma Julie.”

It seems baking is a wonderful connection for many grandmas and grandkids! Thanks Julie!
The next email I received was a blast from the past. Laurie’s note brought back some wonderful memories:
“Hello, Chris.
You visited our West Alabama Quilters Guild in Tuscaloosa in 2011 for a fun weekend workshop and we appreciated you coming all that way. Here is a snapshot of you and me together as well as one of you with guild members looking on as you demonstrate a technique!


In 2010 we had put on our local quilt show with “Celebrations” as the theme. Many of us made and wore our quilted aprons during that show. It was great fun to make the aprons and more fun to show them off! Here is a set of photos from that show.
Some of those aproned ladies appear at the top of this post and here’s another one of the fun photos Laurie sent:

What a great idea for quilt show workers! These ladies “do” aprons well!
Laurie continued with a true confession about her apron addiction. It made me smile:
I have gone radical, as my husband says, because I wear one of my many quilted aprons while I do errands in public as the pockets are more convenient than carrying a purse. I now tend to build my outfits around a good quilted apron – for social events, too! Aprons are so comfortable and easy to add a splash of color to my outfit. I like this “tabard” style. I first saw this style in a quilting magazine – In the September 2013 issue of American Quilter magazine – Suzy’s laminated New York Apron
After seeing these photos of her beautiful aprons, I can see why she builds outfits around them:


Thanks so much Laurie. I absolutely remember you – and the wonderful time I had with your guild!
********************
I can’t resist sharing just one more photo that arrived in my inbox this week, even though it’s not about aprons. I did an online Mariner’s Compass Workshop for the East Iowa Area Quilters a few months ago. Here’s Cindy’s email:
“Hi Chris
I finally finished my 1st Mariners compass! I love it. Shorter spikes turned out great I think. Thank you again for the class. You were very good at making every aspect of the process very clear. I really enjoyed the whole process and keep thinking what if I do this or that. I know I will do more.
Sew Happy, CIndy”

The overall octagon shape really shows off the varied spike lengths. Great job Cindy! It sounds like you’re hooked on compasses just like me 😊.