• Skip to main content
  • Skip to primary sidebar
  • Skip to footer

  • Home
  • About
  • Gallery
  • Classes
  • Trips
  • Books
  • Blog
  • Contact
  • Sign Up For My Blog

Blog

Buried Treasure

July 28, 2019 4 Comments

Last year I wrote a post about a quilt my friend Eileen made for her husband Ken (to read that post click here). It was a traditional bear’s paw pattern done with a fun, new technique.

This past week she came to class with a vintage family quilt top and it’s story:

“Ken grew up in Kentucky and his mom was a quilter. In her later life she became ill with cancer and moved in with Ken and Eileen in Wisconsin so they could take care of her. While she was with them she continued to make quilts. After she died, another relative was allowed to live in her house in Kentucky (for 15 years after her passing!). Recently, Ken took ownership of his mother’s home and, as he and Eileen went through they found a quilt top they didn’t know existed, buried in a bag of material in a closet.”

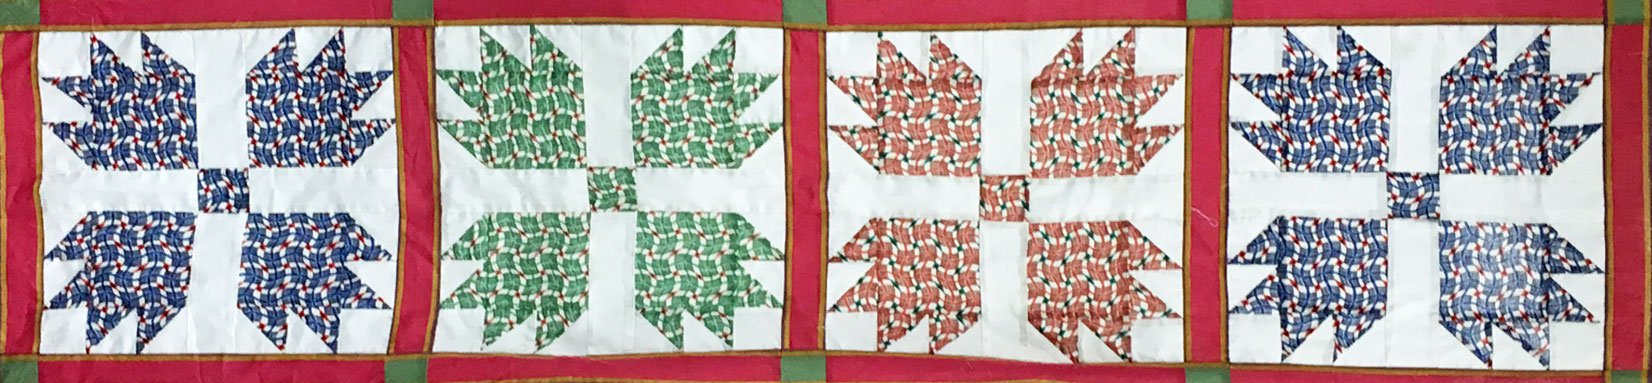
What a coincidence – it’s another bears paw!

Eileen was quite excited to find this treasure and brought it back to Wisconsin to wash it – and now she wants to finish it.

She brought it to Open Lab this past week and we were all intrigued by the “fussy cut” stripe used in the sashing and border.

Then we noticed that all three of the fabrics used for the paws was the same print in a different color way. It’s quite an interesting print and I was wondering if anyone out there has an idea of what decade this fabric is from. If you have any information to share, please comment to this post.

***************************

And thanks to everyone who left a comment on last week’s post about the cutter quilts. I found your stories such fun to read!

If you missed those comments – click here – and then scroll down to the bottom of last week’s post!

Cut a Quilt?

July 21, 2019 5 Comments

I love quilts. I especially love old quilts – and they don’t need to be museum quality. As many of you may know I have a lecture about my “less than pristine” collection of quilts I call But I Still Love You. I also have 3 other vintage quilt/clothing lectures – and you can read about them on the classes page of my website. Click here to see them all!

Sadly, I occasionally come across a quilt that is in such bad shape, it is unusable.

These are often called “Cutter Quilts” and some crafters will cut them up and make something new from them. This used to make me sad, but over the years I’ve come to believe that it’s better to make them into something new and lovely, or even useful, than have them sit in a box or be thrown away. I am very much against cutting up vintage quilts – unless there is really no hope for them.

Many years ago I made this teddy bear from an embroidered quilt I purchased at an auction. Most of the embroidery had been worn away, so I salvaged the best parts.

I used to participate in craft fairs and one of the friends I shared a booth with made old world santas from tattered quilts. Anita hand stitched the faces and embellished them in unique ways. I had to buy one:

By our next craft fair I was making crazy quilted coats for her santas, we split the profits and they were a hit. I was happy because I was still a “non-cutter quilt purist” at that time and it stopped her from cutting quilts apart.

I think the incident that changed my mind on this topic came about way back when I first began teaching quilting at Madison Area Technical College. I had a delightful woman in my weekly class who was a bit quirky. She lived out on a farm and decorated it with tattered quilts, pigs and anything purple.

Sadly, she came to class one day to say that her husband had run off with another woman and left her with his debt. She needed to have an auction and, through tears, invited all of us to come and give her treasures good homes. I was happy to oblige. I still have a number of her ceramic and wooden pigs in my kitchen. I bought two of her quilts and they were in very bad condition. So I stuffed them in a closet and tried to forget about them.

A few weeks later I was thinking about what I could do to cheer Jeanine up. I decided making a pig out of the tattered quilt with the purple ties would be the best use of that quilt. I cut out the good parts, lined the ears with purple and wrapped it up to bring to class.

She cried – but she loved it!

A while later Jeanine came to class with a smile on her face. She had met a wonderful man. They got married, moved to Florida and had 2 beautiful little girls. Don’t you love a happy ending?

So, if you have a family heirloom, and it is really falling apart, giving it new life might be the right thing to do. Especially if it can be made into a number of smaller items and shared with family members who would appreciate it. Cutting it into smaller “chunks” and placing them in a shadow box or frame is a nice option. Making a number of small table toppers is also a good idea – or maybe Christmas stockings!

I did a bit of web surfing and absolutely loved the idea of placing a quilt piece inside an old window on Sadie Seasongoods website. To read this delightful story click here.

If you’re wondering how I came up with this blog topic – I recently received an email from a site called Jen Reviews. This is what it said:

“My name is Jess and I’m the Editor at Jen Reviews. I was doing some research and just finished reading your wonderful blog. I just published a beautiful cutter quilt snowman tutorial complete with step-by-step pictures and detailed instructions.”

I went to her site and her snowman made me smile. Click here to link to the instructions. 

Have you done something with a tattered quilt? Would you like to share? I’d love to hear all about it at:

A Rotary Blade Changing Aid

June 30, 2019 4 Comments


While in Paducah this Spring Eileen and I stopped by a vendor booth owned by Cynthia Ellis. She is not a quilter, but she does beautiful wood turning. I already have a lovely turned seam ripper and pen, but what caught my eye were her magnets – they’re beautiful:

I wasn’t sure why I needed one and then she made it clear. Changing the rotary blade in my cutter is always a nervous time – I don’t like to bleed! With her Magne-Dots (magnets with handles) there’s nothing to worry about. Let me give you a quick step-by-step:

Begin by taking your cutter apart. I like to lay each piece out in order, with the part closest to the handle piece facing up, so it’s easy to put back together.

Pick up a Magne-Dot and grab the old blade.

Lift it off the cutter screw:

And dispose of it in your sharps container.

Pick up the new blade from its case. If it’s a multi-pack, pick up the stack. You’ll notice the lubricant on the blades. This often makes them stick together.

To separate the blades, place the other Magnedot on the bottom blade and slide them apart.

Place the new blade on the cutter screw.

I find it helpful to use the top of the second Magne-Dot to hold the blade while releasing the first Magne-Dot.

My fingers never came near the sharp edge of the blade and I’m ready to reassemble my cutter!

I love it when artists come up with great ideas for using their work and I feel it’s an honor to purchase from them. I’ve ordered a number of pairs of Magne-Dots from Cynthia’s website to give as gifts. To visit her site and get your own Magne-Dots click here!

And remember – they work best in pairs!

Trey’s Modular Log Cabin

June 23, 2019 2 Comments

Last week I showed you my latest “modular” style quilt, where the blocks are each finished as individual small quilts and arranged and rearranged on a background quilt through the magic of Velcro™. This week I have one special arrangement to share.

While I was working on the background quilt my grandson, Trey, was very interested. When I noticed this I asked him if he’d like to create his own pattern. He nodded his head in glee, and was happy to help me pull the blocks from my current arrangement on the background quilt. He then began placing a few blocks:

pulling some off:

and starting again:

All of a sudden it seemed a lightbulb went of in his head! He pulled the latest blocks off and quickly began again.

And this was the result:

He’s 4, he’s learning his letters, and T is definitely his favorite!

We smile a lot when he’s around!

My Modular Log Cabin Quilt

June 16, 2019 53 Comments

The Madison Quilt Expo has a challenge every year and I entered it a few years back when the theme was Autumn in Wisconsin. This was the quilt I made for that challenge. I call it “Which Way Does the Wind Blow?” because of the mariner’s compass leaves.

This year’s theme is log cabin. Participants are to make an innovative quilt with this very traditional block, 30″ x 40″. So ~ what can you do with the log cabin pattern that hasn’t already been done?

Well, since I’ve been absorbed in my latest quilt-venture: “Modular Memory Quilts”, it became obvious to me that I should make a background quilt and attach “individual log cabin block quilts” to it through the magic of Velcro™. It was great fun to make all the blocks ~ and quite a challenge to figure out how to get it all to work (the black stripes on the background quilt are the Velcro™, the back of the blocks have Velcro™ strips also):

When piecing the blocks, I decided to change the width of my logs to create a curved effect, and I alternated the placement of the green background and the scraps to add even more interest.

Now I have the parts made and I’m trying to decide on my favorite set. Since log cabin blocks can be put together in a myriad of ways, I’d love your input.

Which is your favorite?

Straight Furrows
Alternating Circles
Straight Furrows and Circles
Curvy Pinwheels
Barn Raising

Please let me know your choice in a comment to this post.

And now for my true confession. I got so into this project, and was having so much fun, that I never even thought about reading the fine print in the challenge rules. Once it was done I discovered this in rule #7: “Quilts in multiple pieces or in frames are not accepted”. UGH!!!

I’m grateful the challenge got me to make this quilt and annoyed with myself for not reading the rules. But even if I had, I would have made this quilt for the sheer fun of it! Since it can’t get into the challenge at the Madison Expo, I think entering it in the actual quilt show there is a great option. I’ll let you know if it gets in :-).

And a quick follow up to last week’s post…

Mary Margaret responded to last week’s post with a few photographs of her quilts.

She said: “I like to take my quilts out to photograph them in fun places. I took some of the photos up at the clearing in Door County, but most were from old Falls Village in Menomonee Falls. I put quilts on doorstops, hanging over barn doors etc.” 

What a great idea. When my friend Di designed my original website she photographed a number of my quilts out in our woods. Click here if you’d like to go to my Gallery page, then scroll through the quilts. You’ll be able to tell which photos were taken by Di :-).

I think I need to photograph my quilts in unique ways like this. Thanks for the inspiration Mary.

Oak Leaf and Swirl – Part 2

June 3, 2019 3 Comments

I had a number of readers ask about the thread/machine I used to do the quilting in the background of this quilt. I have a Handi-quilter Sweet 16, sit down mid-arm machine, and I used polyester thread. Now I have a confession to make, I continue to have problems with tension and breaking when I use thinner threads in my mid-arm. I get the best results with Gutermann polyester thread in the top and bobbin.

Since the background was quilted in part one, it’s time to share a bit about my appliqué technique. But I don’t want to put the cart before the horse, so I’ll begin with the design process I used to create the twisted Oak Leaf and Reel patterns.

I know this border is actually vertical in the quilt, but it fit better horizontally here for explanatory purposes. Do you see how the block on the far left looks like a typical oak leaf and reel block? Then, as you travel to the right, each subsequent block has a little more “twist”?

I created this effect in Photoshop using filters. I selected “distort” followed by “twirl”. Then I typed in the percentage of twirl and here’s what I came up with:

I hope you can see the gradual change from zero to 100% rotation. The 100% drawing was what I used to create the quilting design for the center of the quilt. My hope was to portray the wind swirling the leaves around.

To make the appliqué border blocks I began by layering a piece of the brown plaid border fabric, right side down, with a silk square of men’s necktie fabric on top, wrong side down also, and lastly the paper pattern – pinned at the corners:

Next I free motion stitched on all the pattern lines:

When I turned this block over to the fabric side I was able to see the stitches (I used white thread for demonstration purposes – in the actual block I used a matching thread so it wouldn’t be obvious):

I free-motion stitched over these lines a second time, slowing down my hands to achieve a short stitch length, because this will be left raw edged and I don’t want things to come apart. Once the stitching was done I trimmed away all the extra plaid fabric and – voila – a raw-edge repliqué block!

This is the same way I created the windswept tree!

Once the left border was added I had a minor surprise. I made the quilted background 2″ longer than needed to allow for shrinkage when quilting, but the length was now 1/2″ too short for the contest!!!

What to do? Don’t panic! Simply add triangles along the bottom!

I raw-edge appliquéd these triangles too and I think they add a lot of interest. What a fortunate mistake! It’s all about attitude :-).

I hope you enjoyed learning about my creative process and the techniques required to get ‘er done. I know some quilters have everything planned before they begin, and I’m sure that’s a good way for them to work, but I love to fly by the seat of my pants and wait for the “what ifs”.

How do you work? Intense planning? or “let’s see what happens”? Please comment and let us all know.

Oak Leaf and Swirl – Part 1

May 26, 2019 15 Comments

As I mentioned a few weeks ago, I have a quilt hanging in the National Quilt Museum in Paducah! Praise the Lord!

During Spring Quilt Week the museum held a “Meet the Artist” event and eight of us were there. As an unexpected bonus to all that fun, each artist was asked to do a short interview about their quilt, and I now have the link to those interviews. To view the videos click here!

I hope you find them as interesting as I did :-)!

When I enter a contest such as this, I not only enjoy creating something according to the contest rules, but I love to challenge myself to try things I haven’t done before. This quilt was no exception.

I began with an idea I’ve heard about, but never tried – quilting the background first and then adding the appliqué. I knew I wanted to achieve a trapunto look in the unquilted areas, so I used a double layer of batting: an 80/20 cotton first, with a washable wool on top. The fabric was a beautiful silk/cotton blend called Radiance. I only had a yard and they no longer make this fabric. Since the minimum size for the contest is 50″ x 50″, I knew this wasn’t going to be big enough, but I tend to worry about things like that later.

I came up with a basic pattern using a windblown tree I’ve played with in other quilts, adding copyright free leaves from the internet, and a twisted traditional oak leaf and reel block I created for the central design (more about that later).

I marked the areas where I wanted to place these motifs, and then quilted around those areas to mark them.

From there I added large spirals to mimic the wind (plus a little bit of stippling around the central image to see how the faux trapunto was going to look):

Once the swirls were done, more stippling and mini-spiraling could commence:

and more:

Until the quilting was completed:

You may have noticed I added a bit of matchstick quilting along the top and right edges. I like the way the curvy and linear designs play together:

The oak leaves were made from men’s silk necktie fabric. Each one was made by sewing 2 pieces of the same tie fabric, right sides together, in the shape of a leaf; then turning this piece right sides out and stitching it to the quilt along the vein line:

The tree was done using a technique I call raw edge repliqué. I used the same technique for the blocks in the border on the left, but this post is getting a bit long, so I’ll save that information for next week’s post.

Have you ever quilted the background first and then added the appliqué?

Did you enjoy the process? I really did and I hope to play with it more in the future :-)!

Bartering: Quilting for Technology

May 19, 2019 1 Comment

Nine years ago my neighbor Di and I worked out a barter. I taught her how to make a Lone Star quilt and she built my website. She also got me into blogging!

Well, last Fall she informed me that my website was due for an update and we worked out a new barter. I posted about this when the barter began, and you can read about it by clicking here.

The quilt top is done and I’m thrilled to have brought it to completion. This is one of the blocks the quilt is made from:

and here’s the king sized quilt top ready for Aunt Susie’s Long Arm Quilting!

Jenny didn’t want a pillow tuck, so the border doesn’t go around the top of the quilt. The pieced center just fits her king sized bed and the plain cream colored border/final pieced border drop off the quilt sides. It’s a very bright and cheerful quilt.

Any guesses how many pieces are in it?

1796!!! I think that’s a record for me. What’s the most number of pieces you’ve put in a quilt?

The other half of the barter is coming to fruition this weekend! Di has uploaded my new website and I think it is lovely! Please go to: https://www.chrisquilts.net/ to visit my homepage,

and feel free to navigate around a bit (i.e. click on whatever looks interesting) to see all that it has to offer.

Today Di is completing the uploading of the blog. I think you’re going to like the new format. It’s visually crisp and clean, and should be easy to use. But please be patient if a link doesn’t work – or something doesn’t look quite right yet – we’re still in the final stages of the upload.

Thank you Di, for all your knowledge and hard work. It’s really appreciated.

It certainly is fun to have friends with different talents to share. Have you done a barter with your quilting skills that you’d like to share? If so, please send me an email about it: .

  • « Go to Previous Page
  • Page 1
  • Interim pages omitted …
  • Page 38
  • Page 39
  • Page 40
  • Page 41
  • Page 42
  • Interim pages omitted …
  • Page 77
  • Go to Next Page »

Primary Sidebar

Archives

Recent Posts

  • The Indiana Heritage Quilt Show ~ 2026
  • Bird’s Eye View
  • The Birds
  • Sew Much Creativity
  • A Last Minute Baby Quilt

Recent Comments

  • Kathy Wuhrmann on The Indiana Heritage Quilt Show ~ 2026
  • Doris Ast on The Indiana Heritage Quilt Show ~ 2026
  • judy raddatz on The Indiana Heritage Quilt Show ~ 2026
  • Jeanette Bussard on The Indiana Heritage Quilt Show ~ 2026
  • clkquilt on The Indiana Heritage Quilt Show ~ 2026

Categories

Footer

My Guide

Whatever you do, do your work heartily, as for the Lord rather than for men.

—  Colossians 3:23

Contact Chris!

  • Home
  • About
  • Gallery
  • Classes
  • Trips
  • Books
  • Blog
  • Contact
  • Sign Up For My Blog

Copyright © 2026 · Chris Quilts · Website by Adunate · Privacy Policy