• Skip to main content
  • Skip to primary sidebar
  • Skip to footer

  • Home
  • About
  • Gallery
  • Classes
  • Trips
  • Books
  • Blog
  • Contact
  • Sign Up For My Blog

Blog

From One Barn to Another

December 16, 2018 10 Comments

When you say barn quilt nowadays, people often picture a wooden barn block attached to the exterior of an actual barn. I have one of those and posted about it years ago (click here to read that post).

Earlier this year I made a fabric barn quilt and entered it in a contest in which it traveled for 6 months. After I got it back I realized I had never included it in a blog post. It was a very enjoyable project and I tried a number of different techniques to accomplish my goals, so I felt it was time to share it with all of you – since it’s still the same year as I made it (by 2 weeks  :-D) ! It’s called “From One Barn to Another” and it measures 24″ square.

This was actually created by combining photographs of two different barns owned by my friends Glen and Di Lohr who live just across the road from me. Di was happy to have me do a photoshoot one sunny summer afternoon, as inspiration for a Barn Quilt challenge which invited quilters to do something innovative with the barn theme.

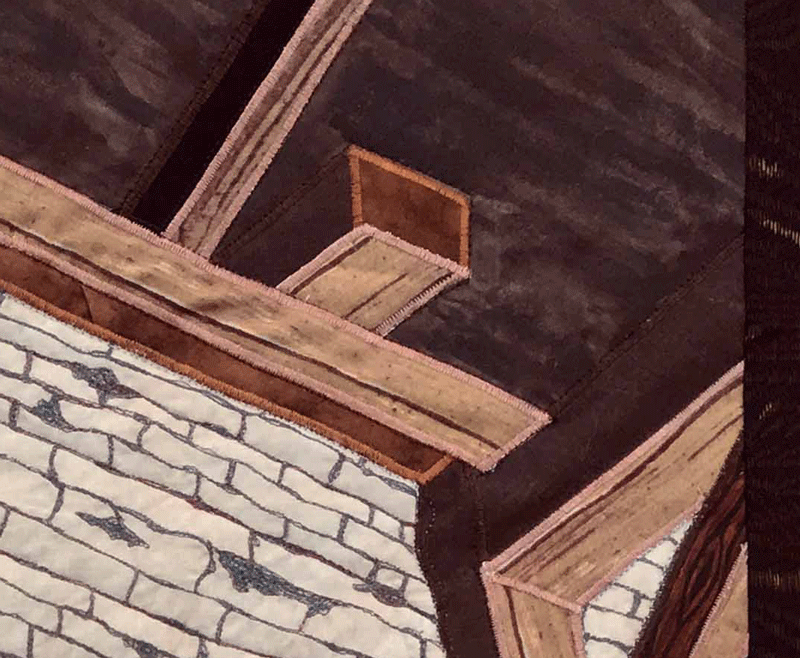
The majority of the quilt is the interior of their German Fachwerk barn.

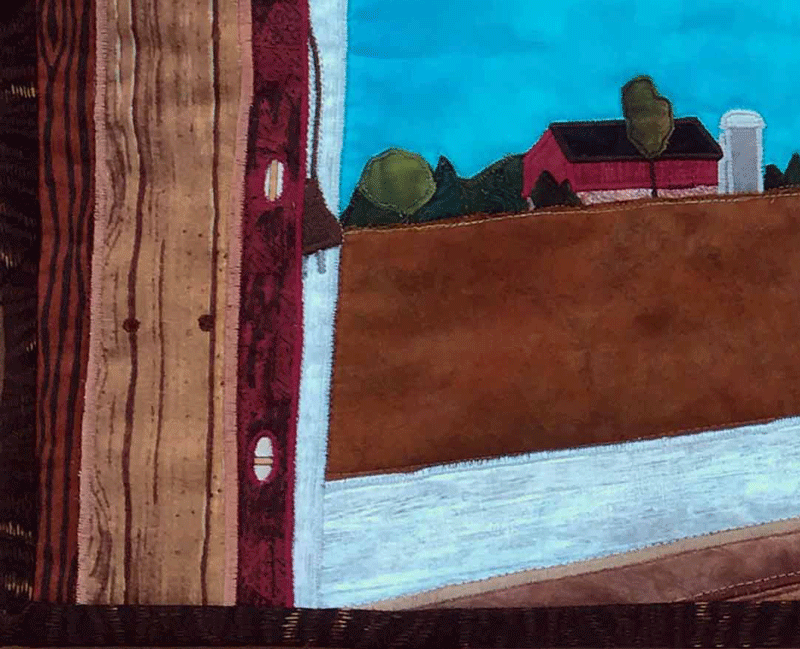
Unfortunately this window didn’t look out at their more traditional Wisconsin style barn. But that didn’t stop me, I just Photoshopped™ it in,

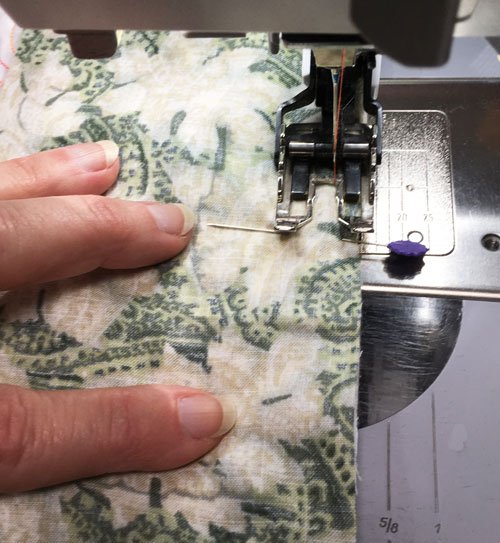
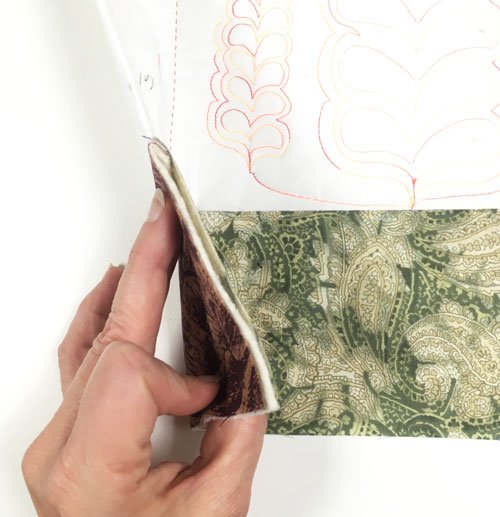
and used my repliqué technique to do most of the work. 

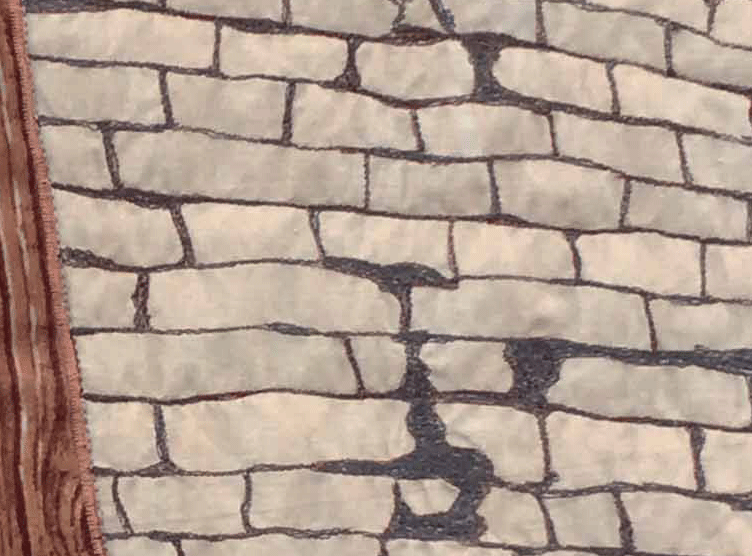
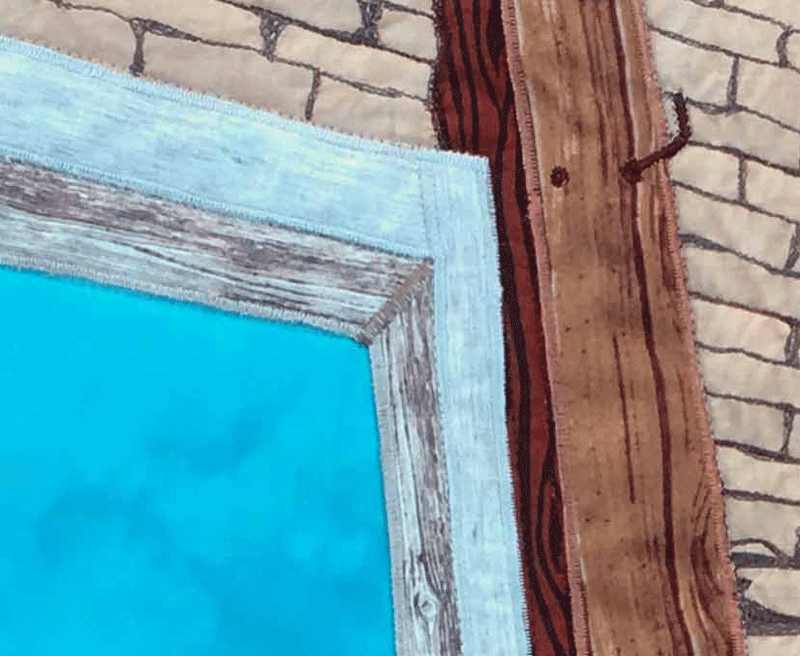
The bricks created the greatest challenge for me. I certainly didn’t want to satin stitch all the way around each one. Neither did I want to use raw-edged repliqué (stitch around each brick and trim away so the mortar shows through). So I did something completely different – I thread-painted (stitched heavily in mortar colored thread) the mortar in as a wholecloth design on brick colored fabric! 

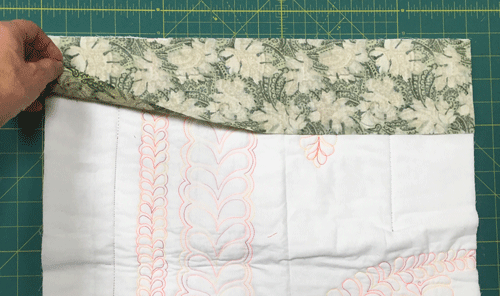
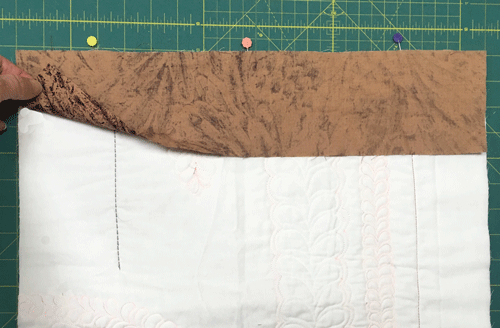
The challenge fabric we were required to use was a barn board print. I used both sides of the fabric to achieve shading in the window frame (the right side was gray while the reverse was much whiter):

Out the window I did all the man-made objects with repliqué, and the God-made objects with raw-edged repliqué (no satin stitching).

When it came to the ceiling, I didn’t have a dark enough shade of brown, so I painted what I did have:

I was pleased with the finished results. I’m going to hang on to it for a little longer, in hopes of exhibiting it in a few shows, but eventually is will be gifted to my wonderful neighbors.

Hand-made Christmas

December 9, 2018 1 Comment

We were living in Sun Prairie, WI when I first learned to quilt. After a few years of making quilts I decided selling them in craft fairs might be fun. At one of these fairs I met Jeannie. She loved quilts, but had no desire to make them, so we worked out a deal. It turned out – she and her husband made original design Santas and I already had a Santa collection 🙂 . Jeannie’s husband did the carving and she did the painting. We worked out a barter. She ended up with a number of my handmade quilts,

while I was thrilled to acquire 5 of their unique Santas (the tallest is 10″) .

Fast forward to last month when I was teaching in North Dakota. Amy was in my free motion quilting class. She caught on fast and did very well, but she admitted to me her first love was knitting. The next day she stopped by my classroom and handed me a small box with a thank you note attached. Inside was a hand-knit Santa!

Amazing! And now he’s part of the family. They may not be jolly, but I love them all!

What a wonderful gift. Thank you so much Amy!

By the way – Amy has patterns available on-line, and her work in lovely! You can see for yourself at: https://www.knitpicks.com/cfPatterns/IDP/IDP_Pattern_List.cfm?ID=K00509

************************

Also – if you’re looking for a unique, last minute Christmas gift, my daughter-in-law, Betsy, has an Etsy shop where she sells her macramé and animal sketches: https://www.etsy.com/shop/KnotsAndNubs?section_id=24967124

Her macramé is lovely: 

and she has many adorable animal sketches available (each one is 8″ x 10″):

If you’d like a sketch or painting of your own pet or favorite animal, Betsy  would be happy to work with you. You can contact her at: . 

And, for those of you who live in Southeastern Wisconsin, Betsy also has her work available at “There’s No Place Like Home” in Oconomowoc (25 S. Main St.).  She’s very talented (I’d say that even if we weren’t related, LOL)

I think hand-made gifts are the best!

Adding Borders – Quilt as You Go!

December 2, 2018 8 Comments

Last week I shared a technique for bordering a block quilt-as-you-go, but have you ever finished the quilting  on a project and realized it would look nicer with one more border? or maybe it needs to be just a little bigger? I’ve had this happen a number of times and, before I bound the outside edge, I did something about it! This also works for quilts that have been constructed “quilt-as-you-go” fashion and need borders, and it works on any quilt – small or large. It’s as simple as:

1. Measure the top and bottom edges of the quilt, decide the border width, and make two border strips this width and length from each of: (a) the border fabric for the front of the quilt, (b) the backing fabric and (c) batting. (Please be aware I’m using a sample quilt sandwich as my “quilt” for this demo – I was practicing feathers  🙂 )

2. Choose 1 set of borders and lay the border fabric (a), right sides together, and even with the top edge of the front of the quilt.

3. Pin this strip in place and flip the quilt over to the back. Lay the back border strip (b) even with the same edge of the quilt, right sides together.

4. Lay the batting strip (c) on top of this back border strip.

5. Add more pins along the edge through all the layers

and sew through all six layers with a ¼” seam allowance (a walking foot is very helpful).

6. Fold all the border strips away from the quilt, and on top of each other to make a flat border:

Here’s a side view:

7. Press this new quilted border along the edge, pin if desired, and repeat for the bottom of the quilt.

8. Measure the sides of the quilt and repeat from step 1 above to add the side borders.

The borders may now be quilted (if needed) and the binding attached. I like to quilt a straight line ½” from the border seam all the way around. This encases the seam allowance and it’s thickness adds a nice fill to this narrow quilted area.

I hope this was helpful and easy to understand. It is a very do-able technique :-).

**********************************

Continuing Stories:

A few weeks ago I shared the story of a shirt and tie quilt made by my friend Jean. She recently wrote to tell me she made a label for the quilt using a pattern for an origami Hawaiian shirt ornament she’d made as Christmas gifts in 2014. I was a lucky recipient of one of those ornaments:

And here’s the label (name removed to protect privacy):

Adding the “dry clean only” advice on the label was a great idea too. She also said she tucked some leftover tie fabric in a few of the border pockets.

I was so glad she included these pictures. Thanks again Jean!

Also, in response to Debbie’s quilt for little Grace, Beth emailed me this: “I saw your picture of the memory quilt with the clothes. I thought I would share the quilts I made for my great niece and great nephew with their onesies!”

So many great ideas – thanks Beth!

Finishing a Small Quilt – “Quilt-as You-Go”

November 25, 2018 3 Comments

Looking for a quick way to finish a small quilt – borders and all?

I have a small block I want to border, finish and hang on the wall (this would work great for placemats and table runners too). Rather than adding the borders and then layering and quilting the traditional way, I decided to cut the backing and batting a little larger than the size of the finished quilt.

*Then I layered them on the work surface: backing, wrong side up, then batting.

*Next I centered my block on top and pinned it in place.

*I cut border strips for the sides at the appropriate size, layered them right-sides-together with the block and sewed them on with a ¼” seam allowance, pressing the border over the batt after stitching.

These seams will act as quilting lines.

I then measured, cut, and stitched the top and bottom borders on in the same fashion.

I began with larger pieces of backing/batting then my first border required, because these were leftovers from a previous project. I could now add another border if I want, since the extra backing/batting is already there, or I can square this up and bind as usual.

I’m thinking one border is enough – gotta go – time to bind!


Fascinating Specialty Quilts

November 18, 2018 8 Comments

Over the past month or so I’ve seen a few quilts that are so unique I just have to share. Last week I posted about the Capital Quilters show in Bismarck, ND. One of the quilters who was in my Beginning Fiber Art class, Colleen, had a quilt in the show that really made me smile. It’s called Mod TVs (I apologize that I don’t have Colleen’s last name, nor the quilter of her quilt – the picture of the card on the quilt was too blurry to read):

Colleen said she made it from a pattern, but the special part was she picked some of her favorite cartoon characters from the past and her long-arm quilter came up with patterns to put them on the tv screens.

What a trip down memory lane. Thanks Colleen!

The next quilt I want to share was made by Debbie Hawver. She was asked by a friend to make a memory quilt from her granddaughter Grace’s clothes. Debbie did an amazing job of fitting the clothes together:

She kept many of the flounces, straps, and ruffles, and even repliquéd Grace’s name in her favorite colors. What a treasure! Great job Debbie!

Debbie is a regular in my Open Lab class, as is Jean Casey, who also made a fascinating quilt for a friend. Her friend’s husband died unexpectedly and Jean was asked to make a memory quilt from his shirts and ties. She decided to match them up and created this amazing quilt in a “quilt-as-you-go” fashion.

Jean used the collars along with the ties, and then quilted each block in a pattern to match the tie.

In this one straight quilting lines are an extension of angles in the tie fabric.

She matched up railroad tracks with the train tie.

And this one is self explanatory. Jean said she did a bit of free-motion practicing before actually quilting this block.

The border is made from leftover shirt pieces and she even put a few pockets in for fun! Well done, Jean.

Three very different and delightful quilts. Thanks for letting me share them ladies.

***************************

Also – last week I mentioned a great idea for making sample quilt sandwiches to practice free-motion quilting on:

Purchase pre-quilted muslin fabric with your 50% off coupon at JoAnn’s and simply cut it into smaller rectangles. I spent a few days teaching for the Shawnee Quilters in Carbondale, IL this past week (a wonderful group) and tried it out. It worked great! No basting sprays, no pins in the way, and it’s quite easy to ignore the cross-hatching in the background!

While I was in Carbondale I had a delightful surprise. Nancy had been at a meeting where I presented my Quilt Tales lecture – complete with tuxedo.

She snapped a pic of it and created her own  😀 ! front:

and back:

I love it – hope it made you smile.

Make a Scrap Quilt Without Even Trying

October 21, 2018 7 Comments

My friend, Lori Schloesser, is a very talented quilter. She loves to piece and machine quilt, but she looks tempted to run in the opposite direction when the “A” word is mentioned. She simply doesn’t like to appliqué. This is ok since her piecing is amazing! She recently brought a scrap quilt to our Fiberista meeting and we were impressed.

It’s queen sized and made from 1″ finished squares! WOW! Here’s a detail shot:

When asked about it she said she didn’t have a pattern, and her plan isn’t to sit down and make a quilt. She simply cuts out a lot of 1½” squares, and sews the squares into pairs as “leaders and enders” while strip piecing other projects. When she finally has enough – she makes a quilt. If that isn’t clear, and even if it is,  – you simply must read the following steps, in her own words  🙂 :

“• Cut lots of 1-1/2 inch squares.

• At the end of a set of chain piecing on a different project, sew two squares together and leave them under the needle.

• Start the next set of chain piecing and at the end, again sew two squares together, leaving them under the needle.  The first two squares will be at the start of the chain. Press them as you press your other project and put the squares in a container.

• When I have enough to sew the block together, I make a little space near my sewing machine and lay the pieces out.  I sew them together the same way – at the end of chain piecing another project.

• I generally use sort of a dark/light arrangement, but my only real criteria is that each square not blend in with the squares around it.  That means any white/very light squares go in the center so they don’t blend in with the white strips.

• I cut the white strips to size (4-1/2, 6-1/2, 8-1/2 and 10-1/2 inches) to help keep everything square and the right size.  (If I can’t attach a white strip without getting pleats, I need to go back and fix seam allowances.)

I like to lay out the blocks on point alternating the two blocks.  

You could use solid white for the side triangles but I prefer to use more blocks and cut them in half to finish the quilt.  Of course I take apart the cut off ends and reuse the pieces.

That’s it! Makes me want to cut a lot of squares and leave them next to my machine. What a great way to use up those small pieces leftover from finished projects, instead of leaving them in a pile because you don’t know what to do with them (my technique – and the reason my sewing room looks like it does most of the time).

The next month Lori brought in this scrap quilt:

And we were amazed all over again. This block she pieces on a rectangular foundation, usually newsprint.

I love greens and browns, so I really find this quilt appealing. And the overall leafy quilting design adds to the organic feel.

She said her strippy quilts: “are an intentional project. I usually make them whenever I don’t have another project and just need to sew without thinking too much about it.” Then she sent me pictures of some other scrappy, strippy quilts she’s made this way:

I asked Lori to tell me more about these quilts and here’s her response:
“I usually make them 60 x 80, so a big lap quilt or a really skimpy twin.  I have generally used them as gifts for acquaintances (like co-worker weddings).  I’ve started donating them since I’m making more quilts than I’ve opportunity to give them to people I know.  I’ve donated a couple to the Lutherdale Bible Camp quilt auction and one to a work-related fundraiser.  I like to have at least a couple in reserve – it’s so much easier to give them away if they’re already done and ready to go.”  

I know she also donates quilts to Project Linus. What a generous quilter!

Thank you Lori, for sharing your quilts and your process with us!

Half Square Triangle Tricks – Trimming

October 14, 2018 5 Comments

Just a quick warning concerning last week’s post. May wrote to say that the “ripper perch” looked a bit dangerous. We should always be careful with any of our tools, but I wanted to assure you that I keep the ripper’s cover on it when not in use.

As I mentioned last week (click here for that post), the center of the quilt that I’m working on contains 336 – 3″ finished half square triangle blocks (there will be more needed for the border). They’re pressed and cut apart and now it’s time to trim.

I find the most time consuming part of trimming is aligning the ruler for every cut. That prompted me to get a Bloc Loc™ ruler – and I’m very happy with it.

This ruler has a groove on the bottom for the seam allowance to nest in.

This means the seams must be pressed to the side. To begin I lined up the Bloc Loc™ groove on the seam, and centered it on the block (I’m trimming my blocks to 3 ½”).

I rotary cut the top and right sides:

Next comes the tricky part. The ruler and block need to be rotated to trim the other sides. I began with a “lazy susan” style cutting mat, but it was awkward and didn’t turn easily. Then I decided to try one of the mini cutting mats in my collection. I found this one spun quickly on my table. It worked great! So here it is rotated:

I simply slid the ruler down the seam allowance to the correct measurements:

and rotary cut the remaining two sides:

The best way to get great points when making half square triangle blocks is to be sure the diagonal seam drops off the block at the exact corners. The groove on this ruler guarantees it!

It’s amazing how long it takes to trim that many blocks, but I am really pleased with how accurate they all are:

After my last post Nancy commented that she likes using the Clearly Perfect Slotted Trimmers™ for squaring up her half square triangles. I’ve watched a You Tube video on them and I think I may need to give them a try – to compare them with the Bloc Loc™. Stay tuned.

Half Square Triangle Tricks – Pressing and Cutting

October 7, 2018 6 Comments

My neighbor Di is a dear friend, great walking partner, and talented website designer. She has her own business: Adunate Word and Design, and she designed both my website and my blog. A while back she mentioned that both of these items were a bit ancient and they might begin to malfunction if I didn’t do a bit of updating. My response: “may I hire you?”

Figuring out the nitty gritty of how things work on the internet gives me the heebie jeebies. Her response made me smile. She asked me if I remembered her talking about the quilt she started for her daughter’s wedding – 4 years ago. Well, the fabric was in a bag, and much of it was cut into little pieces. I now have the bag and she’s in the process of updating my web presence  😀 !

I was sure I had the better end of that deal until I looked at the pattern for the king sized quilt:

and realized she had already cut out all the light triangles and 2″ squares. There was no opportunity to strip piece the 4-patches or the half square triangles! Yikes! Did I say KING SIZE?!?

I decided it was still a good deal – and began cutting all the dark triangles. I’m not sure I’ve ever done a quilt with this many small pieces, but I’m up for the challenge. I chain pieced all 336 half square triangles for the center of the quilt. When making half square triangles, the amount added for seam allowance is 7/8″ (½” for the square and an additional 3/8″ for the diagonal seam). In a perfect world, cutting at this measurement, sewing a perfect ¼” seam allowance, and pressing accurately, should yield accurate blocks that don’t need to be squared up. But only God is perfect. In my case I prefer to cut everything a bit larger than needed and do that trimming thing. So I added 1″ for seam allowance and stitched with a scant ¼” seam allowance.

I have two great gizmos to help with this project: a Tailor’s Clapper I purchased at the Madison Quilt Expo this year, and a Ripper Perch (I made that name up because I don’t know what it’s really called  🙂 ):

I left the half square triangle blocks chained together to make laying them out easier, and placed the first 9 on my ironing board. I pressed them, with the dark triangles on top, to set the seam (this will give you a crisper press):

Next I finger pressed the first one open and set the iron on it:

I then finger pressed the next one, set the iron on it and laid the “Tailor’s Clapper” on the previous square. It holds in the heat to give a great press:

I moved down the line in this way until I had all the blocks on the board pressed.

Now to cut them apart. I was given a very useful tool by my friend Judy a few years ago.

It’s a seam ripper set in a spool that velcros™ to a heart shaped base:

You simply pick up a pair of squares and pop the threads between them onto the ripper:

Voila – the thread cuts quickly and cleanly, then you move down the line.

Once the pressed triangles were stacked I could repeat the process for the remaining 327 half square triangle blocks!

Next week I’ll share my favorite tip for squaring up blocks!

**************************

And one more thing…

Next Saturday I’ll be the featured speaker at the Festival of Quilts in Spring Grove, Minnesota!


If you’re in the area – I’d love to have you join me for my Gradation Play lecture.

  • « Go to Previous Page
  • Page 1
  • Interim pages omitted …
  • Page 41
  • Page 42
  • Page 43
  • Page 44
  • Page 45
  • Interim pages omitted …
  • Page 77
  • Go to Next Page »

Primary Sidebar

Archives

Recent Posts

  • Quilting in Bloomington ~ Part 2
  • The Indiana Heritage Quilt Show ~ 2026
  • Bird’s Eye View
  • The Birds
  • Sew Much Creativity

Recent Comments

  • judy raddatz on Quilting in Bloomington ~ Part 2
  • Kathy Wuhrmann on The Indiana Heritage Quilt Show ~ 2026
  • Doris Ast on The Indiana Heritage Quilt Show ~ 2026
  • judy raddatz on The Indiana Heritage Quilt Show ~ 2026
  • Jeanette Bussard on The Indiana Heritage Quilt Show ~ 2026

Categories

Footer

My Guide

Whatever you do, do your work heartily, as for the Lord rather than for men.

—  Colossians 3:23

Contact Chris!

  • Home
  • About
  • Gallery
  • Classes
  • Trips
  • Books
  • Blog
  • Contact
  • Sign Up For My Blog

Copyright © 2026 · Chris Quilts · Website by Adunate · Privacy Policy