• Skip to main content
  • Skip to primary sidebar
  • Skip to footer

  • Home
  • About
  • Gallery
  • Classes
  • Trips
  • Books
  • Blog
  • Contact
  • Sign Up For My Blog

Blog

A Great Binding Tip!

January 22, 2017 8 Comments

A number of years ago my friend Jean  showed our Open Lab class a clever way to control binding while attaching it to a quilt (to read a previous post about some lovely placemats Jean made, click here!). I thought I had posted about it, but can’t seem to find that post (after 6 years of blogging I’ve covered a lot of topics!)

The concept is quite simple and it requires 2 easily obtained supplies: an empty toilet paper roll and a piece of ribbon. After making enough binding to go around her quilt, Jean rolls it onto the toilet paper roll, threads the roll onto a length of ribbon, ties the ribbon around her neck, and stitches the binding to her quilt. The binding feeds evenly off the roll in an extremely organized fashion. Brilliant!

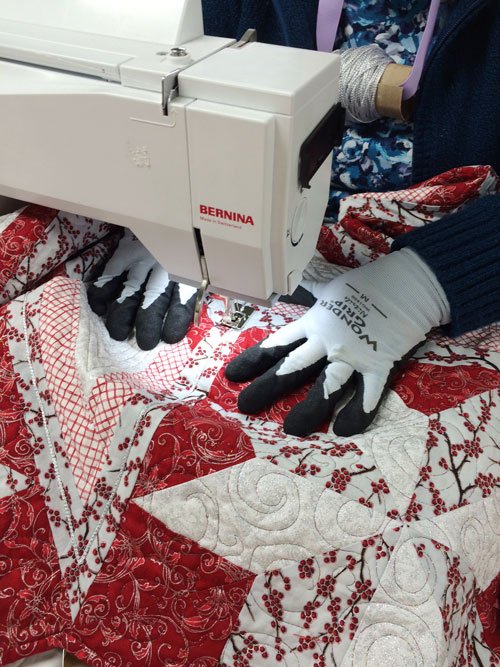
Fast forward to this past Christmas. Connie, another Open Lab friend, was making tree skirts (I posted about them in December – click here for that post). She chose to couch silver cording onto one of the tree skirts (for couching instructions click here). Jean just happened to have one of her special rolls with her and it made the couching oh so much easier:

Connie added the cording with Jean’s binding roller.

couching roll

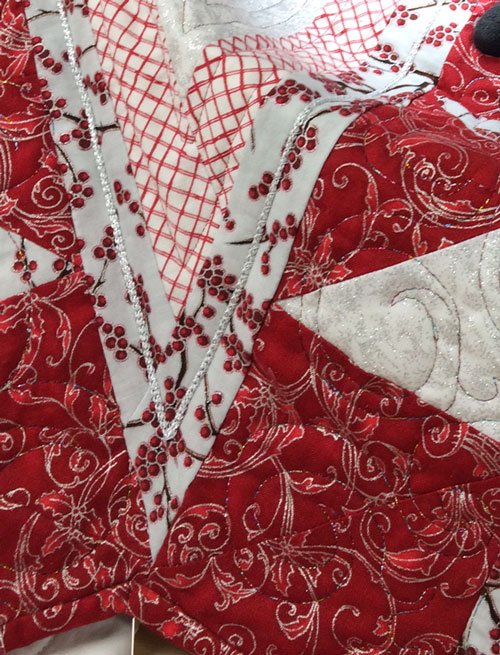
Here’s a close up of the couching. It really added some extra zip to the tree skirt!

Thanks Jean, and Connie 🙂 !

I don’t know why I haven’t tried this yet, but I know what I’ll be doing with my next empty toilet paper roll.

Let me know if you try this. A picture of your project would be fun too!

Silly Goose

January 8, 2017 17 Comments

So here’s a fun way to begin the new year – sharing pictures of my latest quilt! A few weeks ago I mentioned that my most recent contest quilt had been accepted into the New Quilts From an Old Favorite contest at the National Quilt Museum in Paducah, KY. The judging is completed and I’m now free to share my quilt with you. The traditional block the museum chose this year was Flying Geese. While at the AQS show in Paducah this past Spring I got my idea. It’s called Silly Goose, and the label reads: “There’s one in every crowd. She just can’t follow the leader or the rules. What a silly goose!”

flying geese variation

It was great fun creating the crazy, silly-ness in the solo silly goose.

I used stretchy metallic fabric once again. You may remember my first experience with that in “40 Wonderful Years” (click here for that post). It was a challenge to sew on, but the stretchiness gave the trapunto a shine I loved. The only color I couldn’t find in a Spandex™ type fabric was orange, so I tried polar fleece. Another non-traditional quilting fabric. It is a little fuzzy, but I was pleased with the results.

Next, came the quilting. That was even more fun! I chose to free motion embroider designs on the background fabric in neon thread, before I layered and trapunto’d the top. This allowed the embroidery to lay on top of the poofy areas.

machine embroidered trapunto

The effect was just what I was looking for.

Once begun, the quilting took on a life of it’s own, and it was a joy.

This was followed by fused crystals in the small amount of space that wasn’t yet stitched.

WooHoo! I hope you can see the joy I have in playing with fabric, color and design. The Flying Goose exhibit will be hanging in the National Quilt Museum during Quilt Week this Spring. Then it will travel for two years to many shows across the country. All the quilts will also be featured in a book, published by the museum. It’s always fun to have a quilt travel and visit places I have yet to see.

I praise God for the opportunities and joy He’s given me through quilting!


Quilting Time

January 1, 2017 19 Comments

Happy New Year!

On Thursday this week Maria invited Ida and me over for a day of quilting in her recently cleaned studio.

When we arrived we found her living room to be a feast for the eyes. She had her lovely Christmas quilts hanging on the wall.

and many other beautiful quilts folded over ladders.

Along with clocks! So many clocks! And they were all at different times!

So, we had to ask. Her answer got me to thinking about time – a thought very pertinent, since we’ve just started a new year. Time can crawl, or it can fly (like all of 2016). It is also of the essence, and this related to Maria’s reply.

She said that time is very, very precious. It’s the most valuable thing we have. Food, things, people, and just about everything else can be replaced, but when time is gone – it’s gone. She loves to go thrift store shopping and look for old or interesting clocks. This was the point when we noticed none of the clocks were at the current time. When asked she replied her clocks represented important dates in her life: her dad’s birthday, March 12, was 3:12 on one of the clocks. Her birthday, October 9, is 10:09. Each clock meant something. Wow! I had never noticed that a 12 hour clock could represent the dates for a 12 month year.

Then she showed us the one set for three o’clock to represent the time of Christ’s death for her sins. She said she has the alarm on her phone set for that time each day, so she will pause and remember His sacrifice. I think I may be in need of a few more clocks  🙂 .

We each got quite a bit of quilting done, plus a lot of good conversation, and a nice lunch out. Maria showed us the quilt she’s been working on for almost a year, Jinny Beyer’s Moonglow. She has one more border for the top to be finished.

Gorgeous! Thanks Maria, for a delightful, and insightful, day.

My wish for the new year is that you will have time to do what you love, and to spend with those you love. And that you will use it wisely. God bless you in 2017!

Merry Christmas 2016!

December 25, 2016 8 Comments

Joy to the World!

I love Christmas! It is such a joyful time of year. And when it snows, everything is so beautiful! We’ve had 5 major snow falls so far and I feel like I’m living in a winter wonderland.

I enjoy the preparations for Christmas. One of my favorite pre-Christmas activities is to “ring and sing” for the Salvation Army. My friend Sharon and I have done this for over 15 years, and this year Margaret joined us.

One of my family’s Christmas traditions is to bake Christmas cookies together. My mom and I haven’t missed a year since I was able to help. This year Betsy, Sommer and Trey joined in the fun.

My dad was in charge of helping the kids “unwrap the Hershey kisses”.

Christmas Eve and Christmas day we were blessed to celebrate with all the family who live nearby. I couldn’t resist having our family Christmas picture taken in front of my round robin Christmas quilt this year. Merry Christmas from the Kirsch house!

Many gifts were exchanged, but the most amazing gift of Christmas is that God became man, lived, died and rose again, out of love for each of us. Oh come let us adore Him – Christ the Lord!

Quilts and Staples?

December 11, 2016 2 Comments

It’s beginning to look a lot like Christmas in our woods. Last week we got a few inches of snow, so I headed out to take some pictures. This was my favorite:

Yesterday we brought the canoe into the barn just in time for more snow. The pond is now frozen over, the birds are loving our feeder, and it looks like we’ve had about 6″ more so far.  I think it’s beautiful!

This week’s post has nothing to do with snow, but I hope you enjoy it!

You may remember a post I did last Spring about rust dyeing (click here to read that post). My friend Ida created a couple of pieces of rust-dyed fabric when our group experimented with the technique. Well – she decided to do something with a piece of that fabric. She added a Seminole border in wonderful matching fabrics.

idas-rust-quilt

Our group had discussed the difficulty of quilting rust dyed fabric. The rust leaves enough metal in the fabric to make some areas impenetrable to a needle, thus making the quilting step a frustrating experience. Ida surmounted that problem by “tying/tacking” her quilt with brass staples!

idas-staples1 rust dyeing

Ingenious! And just when you think there’s nothing new under the sun. Leave it to my very creative friend Ida – to come up with the perfect solution.

Stapling your quilt… it might become the new, “in” way to quilt!

************************

An Exciting Update for quilters in and out of Wisconsin!

This past week I received good news about the Treasured Quilts of Wisconsin video on pbs. The entire show is now available on-line. So, even my out of State viewers can access it! Here’s the link!

http://video.wpt.org/video/2365906809/

Watch now: WPT Presents | Treasured Quilts of Wisconsin | WPT Video
video.wpt.org
Join host Nancy Zieman for this special featuring interviews, stories and quilts.

Scarecrow Faces

November 27, 2016 3 Comments

Important information about our upcoming cruise

Our Sew We Go cruise from Quebec to Boston in September of 2017 is going to be norwegian-dawnspectacular! And we still have a few cabins left. Because this is such a popular cruise, most cabins not spoken for by December 26 will be released back to Norwegian Cruise Lines. So, if you’ve been contemplating joining in on the fun, we need to hear from you soon. This could be a wonderful addition to your Christmas “wish list”. For all the details go to: https://www.chrisquilts.net/trips/, or to open a printable pdf click here!”

***And now for my topic of the week***

While teaching in Nebraska last year, I found a pattern for a table runner I just had to have.
topsy-turvy-scarecrow-pattern
To order your own pattern go to: Happy Hollow Designs!

I usually like to design my own projects, but these scarecrows were just too cute, and I promised myself I would make it this year! I pulled it out in the beginning of September only to realize I didn’t really feel like tracing/cutting out all those little pieces. Inspiration struck when I thought about scanning the pattern into my Brother Scan ‘n Cut™, and letting this wonderful machine do the tedious work. It was a great project for me to learn more about what my Scan ‘n Cut™ can do (to read my previous Scan ‘n Cut™ post click here).

Once the pieces were all fused and cut out, Sommer helped me to “build” the scarecrows. She was disappointed when I ironed them down

scarecrows-faceless

and machine blanket stitched around them,

scarecrows-stitching

because she couldn’t keep playing with them. So she offered to draw the faces. I stalled until mommy came to pick her up. That night I told Mike about it and he said I should let her. Duh!

The next day I had her draw some faces on paper first. We talked about different expressions, and shapes for eyes and mouths. I was amazed at how confident she was. Then I handed her a washout marker (grandma loves her, but she’s not crazy 😀 !) and stepped back. Without hesitation she drew every face: boom! boom! boom! She was done and never even needed to turn the piece around to draw the upside down scarecrows!!!


scarecrow faces scarecrow-faces-detail2

And here’s the finished runner:

scarecrow faces

I love them! I traced over Sommer’s lines with permanent marker. I think it’s my favorite table runner ever.

Garment Art

November 20, 2016 8 Comments

Before I get to this week’s topic – I have some exciting news! I finished my most recent contest quilt this past month, and sent the photos and entry papers to the National Quilt Museum in Paducah 24 hours before the deadline. The New Quilts From an Old Favorite challenge block this year was “Flying Geese”. My quilt is entitled “Silly Goose” and it was accepted as a finalist!!! It will be hanging in the museum during quilt week this April – praise the Lord! I can’t share pictures until after the judging, but I learned a lot while creating this project and can’t wait to post about it in the future.

And now – my topic of the week:

I have a jacket I made to wear while presenting my “Gone to the Dark Side” lecture, but I like it so much I wear it often (and Mike is ok to be seen with me wearing it in public  🙂 .

quilted art jacket

quilted art jacket

I may have shared the jacket previously but, if you haven’t seen my lecture, you haven’t heard the story.

I often refer to my fabric stash and UFO’s as items that are marinating until they reach the perfect time to be used and enjoyed. Usually a project hits the UFO bin because I’m not sure what to do next, and it’s not until I learn a new technique that will work in it, or I have a person or contest to finish it for, that that particular project comes to fruition.

Way back in the mid 90’s I found a yard of fabric in a remnant bin at JoAnn Fabrics that grabbed me.

dark-side-fabric

I wasn’t sure it was even all cotton, but I didn’t care. I bought it, brought it home, and threw it in the stash (a healthy stash needs to be fed regularly).

A few years later I passed by a clearance shoe rack at a major department store and found a pair of shoes in the exact same fabric (and I did still wear this type of shoe back then)!

dark-side-shoes

Now I’m sure I need to use that fabric in a garment, so I buy the shoes and throw them on a shelf near the stash.

A few years later I’m at a discount store and there it is … a purse in the same fabric!

dark-side-purse

So I threw it on the shelf, next to the the shoes and pulled out the fabric. After pulling some additional fabrics from my stash, and finding a jacket pattern in the pattern box, I began string pieced units for the jacket fronts. About an hour into it I lost interest and everything was thrown into a brown paper sack and pushed to the back of the shelf.

Additional years passed until I met a trio of garment sewers at a Sewing and Quilting Expo, who referred to quilting as “the dark side” of the sewing world. This led me to create the “Dark Side” lecture. As I’m putting this lecture together I realize it would be great to have a “costume” to wear while presenting it. I dig to the back of the closet, decide I still like the fabric, and discover the shoes still fit. I also have a newer jacket pattern that I really like. It’s called the “As You Wish” jacket by Kate Art Designs. This is not only a well done pattern that is easy to use, but Kate has a video in which she shares the perfect way to fit your jacket on her site.

The marinating is finished, all the necessary components have come together, and the time to create the finished project has arrived.

I marked each pattern piece at the correct size, and cut it out about 1″ larger than needed from  3 fabrics: the outer fabric, the lining and a piece of flannel to act as a thin batting/filler. I layered each piece and began the fun part – creating a design. I played with design techniques from my most recent book: “Where Do I Start With Fiber Art”.

Where-Do-I-Start-With-Fiber-Art

Squares and square-spirals were fused in place and then secured with top-stitching. The solid yellow areas are made from ultrasuede.

The sleeves yelled at me “don’t overdo it”, so I continued the square theme in a “Big-Stitch” with embroidery floss (click here for a post on the Big Stitch).

Once the designing was done, I cut the pattern pieces out at the correct size and sewed the jacket together, binding the outer edge and covering the seams with the focus fabric.

I’m so pleased with the results and especially thrilled that this very old UFO has a new and exciting life ahead of it. I’ve also discovered that I now utilize some quilting techniques to speed up and augment the garment creating process.

Do you have a garment background? Any garment pictures you’d like to share?

Birthday Block Update

November 6, 2016 3 Comments

I love Autumn. So having a Fall birthday is always a joy, but this year it was especially delightful. While the children were enjoying their leaf pile:

leaf-fun-sommer-trey

I was enjoying my block pile:

birthday quilt blocks

Are you ready for the grand total?

60 blocks exactly!!!

I can’t believe it. How amazing! I had to recount the pile twice, just to be sure.

In honor of my 60th birthday, Wendy invited friends to send me 4-patch blocks during the month of October (click here to read that post), in hopes of getting 60. And I did! What wonderful fun!

Thank you to everyone who made this gift so special. I have enjoyed every moment reading and re-reading the blocks and cards while thinking about the dear friends who sent them to me. Some contained short messages, others quoted famous people (there were two from Einstein!), and many included Scripture verses. Each block is special to me. Here is a sample of just a few:

The block from Wendy, who came up with this delightful idea. We have shared so many adventures together and words can’t express what a blessing she is in my life.

block-wendy

My mom taught me to sew and, even though she is not a quilter and she had a broken hand at the time, she made a block and wrote on it (I love the X O X O X O white fabric, and I love you mom!).

birthday block

At Patched Lives quilt guild Geraldine came up and handed me this block:

block-geraldine

She wished me a happy birthday and then explained that her hands shake too much to write well, but when I look at her unsigned block I should think of my dear friend Geraldine who is 89 years old. You’d never know it to talk to her!

A surprise block came from my friend Nina. We haven’t seen each other in quite a while, so imagine my glee in receiving this message along with a block: “Dear Chris, Happy 60th birthday! I read your blog every week. As we travel quite a bit, I can actually report that it has been read in some wild places – New Zealand, Tasmania, the Ukraine, Israel – to name a few. It has given me great pleasure and a cozy sense of home.”

block-nina

The last block I’d like to share was the last one I received. It was #60 and came all the way from Arizona. Evelyn and I have had many wonderful quilting adventures together.

block-evelyn

I’m not able to find the words to capture how truly humbled and blessed I feel by the generosity of all you dear, dear people. Thank you so much! I can’t wait to start playing with a layout for my favorite quilt (I’ve already decided this will be my favorite quilt 😀 )!

If you’d like to see the list of the Scripture verses included on my blocks click on birthday-block-bible-verses!

  • « Go to Previous Page
  • Page 1
  • Interim pages omitted …
  • Page 49
  • Page 50
  • Page 51
  • Page 52
  • Page 53
  • Interim pages omitted …
  • Page 77
  • Go to Next Page »

Primary Sidebar

Archives

Recent Posts

  • Quilting in Bloomington ~ Part 2
  • The Indiana Heritage Quilt Show ~ 2026
  • Bird’s Eye View
  • The Birds
  • Sew Much Creativity

Recent Comments

  • Laurie Neubauer on Quilting in Bloomington ~ Part 2
  • judy raddatz on Quilting in Bloomington ~ Part 2
  • Kathy Wuhrmann on The Indiana Heritage Quilt Show ~ 2026
  • Doris Ast on The Indiana Heritage Quilt Show ~ 2026
  • judy raddatz on The Indiana Heritage Quilt Show ~ 2026

Categories

Footer

My Guide

Whatever you do, do your work heartily, as for the Lord rather than for men.

—  Colossians 3:23

Contact Chris!

  • Home
  • About
  • Gallery
  • Classes
  • Trips
  • Books
  • Blog
  • Contact
  • Sign Up For My Blog

Copyright © 2026 · Chris Quilts · Website by Adunate · Privacy Policy