• Skip to main content
  • Skip to primary sidebar
  • Skip to footer

  • Home
  • About
  • Gallery
  • Classes
  • Trips
  • Books
  • Blog
  • Contact
  • Sign Up For My Blog

Blog

Facing a Quilt

October 5, 2014 3 Comments

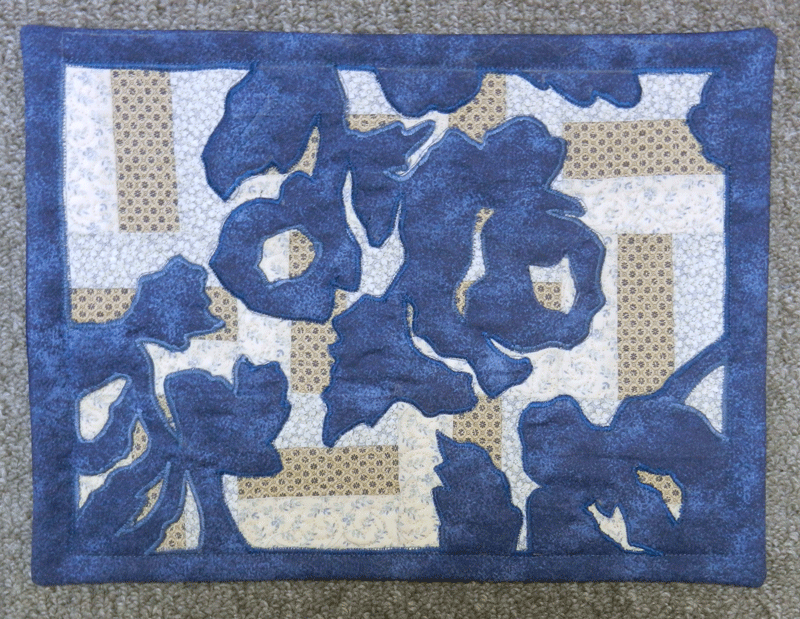
I’ve discovered a great way to face quilts – giving the look of no visible binding on the front. I found it in an article by Kathleen Loomis, in American Quilter magazine 7 years ago.

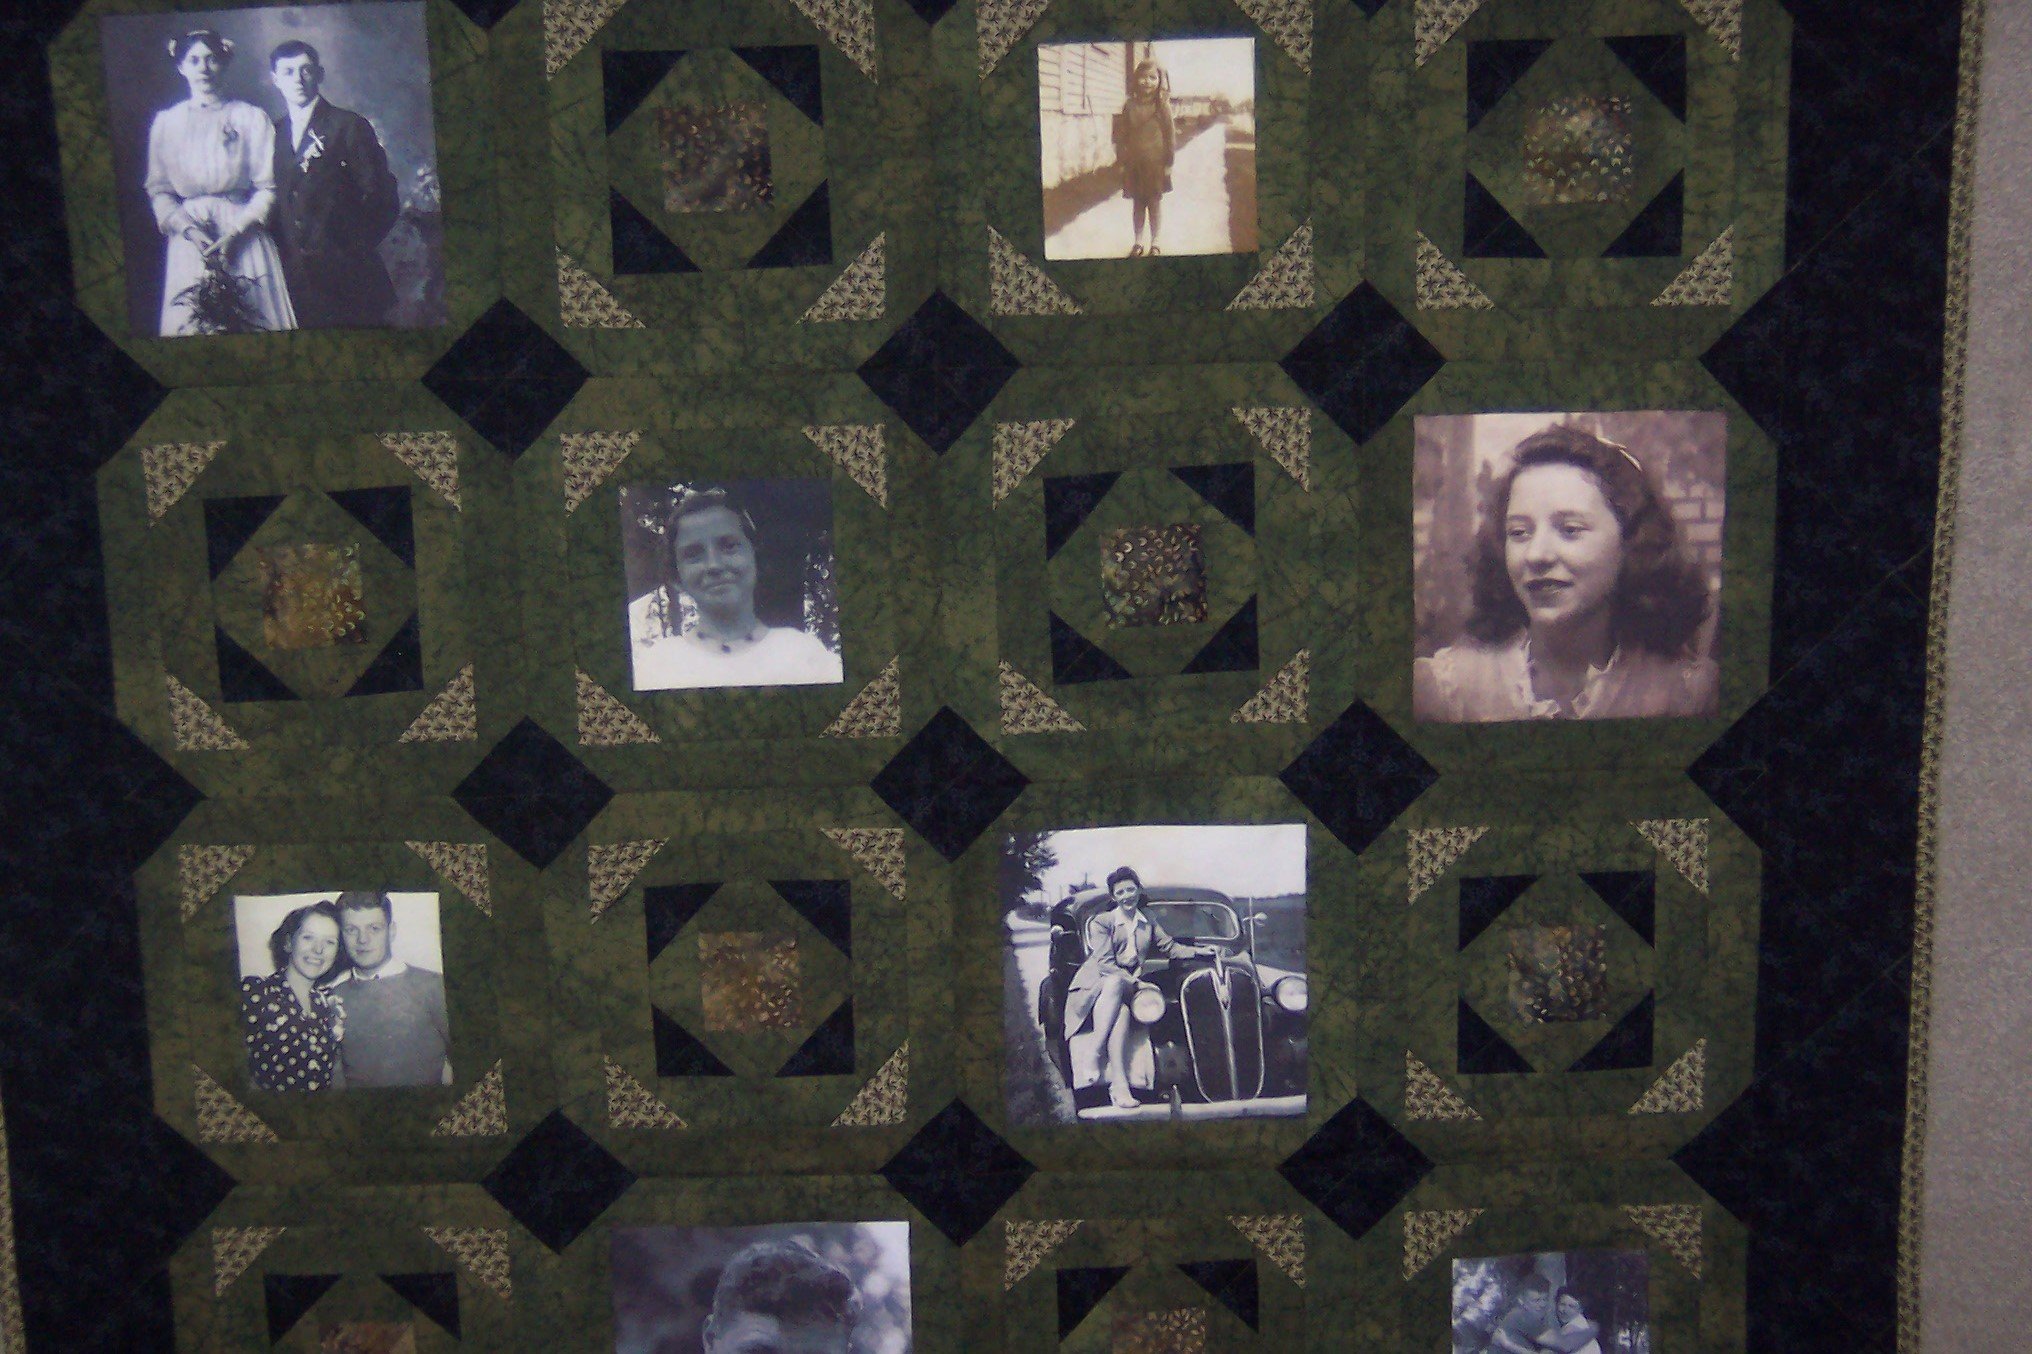
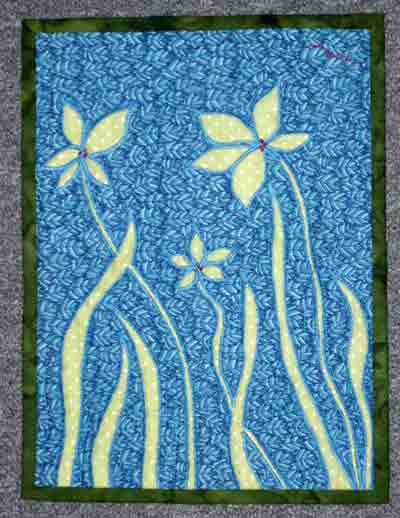
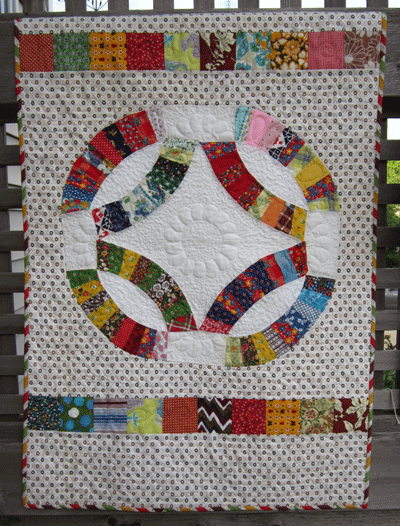
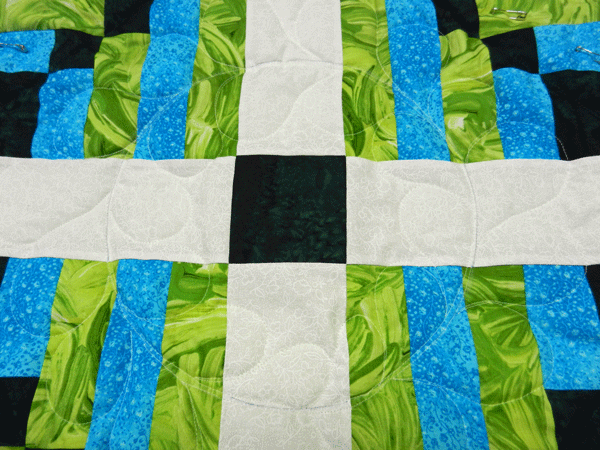
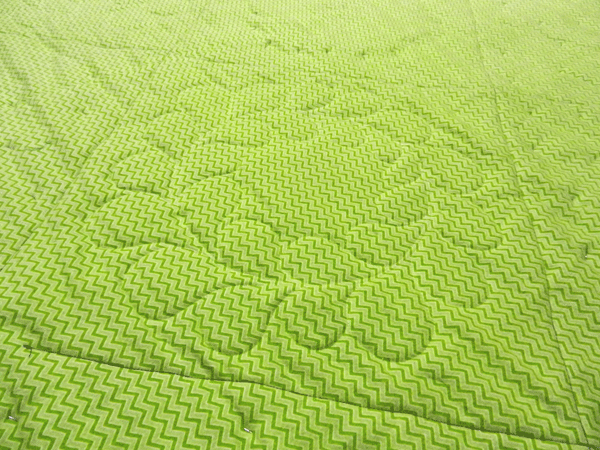
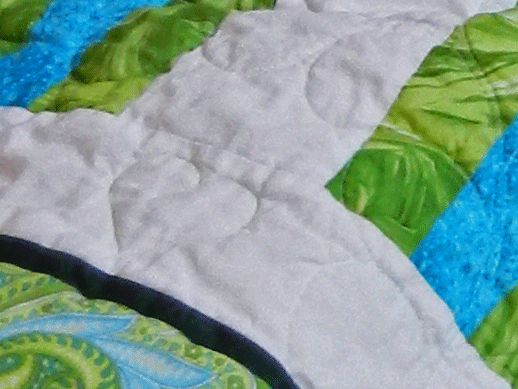
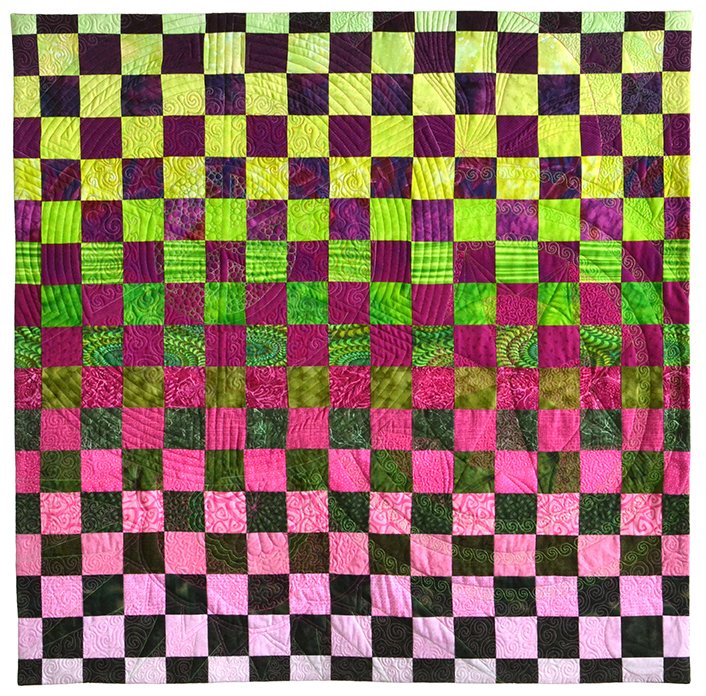
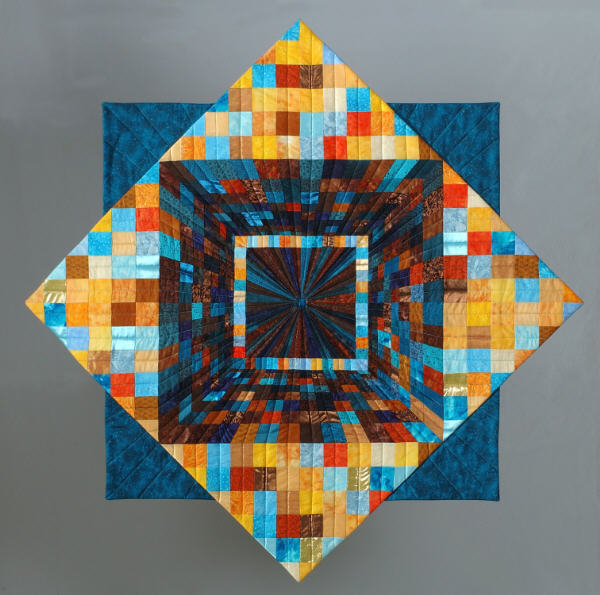
It’s not uncommon for a faced quilt to end up with bulky corners, but Kathleen’s way eliminates that problem with a slick trick for trimming out the excess.  I’ve used her facing technique for many of my quilts and have always been pleased with the results. Here are a few of my faced quilts. All three of these quilts are clearly art quilts and I felt a binding would have detracted from the finished look of the quilt.

Risen - an experiment in celtic design using red rayon rat tail to outline all the elements.
Risen – an experiment in celtic design using red rayon rat tail to outline all the elements.


Interchange - made for a challenge called "Color Wheel Opposites"
Interchange – made for a challenge called “Color Wheel Opposites”
Vanishing Point - made for a challenge called "On-Point"
Vanishing Point – made for a challenge called “On-Point”


Kathleen has a great tutorial for facing quilts on her blog (with lots of clear pictures) . She’s refined her technique a bit since I first read about it, and she’s eliminated the curved corner pieces on the back, but the essence is the same. Rather than my having to redo the instructions, I think you’ll enjoy getting it from the originator. Please click on this link for the step by step instructions:  http://artwithaneedle.blogspot.com/2011/03/perfect-faced-quilts-tutorial.html.

Give it a try and then remember to “bookmark” her site so you can find it again (although the link will always be on my blog and you can find it by typing “facing” in the search box on the upper right of my blog page).

Sommer Sews!

Sommer and I had a sewing adventure this past week and I just have to share. She came over wearing pants that were about 1 ½” too long. Grandma decided she needed to do a quick hem job and Sommer was fascinated watching me thread the needle. She climbed up in my lap and really examined each stitch I was taking. After a few she said “I do it” and tried to take the needle from me. I told her it was too sharp and she should just watch. My next thought was: “I wish I had an old fashioned sewing card for her”, then: “where can I buy them nearby”, and this was followed quickly by “you own a paper punch – go find some cardboard”  😀 ! In a short amount of time she had colored on her card, I wrote her name on it and then found an old rainbow colored shoe lace. I took a video as she stitched, and you may click here to watch it. Here are a few pictures of Sommer sewing!

Sommer Sews 1

Sommer Sews 2

Sommer Sews 3

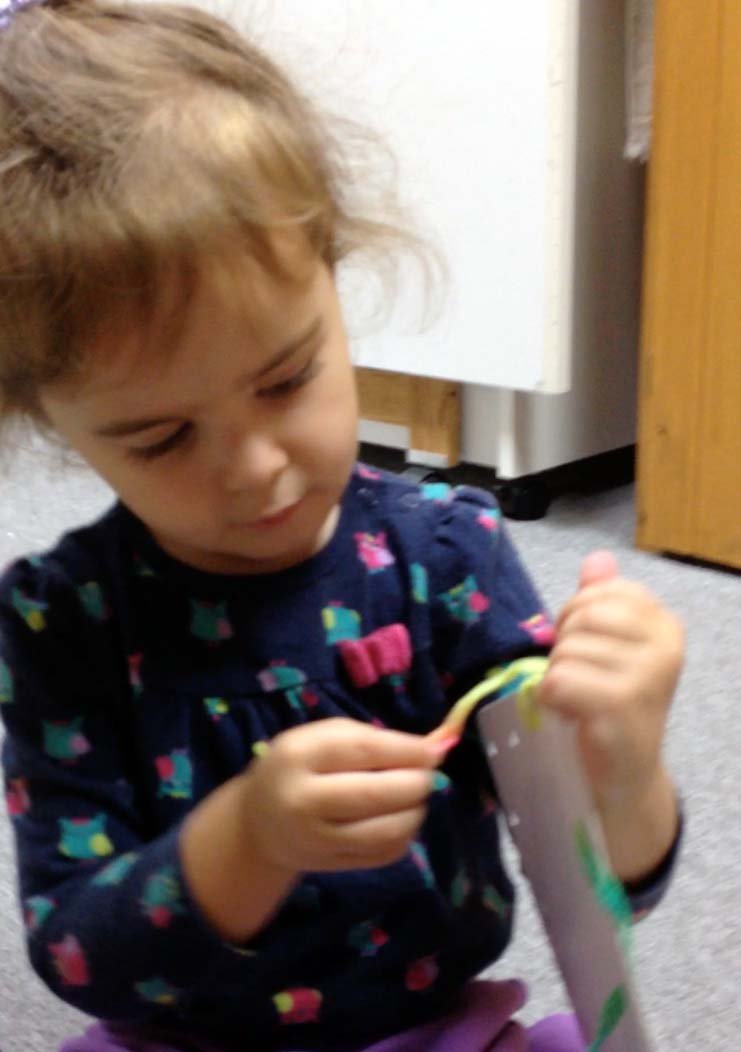
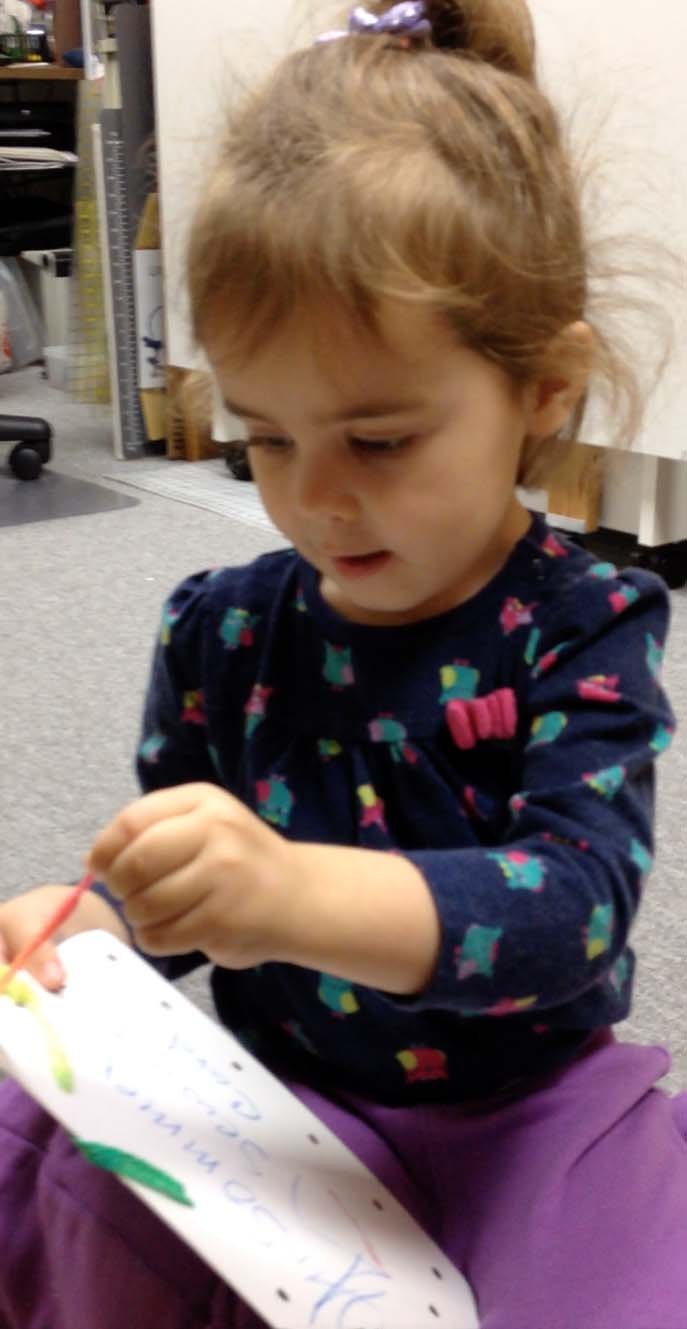
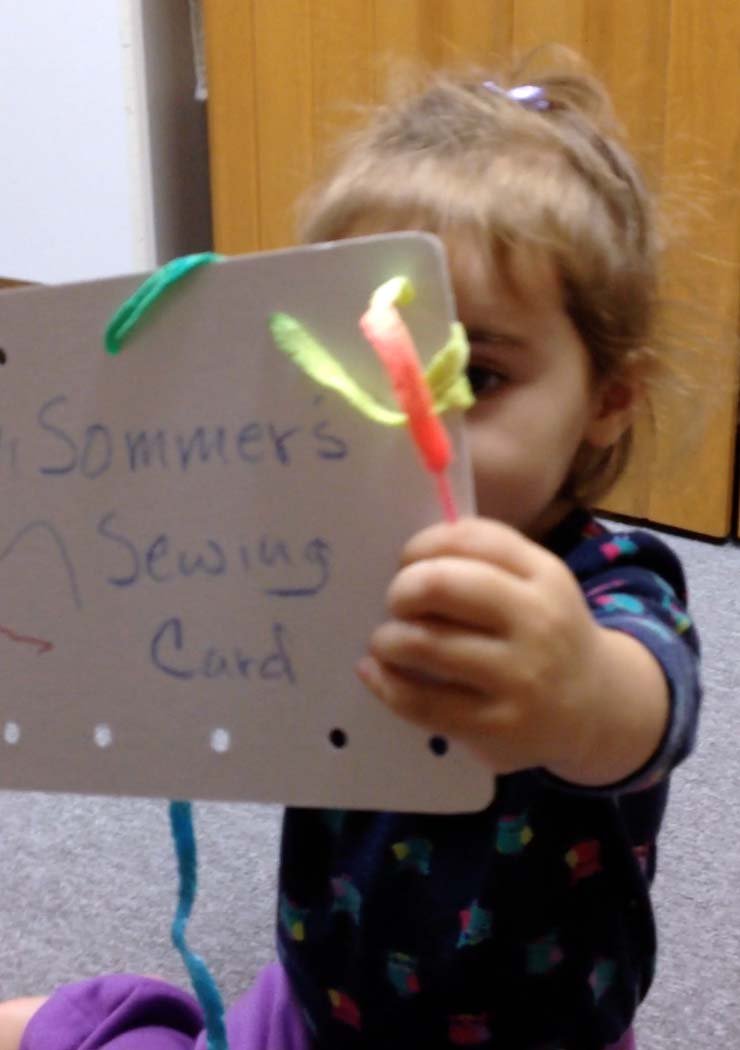
She loved it, and sewed, and re-sewed the card three times. She sure is grandma’s girl!

Turning a Quilt

October 13, 2013 13 Comments

I’ll get to the topic at hand in a moment, but first, I received some lovely responses to last week’s post about the memorial quilt.  Please go to the comments on that post to read about them. There are so many ways quilts can be used to comfort and show love. Laura Krasinski reminded me of the memorial quilt the Milwaukee Art Quilters made for Margot (one of our members), who’s sister passed away. Each member made a floral block. Here’s Margot with the quilt.

memorial quilt

This week Nancy sent me a photo of the memory quilt she made for her mother who is struggling with Alzheimer’s Disease. Here’s what she wrote:

“Dear Chris,I enjoyed your recent Blog about Memory Quilting.  I have done a lot of Memory Quilting and enjoy this process of keeping the past alive.  It was a helpful tool for me, also, when grieving the loss of a much loved family member.  I have attached two photos of a quilt I made for my mother who is living with Alzheimer’s Disease.  It has photos of her as a child, young adult, young mother and wife.  She has it on top of her bed and continues to tell me that “it is the best gift I have ever received”.  She looks at the photos and occasionally it triggers memories from the past.  Thanks for highlighting this quilting format.  Nancy”

This is Nancy’s lovely quilt:

memory quilt

My Father-in-law suffered with Alzheimer’s and he passed away a few years ago. In his memory I decided to make a small quilt for Ami Simm’s Alzheimer’s Art Quilt Initiative. She has raised a large amount of money to fight Alzheimer’s in honor of her mother, by auctioning off small art quilts (8″ x 11″). Harold Von der Linde, my dear FIL, was a passionate gardener, so I called his quilt “Memory Garden”. It sold for $75, what a blessing!

memory quilt

Then yesterday I received an email from Marie with this message:

“Chris, I enjoyed your blog on memorial quilts.  My grandmother passed away over 10 years ago and I was fortunate enough to get her stash.  She had scraps left over from toys and quilts she made the grandkids.  As I was going through the fabrics, I found several patchwork blocks and partial pieces from a double wedding ring.  This year for our family reunion I decided it was time to put them to good use.  Here are a couple of pictures of the wall hangings I made combining the pieces.  The family members who received them were just thrilled and I felt good about passing on a bit of my grandmother’s legacy.”

These are the pictures she included in the email:

marie-quilts

marie-quilts2

marie-quilts-3

They’re lovely Maire, thanks for sending the pictures!

So, on to “quilt turning”. Not as in “a bed turning of antique quilts”, but a simple technique for finishing small quilts, sometimes referred to as the “envelope” technique. This is my favorite way to do it and it’s really quite easy!

1. Square up your small quilt and cut a piece of batting the same size. Cut a piece of backing the same width, but add 1″ to the length measurement.

2. Sew a 1/4″ seam in the back (this will take up some of the extra length), leaving a 3″ opening in the stitching, and back stitching on both sides of the opening . Press the seam to one side, and cut the fold at the opening in the stitching. Trim the length to the same measurement as the quilt top.turning a quilt

3. Layer the pieces: batting, quilt top (face up) and then quilt back (right sides together). Stitch all the way around with a 1/4″ seam (no need to leave an opening along the edge).

quick-turn-stitched-layers

4. Trim off the corners of the seam allowance and turn the quilt right side out.

turning a quilt

5. Push corners out and press.

quick-turn-back

6. Stitch up the opening in the back and quilt as desired!

quick-turn-front

The best part of doing it this way is that the opening is easy to stitch together on the back and you don’t need to stitch up an opening along the outer edge of the quilt. The ones I’ve done that way always seemed to wobble a bit.

Another way to do a “non-binding” finish on the outer edge of your quilt is to face it. If you have an oddly shaped outer edge, you may want to refer to my previous post on that topic by clicking here.

Wedding Quilt

August 25, 2013 1 Comment

First of all, I must begin with a huge thank you to everyone who responded with opinions concerning the cover for my new book. I was blown away by the number of responses and grateful for all of the thoughtful comments. I did not take that decision lightly and feel good arguments were presented for both covers. That being said, I’m not telling which way I went yet :-)! “Where Do I Start With Fiber Art?” is now at the printers and should be ready for my classes at Expo in Madison next month. It will be available on my website shortly after that.

Now for this week’s topic. My August 11th post began with a picture of me basting a quilt in the driveway. I was making it for my niece’s wedding and Brianne and Scott were married this past Friday. They are a very sweet and special couple and their day was beautiful! It was such a blessing to celebrate this joy filled time with family and friends.

Brianne and Scott

Quilting and finishing their quilt was an adventure for me and I’d like to share some of the things I tried and the results. It was actually made for a class sample last semester and as soon as I got the top together and decided on a border (click here for that story :-)) I knew it was the one I wanted to finish for Brianne and Scott. The colors are bright and modern, and I could just picture them cuddled up under it.

When it came time to layer and quilt it, I chose to use a washable wool batt to make it extra snuggly and, while basting it in the frame, I had a thought: I’m always telling my students that quilting the quilt should be as much fun as making the top. So, how should I quilt it?

Sparingly was the answer. No tight and tiny filler designs this time! I didn’t want to flatten the nice poofy wool. I also didn’t want to drive myself crazy with a lot of marking and planning. This quilt wasn’t going to competition, it was meant to keep 2 people I love warm. Here’s what I did:

1. Gridded the quilt on the diagonals, through the dark squares, with a walking foot.

grid quilting

2. Prepared to make fast and fun feathered wreaths by marking a circle around an embroidery hoop,  straight pinning up to the circle and removing any safety pins that were in the way.

quilting simple feathered wreath

3. I began by free motion quilting the marked circle and then “feathering” around the outside. I’ve found feathers to be much easier since I took a class with Diane Gaudynski and she taught that a feather is half of a heart. I doodled loads of hearts when I was a young girl, so I had the shape down. She also showed us how it was easier to “draw” a half heart from the indent at the top, around to the point at the bottom. Here is my first “outside the circle” feather. I’ve come back up from the point and am at the top of the bump which will be the second feather.

quilt simple feathers4. As you can see – my feathers are big. Once I made all of the feathers around the outside, I stitched a second circle inside the first to create a “spine” and then I feathered the inside.

quilt simple feathers

5. They were a joy to make and the wreath was done so quickly I couldn’t wait to start the next one. Here’s a view of a wreath from the top:

quilt simple feathers

and from the back:

5-gridding-and-feathers-back

Notice how the feathers are not consistent in size or shape and yet they look good when all were done? Don’t agonize over each little stitch – revel in the finished effect!

quilting a large quilt

I did the free motion quilting on my HQ Sweet 16 and I used my “Quilt Float” system to lift the quilt and keep the weight of it from dragging me down. Quilts can be floated with a domestic machine also. For info on the “Quilt Float” from 2 previous posts, click here and then here :-).

heart

When all the wreaths were made it was time to fill in the open areas. I did this with free motion hearts.

The adventure didn’t stop there, but the post is getting a bit long. Next week I’ll share my thoughts on border quilting and working with a wool batt.

Oh – just one more thing. I’ll be presenting a program at the library in McHenry, IL in September and I wanted to share their flyer in case you can make it!

Screen Shot 2013-08-24 at 8.59.56 AM


Quilt Blocking

September 16, 2012 7 Comments

When my quilts are meant to hang on a wall or go to competition, I really want them to be square and lay flat. This doesn’t always come naturally, so blocking is a good way to do some fine tuning. It won’t correct major ripples or wobbles, but it can work wonders for minor issues. Please be aware that I use this technique with cotton batts. Polyester batts may flatten due to melting from the heat of the iron. Be careful too that the colors in your fabric will not run when wet and the fibers are not too fragile for the heat of the iron.

I always quilt my quilts before I attach the binding. I feel this allows me to quilt any fullness out to the edges and then square things up prior to binding, yielding a truly square and flat quilt. So, once the quilting is done I do the square up step.

This is my method of choice:

1. Choose a carpeted, out of the way area and cover with a layer of towels a little larger than the quilt.

2. Place the quilt on the towels, back side up, and mist with water.

3. Turn the quilt to the right side and mist again.

4. Place a large square ruler in a corner and pin the quilt into the carpet along the ruler, keeping the edge of the quilt top even with the ruler. A bit of tugging and encouraging may be required.

5. Butt 2 long rulers up to the top and left edges of the square ruler. This is called “piggy backing” and creates a large square. Keeping the rulers aligned, continue pinning the quilt into the carpet.

6. Continue moving the rulers around the quilt, pinning as you go. Some areas require a bit more encouraging than others :-).

7. Once the entire perimeter has been pinned. Place a pressing cloth over an area and place the iron in the corner for a count of about 5. Move the iron to an adjacent area and repeat until the whole quilt has been pressed.

I then leave everything as is for at least 24 hours. This allows for thorough drying. Once the pins are removed, rotary cut around the now square outside edge of the quilt and bind!

Do you block your quilts?

A New Look For My Blog & a Quick Miter Tutorial

May 6, 2012 4 Comments

Welcome to my new blog look!

Diahann Lohr, of Adunate Word and Design, inspired me to create my blog over a year ago. I then hired her to design my website, now she has integrated the two. I’m thrilled and I hope you enjoy the change!

The address for my new blog is: www.chrisquilts.net/blog. It’s shorter and simpler than my previous blog address, and the good news is that if you usually access my site by clicking on the link in my emails, you can continue to get here the same way. Please feel free to offer feedback by clicking on the word “comment” at the end of this post.

This week’s topic is about my favorite way to miter a border. Once you have sewn on the border strips, stopping both seams 1/4″ away from the corner to be mitered, it’s as easy as:

1. Fold diagonally through the quilt while aligning the border strips on t0p of each other (right sides together), and lay a ruler along the fold with the 45° line along the stitching.

2. Draw along the edge of the ruler on the border strip, remove the ruler and pin.

3. Sew on the line!

I’ve been doing a bit of mitering lately because I was designing a new Attic Window project for a Summer class at WCTC in Waukesha.

Let’s Face It!

October 10, 2011 7 Comments

My latest quilt has a very odd outer edge that I wanted to face, rather than bind. After a bit of noodling I came up with a way that worked great! It would work for any quilt with a curved or unusual outer edge (scallops, double wedding ring, grandmother’s flower garden, etc.). I can’t show the front of the quilt because I plan on entering it in a major show and don’t want to have it shown publically yet. So here’s the step by steps along with a full shape picture from the back :-). I hope you enjoy them.

1. Layer and quilt the quilt. Then, with water soluable thread on top and a thread that contrasts the backing fabric in the bottom, stitch through all layers on the exact line that will be the outer edge of the quilt. Cut away all layers 1/4″ from this line.

2. Lay quilt, right sides together, on a piece of  facing fabric which is slightly larger than the quilt itself . Pin all the way around.

3. Stitch through all layers (with regular thread on top now), exactly on the previous stitching line, all the way around.

4. Trim even with quilt and clip all “inny” angles.

5. Trim facing fabric 1″  away from stitching, all the way around.

6. Fold facing to back of quilt and match facing raw edge with quilt raw edge.

7. Fold facing completely to back and pin in place.

8. Hand stitch the facing to the back of the quilt and – Voila – you’re done!

If any of the water soluable thread shows along the edge, just get it wet and the problem will be solved (or disolved :-).

Also – This past week Laura Krasinski and I hung a joint exhibit of our work entitled “Make a Joyful Noise” in the lobby of the Waukesha Civic Theater on Main Street in Waukesha (just 2 doors down from Frank’s Sewing Center). Please stop by if you’re in the area!

Flange in Photos

October 2, 2011 7 Comments

Natalie commented that she’d like more instructions on inserting the flange from last week’s blog. So here goes…and with pictures 🙂

1. Cut a strip from contrasting fabric 1″ x the length of each side for a ¼” wide flange or 1 ½”  x the length of each side for a ½” flange.

2. Press these strips in half, lengthwise, wrong sides together.

3. Lay a flange along one side of the the quilt top, keeping all raw edges even and pin in place. Repeat on the opposite side.

4. Repeat for the remaining 2 sides.

Here’s a close up of the “keeping the raw edges even” part:

5. If you’re adventurous, you may leap to step 6. If you’re cautious, you may stitch the flanges in place with a basting stitch, all the way around. Use a seam allowance that is shy of ¼” so these stitches won’t show later.

6. Border quilt as usual.

By basting the flanges in place in this way, the flanges look as if they are just a narrow border.

It is “legal” (remember – there are no quilt police) to just tuck the flanges into each border seam as the borders are sewn on without cutting them to fit and basting them in place, but  then you get a different look as in this tumbling blocks quilt:

This look isn’t wrong, it’s just different.

One warning with flanges – they lay on top of the quilt and extend into it ¼” or ½”. If there are triangles pieced to the edge, the flange will lay over them and the points will be lost. So they work best on non-pieced outer edges or between plain borders.

Flanges may also be added just before binding.

If you’ve never tried a flange – I highly recommend you do :-)!

Pleasing separation

September 26, 2011 5 Comments

This past week a student inquired about adding a very narrow border to her quilt to visually separate the quilt center from a wider border. Piecing in a 1/4″ border can be tricky and so I had some alternative ideas to share:

If you’ve ever done counted cross stitch, you are no doubt aware that once the crosses are completed, most patterns have the different color areas outlined with a line of black backstitches. Even though this line is very narrow, it adds a lot of interest and definition. Sometimes this is a good option for separating borders…and even bindings.

One simple way to do this is to sandwich piping (purchased or homemade) into the seam between the quilt center and the border.

Another idea that has been very popular recently is to fold a 1″ strip of contrasting fabric in half lengthwise, wrong sides together, and slip this into the seam. I like to refer to this as a flange and it can add a lot of punch for a small amount of fabric and effort.

One additional idea is really simple and can be done after the quilt is finished and bound – couch a piece of yarn or cording on top of the seam! Couching simply means to lay the yarn/cording in the “ditch” of the seam and stitch on top of it with a zig-zag or serpentine stitch. It can be done in invisible thread or something decorative.

And now for an example to show how helpful this effect can be:

I made the following quilt for a “Tea” challenge through the Milwaukee Art Quilters. All of the fabrics were dyed in tea and I quilted the different areas as a sampler of quilting designs.

For some reason I bound the quilt in a similar color fabric to the rest of the quilt and it seemed to look like the quilt never ended when hung on a light colored wall. So I couched a brown chenille yarn along the binding and was very pleased with the results.

That simple addition made the quilt a success in my mind :-).

  • « Go to Previous Page
  • Page 1
  • Page 2
  • Page 3
  • Page 4
  • Page 5
  • Go to Next Page »

Primary Sidebar

Archives

Recent Posts

  • Spring Thaw
  • Quilting in Bloomington ~ Part 2
  • The Indiana Heritage Quilt Show ~ 2026
  • Bird’s Eye View
  • The Birds

Recent Comments

  • marlene on Spring Thaw
  • clkquilt on Spring Thaw
  • Mary Alice Hart on Spring Thaw
  • clkquilt on Spring Thaw
  • judy raddatz on Spring Thaw

Categories

Footer

My Guide

Whatever you do, do your work heartily, as for the Lord rather than for men.

—  Colossians 3:23

Contact Chris!

  • Home
  • About
  • Gallery
  • Classes
  • Trips
  • Books
  • Blog
  • Contact
  • Sign Up For My Blog

Copyright © 2026 · Chris Quilts · Website by Adunate · Privacy Policy