• Skip to main content
  • Skip to primary sidebar
  • Skip to footer

  • Home
  • About
  • Gallery
  • Classes
  • Trips
  • Books
  • Blog
  • Contact
  • Sign Up For My Blog

Blog

My Dear Friend Margaret, and a New Friendship Quilt

May 13, 2019 Leave a Comment

I met Margaret 8 years ago when she joined my church family. She is an amazing woman. She was born deaf, but was able to have her hearing in one ear restored to 80% of normal when she was 9. She has a number of other disabilities, but she hasn’t let them keep her down. She is one of the most encouraging people I know, and her love for God and sharing His word is huge. She is a blessing to me.

So when she decided to move to Mt. Pleasant, WI to be nearer to her adopted family, we were all saddened to have her move away, but grateful for the new adventure she has ahead of her.

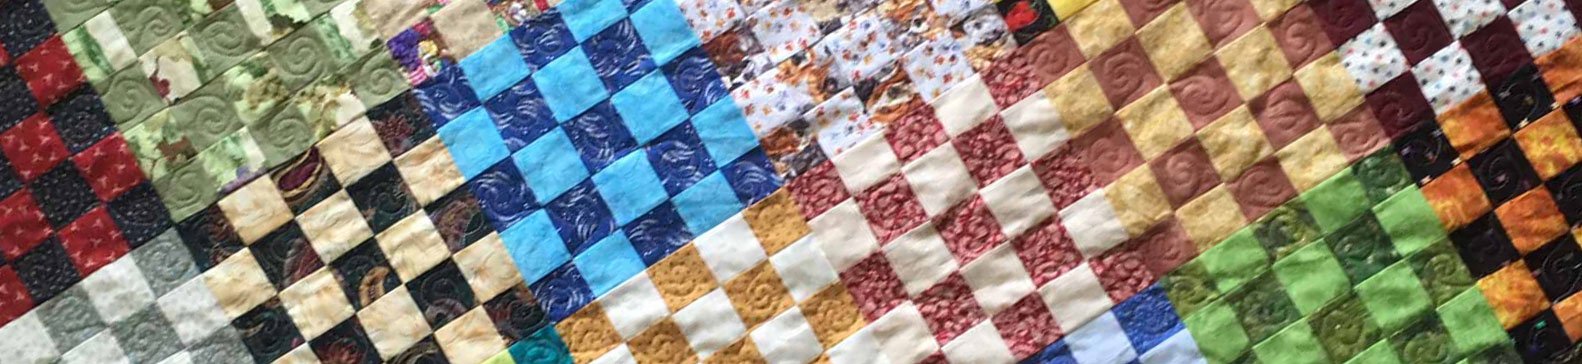
Last week our mutual friend Ann was planning a Sunday School lesson focusing on how much Margaret means to all of us. She asked if I had a small quilt or table runner we could give her to go along with the lesson. My first thought was “why didn’t I think of that?” My second “I need to make her a lap quilt to snuggle up in when she wants to feel the love from her Calvary family”. So, I dug through my UFO bin and found a stack of “25 patch” blocks I’d collected in an exchange at Patched Lives Quilt Guild.

I squared them up and sewed them together. It was a joy and they went together effortlessly. Then I made the quilt sandwich and had fun free motion quilting spirals in the dark squares,

leaving the light squares for signatures! I signed first and here’s what I wrote:

Everyone in class signed it and this week we had more of Margaret’s church family autograph her friendship quilt as she said here good-byes.

We had a wonderful Mother’s Day brunch and took the opportunity to have a picture taken of our Sunday School class. I’m blessed to have all of these wonderful sisters in Christ in my life.

Dear Margaret, May God bless you in your new home. We are all so glad to call you our friend!


Just a short message to quilters in southeastern Wisconsin

I have been teaching at Waukesha County Technical College for over 23 years, and it’s been a wonderful ride. Recently the college announced they will be discontinuing the adult enrichment classes. These include Quilting, Sewing, Reupholstery, Drapery, Clock Repair, and many more.

I feel it is sad that these classes, which are really important to the retired members of our community, will disappear. 

SEW – WHAT CAN YOU DO???

Well, the college will be having a hearing concerning these classes this Tuesday, May 14th at 5pm, at the Richard Anderson Center on the Pewaukee Campus. In the past these types of decisions have been overturned if the outcry from the community is big enough.

PLEASE CONSIDER SHOWING UP! You don’t have to say anything, but we’re hoping for a huge crowd to show support for our classes. So, bring your friends and be there :-). Thank you!

Paducah 2019

April 28, 2019 8 Comments

We helped to hang the quilts on Monday. As always, the plethora of quilts was awe-inspiring. To see photos of the top winners click here!

I usually look for one quilt where I either say “I wish I’d made that” or “wow – I could never do that”, and sometimes both. There were many that grabbed me this year, but the one that stopped me in my tracks was called Celtic Migration. Here it is from a distance and it is lovely, but wait till you see the close-up!

All of the flying geese were 1/4″ x 1/2″ and there were a lot of them!

The National Quilt Museum is always a “must do” at Quilt Week and this year was especially delightful – they had the Best of Show quilts from the last 35 years. The first time I went to Paducah was in 1989 and the winning quilt was Corona II – Solar Eclipse by Caryl Bryer Fallert. It set the quilt world on it’s ear because it was machine quilted. I was new to quilting and I LOVED it.

It’s still one of my favorite quilts!

I was thrilled to be a part of the Museum’s Oak Leaf and Reel contest this year. It’s an honor and a privilege to have a quilt hanging in the museum. My entry is entitled “Oak Leaf and Swirl”. I’ll share more about it in a future blog post.

This year’s contest contained a great collection of art quilts and they were all put into a book available at the NQM gift shop. To see the top 5 winners in the challenge click here. The artists were invited to a “Meet and Greet” on Friday and they had a very good turn out. What a talented group – I’m humbled to be a part of it.

I had a lovely surprise while walking through the opposite gallery. There was an exhibit of quilts recently acquired by the museum and as I came around a corner I exclaimed (to myself) “That’s Roberta’s peacock!”

My friend, Roberta Williams, was an extremely talented woman in so many ways. She has been gone for a number of years, and I believe this quilt was her crowning achievement. I’m so pleased that her family was able to have it selected for the museum’s collection.

One other very exciting opportunity presented itself to me at the museum. A few month’s ago Bonnie Browning, the executive show director for AQS, contacted me to ask if I’d like to be interviewed by the Tri-State Christian Television network because they were looking to do a program about Christian quilters. Praise the Lord! I was thrilled. I brought a few of my quilts and it was a delightful experience. Thanks to Amanda and Kelsie! They said they’d let me know when the program is complete and I’ll be sure to share it on my blog.

Another unique opportunity this week was to spend a little time with my friend Judy Berry. She is the travel planner who has invited me to lead a quilting tour to the International Great Quilt Festival in Tokyo, Japan, this January. She had a booth to advertise the trip and I helped out a bit.

To read all about our upcoming adventure please go to: https://www.chrisquilts.net/trips/. There were many Japanese quilts in the AQS contest and I’ll be including some of them in next week’s post.

In conclusion I need to thank my dear friend Eileen for accompanying me on this wonderful adventure. We laughed, we shopped, we studied God’s word, we took classes, we hung quilts and we rolled them up for shipping home. It was truly a joy-filled week!

As I type we’re on the way home. They got 3″ of snow back home in Wisconsin yesterday, but it’s supposed to reach 50 degrees today so we’re hoping it’s already melted.

This was my 30th year in a row to be a part of Spring Quilt Week in Paducah. I am truly blessed!!!

Marking Quilt Grids With a Laser Level

April 21, 2019 9 Comments

It’s Easter Sunday and my friend Eileen and I are packing up to drive to Paducah for the Spring quilt show. We will be celebrating the Resurrection of our Savior together on the drive down (we hang the show tomorrow :-)), and are ok with this arrangement since we consider every day a day to celebrate what Jesus did for us!

But I couldn’t leave you without a Sunday post, so here goes:

A few months ago I posted about a very talented machine quilter named Doreen (you may read about her at: https://chrisquilts.net/?p=10656)

While reading her blog I was intrigued by a tool she recommended. Then I began a project that required a very accurate grid to be marked on my fabric – and it was time for a fun new purchase!

It’s not a typical quilter’s tool, but it certainly is handy. It’s called a laser level, and it’s very easy to use.

When you turn it on it sends out 2 perpendicular beams of light. Here’s how I used it to mark my quilt:

Lay you fabric out smoothly. I found it helpful to clamp or tape it to a table. Please be aware, I marked the grid in the center of this piece before I thought to take the photos. They were marked with the laser tool, but imagine they’re not there and we’re starting fresh.

This delightful tool made quick work of marking my quilt. It is also helpful in squaring up a quilt for binding.

The project I’m working on here is something I’m quite excited about. This is the base quilt for some really fun blocks. I’m making it for a challenge, so I can’t show you the rest yet. But I think you’ll find it interesting – so stay tuned!

Wishing you and your family a blessed Resurrection Sunday!

Your Creative Mind

April 7, 2019 6 Comments

Last month my friend Sonja was the speaker at my guild.

She is a quilter/fiber artist and I’ve admired her work and her creativity for years. When she decided to put together a lecture, I asked the program committee at Patched Lives to sign her up right away.

Her lecture was entitled Your Creative Mind – and it was a hoot!

She is talented, inspiring and a lot of fun.

I especially loved the grandmothers flower garden quilt she’s been hand piecing for years.

She’d taken the papers out of the back and can’t decide which side she likes better.

I think the back is great. Here’s a close-up:

She has a wonderful perspective on quilting and life. If you’d like to have Sonja share her creativity with your group, email me and I’ll send you her contact information.

Positive/Negative Quilts Revisited

March 31, 2019 3 Comments

I did a post a year ago about the different look that can be achieved by simply changing the value placement of the fabrics in a quilt pattern. In it I shared quilts made by 2 friends using the Bear’s Paw pattern. To read that post, please go to: https://chrisquilts.net/?p=9428

This week I want to expand on this topic. Way back in 1997 my friend Carolyn took a class I was teaching called Almost Charming. The students brought in the 6″ squares we’d been exchanging in our guild, we sorted them by value, then stitched them into half square triangles, and pieced them into Friendship Star blocks. Since a charm quilt has only one piece of each fabric, and this pattern has two, it isn’t a true charm quilt – so it’s Almost Charming!

I did a post about this quilt way back in 2012. You may want to visit it because it contained my favorite technique for sorting fabrics by value: https://chrisquilts.net/?p=2535

So – back to Carolyn. During class she asked me if she could make the stars white, because stars are not black. I hadn’t thought of that when I made my quilt, but she had a great point. We talked through how to change the placement and she went to work. Over the years she would bring up the quilt and how she really wanted to get it done, and in 2009 she finally did. Then she said she’d send me a pic. Well, it only took another 10 years for the photo to arrive (we both laughed about it)! – and her quilt is lovely!

Isn’t it interesting how different the pattern looks when the values are rearranged? I presented a lecture to Carolyn’s guild a few weeks ago and we both brought our quilts to compare them. It was great fun. Thanks Carolyn!

Around this same time I decided I wanted to share a block making technique with my Open Lab class, and the sample quilt I needed was my granddaughter Sommer’s baby quilt. She’s not a baby anymore. In fact, she just celebrated her 7th birthday!

But she was happy to let me borrow her quilt and I was struck by what a great positive/negative design it contained. So I threw it on the floor and grabbed my camera. By the time I snapped the picture, her little brother Trey had photo-bombed the quilt.

It took a bit of persuading, but he finally rolled off, and I got a shot of just the quilt. You’ll notice it contains both positive and negative blocks and the juxtaposition adds excitement to the whole piece:

In case you’re having a hard time seeing the basic blocks, here they are:

This block is a fun one to make oodles of – and then play around with placement. If you’d like to play a bit yourself – I found a printable tutorial for making the Mary’s Triangles blocks at: http://qacdg.org/wp/wp-content/uploads/2014/04/Block-6in-Marys-Triangles.pdf

I did a post about this back in 2012, when Sommer was born. It has information on how to lay out blocks with a strong diagonal and you can read about it at: https://chrisquilts.net/?p=2303

I know this post contained lots of links. I hope you don’t mind, I just love to share techniques and inspiration. Have you made a Mary’s triangle quilt? Have you made a quilt that included positive/negative effects? I’d love to see pictures. Please email me at !

A Sweet Memory

March 24, 2019 5 Comments

I first began making quilts with my Repliqué technique in the early 1990s. We were living in Sun Prairie at the time and I had numerous people in the Madison area commission me to make quilts of a building or vehicle that was important to them.

One of these clients owned the local Dairy Queen restaurant. Here’s the 1994 photo:

They said it was the last original DQ shaped like a barn in the State and they wanted to have it made as a quilt to hang in the restaurant. I made the quilt – 26 years ago! This photo is of a photo because we didn’t have digital back then :-).

I was so pleased to have it hanging where many could enjoy it, but I was a bit concerned about how well it would hold up – simply hanging from a dowel in an ice cream shop.

Well, we moved away and when we went back to visit my brother and his family over the years, Dairy Queen just wasn’t on the agenda.

This past week Mike and I had business in Madison and, on a whim, we decided to stop for a sweet treat. I was so pleased to see that the quilt was still hanging there – and they had it framed to protect it! It still looked great!

And it’s still in the original barn building!

Here’s a detail shot. The signage was done in satin stitching, ink, paint, and cross-stitch.

Our Blizzards™ were delicious and the woman behind the counter said she’d been working there for 29 years. She even remembered my nephews, who worked with her while they were in High School.

What a wonderful trip down memory lane!

Educational Quilts For Kids

March 17, 2019 4 Comments

A month or so ago I received an email from Rita. Here’s what she wrote:

“I attended your repliqué class at the Bismarck Quiltfest and purchased your book for kids…..the one with colors and numbers. the reason I am emailing you is to get your input on the color and number quilts for my special needs granddaughter…..Emma is almost two and she has Down syndrome. I was hoping to put the two designs in one quilt……I think I will eliminate the cursive writing and just put the appliqué number with the cute buttons on that particular block and try to use them in one quilt…..I think I will need to use the “0” and cut the block down to better try to fit it together.  I am trying to make it a bit simpler for her level of development.   I have also decided to use only nine of the color blocks to simplify it a bit for her level! Do you have any ideas to make this work?”

When she wrote to me I was in Hawaii and I didn’t get back to her in a very timely fashion. This may have been a good thing, because she moved forward on her own and her ideas and execution were great. I finally wrote her back and said I loved the idea, and it would be easy to resize and adjust things when copying the patterns from the book. She responded:

“Thank you for taking time to hopefully help me……So I have attached two photos of the blocks I have completed so far……. I only did some of the color blocks to try to keep it simpler for little Emma….I made the blocks the same size in your pattern but I am stuck on the placement now because of course they are different dimensions…..so I have a couple of different options which incorporate sashings or borders. I would entertain your input on these ……I want you to know I am not trying to redesign your awesome patterns but to make it a bit simpler for Emma for a development tool.”

This time I responded that she should trust her judgement because Emma would love it whatever she chose (I actually didn’t say it that well, but I wish I had). This time she sent me one more option and wrote:

“This might work too?”

I could tell from Rita’s email that she was pleased with this simpler setting and I agreed. Her next email began:

“I thought I would send you a photo of Emma’s quilt – I finished tonight.   I hope it does your two patterns justice!  I really love the size for her and combining the two patterns.   The math was a bit challenging to get the blocks to work but I love the way it turned out!  I know she will use it to work on her color and number development!”

I am so impressed and very pleased that Rita took my ideas and made them her own. I wrote her that this is when a teacher really feels successful.

Many years ago I had a student take one of my Snuggle and Learn classes. She made the “Touch Me, Feel Me, Read Me” quilt for her daughter because she said her husband was blind and he would be able to “read” this quilt to her.

What a blessing to be able to encourage quilters to make quilts that help those with handicaps! Praise the Lord!

I think Rita’s quilt is spectacular! and what a wonderful story! Rita sent me these photos of her with Emma, and Emma with her quilt.

Over the course of our email exchange she shared one other thought concerning a future blog topic:

“I think this would be an awesome blog post to learn about “adjusting” patterns to fit a persons projects!”

Hmm. That sounds a bit challenging, but I love a challenge. Stay tuned :-)!

PaintStick “Appliqué”

March 3, 2019 3 Comments

When Wendy and I lead tour groups, we always have at least one project to teach while we’re traveling. Our recent cruise to Hawaii was a bit of a challenge concerning this topic because the ship traveled from island to island during the night and we had almost all of our daylight hours available to explore the islands. This was a good thing – Hawaii is a great place to have time in the sun :-). But, on most of our other trips we had a day or two “at sea”, giving us plenty of project time.

We were able to “squeeze” in two class sessions this trip, so we needed a fun project that could be accomplished in a short amount of time. What we came up with was Hawaiian Appliqué done with paintstick stenciling. I know I’ve posted this photo before, but this time I’d like to share a bit about the technique.

What’s so exciting about this technique is that the Shiva™ Oil Paintsticks are actual oil paint in a crayon form. They create beautiful designs that are permanent on fabric. Therefore they can be used on garments as well as quilts. It’s a wonderful way to put designs on fabric/clothes, but words could be stenciled too! Just imagine the possibilities!

I chose to put my Hawaiian design on a t-shirt.

So – here’s how: The first step was to create the pattern “paper snowflake” style using freezer paper.

This was opened up to reveal the pattern and ironed onto the fabric, shiny side down.

Then we colored along the paper edge with a paintstick, and dragged the paint onto the fabric with a stencil brush.

The results were great – and everyone got them done in the time we had available. We will be having a cruise reunion in April and we’re hoping everyone will bring their finished quilts for show-and-tell. I’ll post pictures at that time!

  • « Go to Previous Page
  • Page 1
  • Interim pages omitted …
  • Page 39
  • Page 40
  • Page 41
  • Page 42
  • Page 43
  • Interim pages omitted …
  • Page 77
  • Go to Next Page »

Primary Sidebar

Archives

Recent Posts

  • The Indiana Heritage Quilt Show ~ 2026
  • Bird’s Eye View
  • The Birds
  • Sew Much Creativity
  • A Last Minute Baby Quilt

Recent Comments

  • Kathy Wuhrmann on The Indiana Heritage Quilt Show ~ 2026
  • Doris Ast on The Indiana Heritage Quilt Show ~ 2026
  • judy raddatz on The Indiana Heritage Quilt Show ~ 2026
  • Jeanette Bussard on The Indiana Heritage Quilt Show ~ 2026
  • clkquilt on The Indiana Heritage Quilt Show ~ 2026

Categories

Footer

My Guide

Whatever you do, do your work heartily, as for the Lord rather than for men.

—  Colossians 3:23

Contact Chris!

  • Home
  • About
  • Gallery
  • Classes
  • Trips
  • Books
  • Blog
  • Contact
  • Sign Up For My Blog

Copyright © 2026 · Chris Quilts · Website by Adunate · Privacy Policy