• Skip to main content
  • Skip to primary sidebar
  • Skip to footer

  • Home
  • About
  • Gallery
  • Classes
  • Trips
  • Books
  • Blog
  • Contact
  • Sign Up For My Blog

Blog

Shape Cut a Quarter

March 19, 2016 4 Comments

Before we get to this week’s topic, I’d like to do a quick update on my quilt: “How Beautiful – Liberty”. It’s striking me as quite funny – I’ve enjoyed making my accordion door quilts, but never imagined anyone else would want to do it! Since sharing my last two blog posts, and winning the ribbons in Sun Prairie, I’ve had oodles of requests. My mind is just buzzing over the prospect of writing another book with all the techniques from “Liberty” in it. Please stay tuned!

**********************

A few weeks ago the grandkids were entertaining themselves very nicely with their toys in the living room. So I decided it would be a good time to take some pictures for this week’s blog. I brought up my cutting tools, put them on the counter, laid the mat on the floor (the lighting is best in the middle of the kitchen floor)

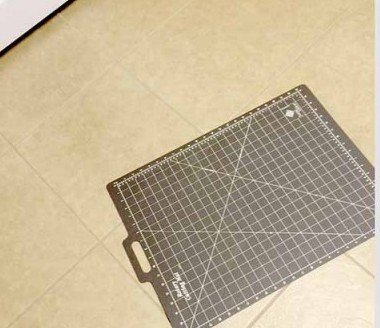
and went to find my camera. When I returned, this was what I found:

SC kids mat

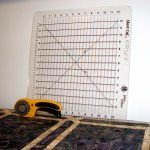
Good thing I had my camera. Trey found sitting on my cutting mat so fascinating, I ended up having to move it to the kitchen table for the photo-shoot  🙂 . Now on to the topic at hand!

shape cutA number of years ago I shared my top three favorite rulers, and included in the list was the Shape Cut™ ruler by June Tailor. This past Christmas I did a post using it to fringe fleece scarves (click here for that post) and recently I shared a similar ruler for marking (click here for the Grid Marker post).

The Shape Cut™ is a great tool for rotary cutting multiple, accurate strips. When it came out it was well received, but it was limited to ½” increments. Back then I was doing freelance work for June Tailor (we’re talking the 1990’s). They asked me to come up with a way to cut ¼” increments with the ½” ruler and I was happy to take on the challenge (they did come out with a Quarter Cut™ ruler, but it had to be made shorter for stability, which made it less useful).

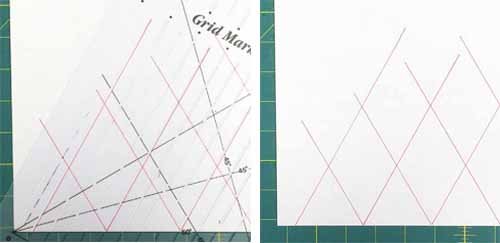
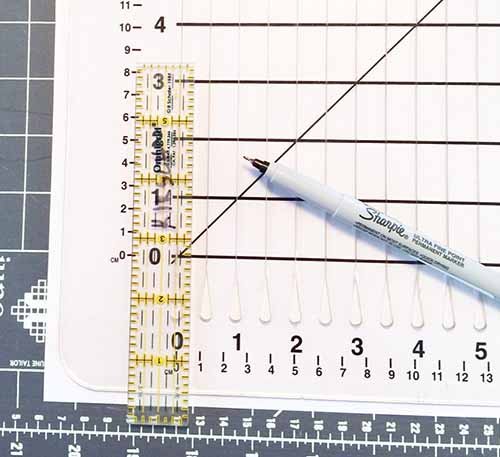
I spent quite a bit of time coming up with the answer, and I think you’ll find it works well. It’s really quite simple, and I devised a chart which does the math for you, that I’ll include in this post. I discovered the trick is to have a dashed line marked between the “0” and ½” slots on the Shape Cut™. The newer ones come with this marking,

SC orig dashed line

but if you have an older ruler, you can add it with a fine line permanent marker.

SC dashed ruler

SC drawn dashed line

Now for the step-by-steps. I’ve given you all the info, but remember there will be a chart at the end of this post that does the math for you!

Step 1: Choose a ¼” increment (i.e. 2 ¼”), double it (i.e. 4 ½”) and cut strips at this size. for 2 ¼” strips your cuts will be at 4 ½”, and 9″, and if you have the larger Shape Cut™, you can continue to cut at 13 ½” and 18″.

Step 2: Lift the Shape Cut™, remove the excess fabric from squaring up on the left cut, and reposition the ruler with the “dashed” ¼” line, along the left edge of the fabric.

We will now, in essence, cut these double strips in half!

Step 3: Cut in the 2 ½” slot (since the fabric is lined up ¼” from the zero slot, this strip will be 2 ¼”).

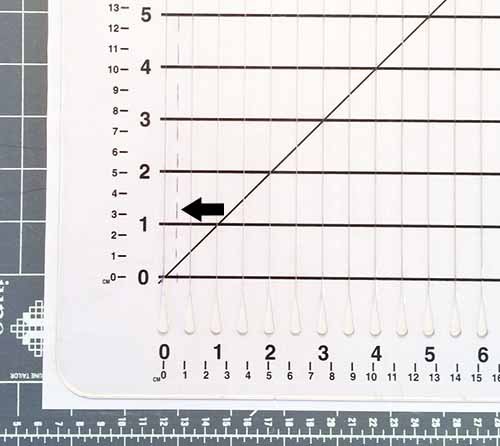
Step 4: Add the double cut amount – for our example – 2½” + 4½” = 7″. Cut in this slot, add 4 ½” again, and cut in the 11 ½” slot. If you have the larger ruler, continue by adding 4 ½” for each cut.

SC paper strips

Here’s a chart with all the math done. To open a printable pdf version – click here, then click on the purple lettering with the word attachment in it (I’m not sure why the extra step, but it works).

Shape Cut quarter cut chart

SC Trey matI’d like to close by sharing a short video I took when I couldn’t break Trey’s fascination with the cutting mat. Click here to view it. Grandchildren are such a blessing!

Minot Prairie Quilt Festival

March 13, 2016 11 Comments

Greetings from Minot, North Dakota,

Minot downtown

where I’m teaching at the Minot Prairie Quilt Festival. The sun is shining and the temps were in the 60’s all weekend. I was very impressed by the way they treat their teachers like queens. The accomodations  at the Minot Grand Hotel were lovely,

Minot Prairie Quilt Fest

and the goodie bag in my room was filled with a yummy variety of products from North Dakota.

Minot goodies

I arrived a day early and Susan and Janet were kind enough to show me around town.

FullSizeRender

We visited the Scandinavian Heritage Center where they had interesting buildings and a huge Dahl horse, similar to the ones we saw in Sweden.

Minot Scandinavian Center

The gift shop was filled with interesting characters!

Minot making friends

Back at the show I was given the opportunity to choose a “Teacher’s Favorite” quilt from all the wonderful pieces in the show. There were so many worthy of the ribbon, but the one that really grabbed me was bright, and beautifully quilted. Here is Diane Slickers with her quilt.

Diane Slickers

And here’s the picture her friend Judy took when she saw the ribbon  😀 !

Diane Slickers2

Congratulations Diane!

I taught three full day classes and the students were great!

Minot Rep class

And being that Minot is quite a ways north, I can now number Canadian quilters among my friends.

Minot ca friends

Everyone was friendly and such fun to be with. It was my first visit to North Dakota, and I’m sure it won’t be my last!!!

***************************

And one last thing 🙂 : This past week I entered “How Beautiful – Liberty” (the quilt I shared with you in last week’s post) in the Sun Prairie Quilt Show, and I was thrilled and humbled to have 3 ribbons hanging on it: a blue ribbon in it’s category, Crew’s Choice (the crew who hangs the show gets a chance to pick), and Viewer’s Choice! I’ve never won a Viewer’s Choice ribbon. What a blessing – praise the Lord!

Liberty in Sun Prairie


How Beautiful – Liberty!

March 4, 2016 15 Comments

Statue of Liberty

I have some very exciting news to share. I recently made a third quilt in my “Accordion Door” series, and I just found out it has been accepted into the American Quilter’s Society show in Paducah, KY next month!!! (to see the post about my first two”Accordion Door” quilts click here)

“How Beautiful – Liberty” is one quilt made from three, in a very 3-Dimensional way. Here is the rather unusual front on view:

How Beautiful Liberty full front.Kirsch-web

The view from the left is a Mariner’s Compass/New York Beauty combination quilt:

How Beautiful Liberty full left.Kirsch-web

And from the right – the true New York Beauty – Lady Liberty:

How Beautiful Liberty full right.Kirsch-web

This is a detail shot, looking down from the upper left corner, just to give you some perspective:

How Beautiful, Liberty detail.Kirsch-web

I used a variation of my Repliqué technique, called Raw-Edge Repliqué, to make both quilts on the “Accordion Door”. (I’m hoping to be teaching Raw-Edge Repliqué at the Madison Quilt Expo this September). The background quilt, which everything else hangs from, is embellished down the sides with Shiva Paint Stik™ designs. The words are from the Declaration of Independence, and were made using my Brother Scan n Cut™. You may remember a post covering the making of these letters from October (click here to view it).

As the label on the back of the quilt states, this is: “My tribute to the founding father’s words in the Declaration of Independence, and to all who have served our nation fighting for the rights endowed on us by our Creator.”

This quilt is currently hanging at the Prairie Heritage Quilt Show, in Sun Prairie, WI. The show runs Sunday through Tuesday (click here for show details).

Also, this weekend I have another quilt on display at the Elk’s Lodge in Watertown, WI (my town). The event is called:

Screen Shot 2016-03-04 at 9.12.50 PM

“A Festival of Visual, Musical, Theatrical and Literary Arts, and People’s Choice Fine Arts Competition”. The event runs Saturday and Sunday, March 5th & 6th. For the performance schedules: click here, then click on “view” under each date. The art contest I’m participating in is viewer’s choice, so if you live in southeastern Wisconsin I hope you’ll consider taking a road trip to Watertown  🙂 . Sunday afternoon you could actually visit both the Sun Prairie Quilt Show and the Watertown Arts Event!

**************

I’m planning to do a few posts in the near future on some of the techniques used to make “How Beautiful – Liberty!”, but for now thanks for sharing in my excitement!

Grid Marking

February 7, 2016 3 Comments

Last week’s Gnome Home blog post was total silliness and fluff. This week’s has information that I hope you will find helpful in your quilting!

I recently surprised myself when I realized I’d never posted about a very helpful tool called the Grid Marker™.

GM mine

Years ago I did freelance work for June Tailor™: demonstrating for them at trade shows, testing their products, designing patterns and stitching samples. It was a delightful learning experience to work on that side of the industry. During my time with them I came up with the idea for the Grid Marker. I am a huge fan of their Shape Cut™ ruler, and felt there was a need for the same type of tool to mark accurate parallel lines. The slots in the ruler are wide enough to accommodate a pencil or marker – and it’s really easy to use!

To make vertical lines, set the bottom horizontal line of the Grid Marker™ along the bottom of the area to be quilted. Choose your favorite marking tool and draw in the slots at your desired increment:

GM verticals
Drawing with the ruler on the left. Accurate lines drawn on the right.

I hope you can see that horizontal lines would need the bottom line of the ruler set along the side of the block. Doing both results in cross-hatching.

To do diagonal lines, choose 45º or 60º, and place that line (I used 60º) along the bottom of the quilt block. Once again, draw in the slots at your desired increment:

GM angles

To do “hanging diamonds” (diagonal cross-hatching), place the other 60º line along the bottom of the block and draw the opposite angled lines:

GM crosshatching

This tool makes quick work out of drawing parallel lines, and it keeps them parallel!

When the Grid Marker™ was introduced, it was chosen as one of Quilter’s Newsletter Magazine’s top 3 tools of the year! June Tailor™ continues to sell the Grid Marker™, but the newer version isn’t quite as long as my ancient and well used one.

Grid Marker

You can find them on the June Tailor™ website, at JoAnn’s, and hopefully at your local quilt shop.


From Thread Tails to Gnome Home

January 31, 2016 1 Comment

Last year the small challenge at the Milwaukee Art Quilters was entitled: “3-D Abodes”. As I noodled on what to create, I glanced at a bag of thread tails given to be by a long arm quilter. It was a wonderful mix of colors, and I had been adding to it for a year or so. So here come the “what ifs”!

What if I sandwiched the mass of threads between black tulle and free motion quilted it into a new “fabric”?

create fabric from thread tails

What if I embellished it with beads, and I got out that thread spinner I purchased and never used, and made more embellishments?

spin threads into ropes

What if I combined it all into a “gnome home”?

So I jumped in, layered, quilted and shaped the mass of threads into an abode by sewing a bunch of darts and pleats into the created “fabric”. Once embellished it looked like this:

Kirsch - Gnome home
To see all the challenge abodes click on: https://milwaukeeartquilters.wordpress.com/category/marq-themed-exhibits/3-d-abodes/

I admit it’s weird, and I had to sew many arcs of plastic tubing to the inside to get it to stand up – and that was rather temporary. So, once the challenge was unveiled and photographed, I took it home and thought seriously about just throwing it away. Instead I tossed it on a shelf, and ignored it for months. Then one day Sommer asked me about it. I put it on the floor and she had a blast putting daddy’s old Star Wars figures in it. Problem is – it kept collapsing.

gh play

Once I realized it was a new favorite toy, I needed a fix, and it came in the form of a plastic jug. With a little glue and stapling it is now stable, and Princess Leia loves it!

gh jug save

So does Princess Sommer!

gh princess Sommer

If you know of a venue to exhibit the 3-D Abode challenge pieces, please let me know. It is a fascinating group of fiber art structures and we’d love to have them seen and enjoyed!

Tie Dye Baby – Results

January 17, 2016 1 Comment

After last week’s baby shower, all of the excitement of Christmas and flying across the country twice to transport grandkids took its toll. I spent the rest of the weekend as a couch potato. On Monday I realized I hadn’t rinsed the dye out of the baby things. Rinsing and washing was a bit of an undertaking, but mom and I persevered and the results were fun, fun, fun!

All the pieces went from this:

dying done blog

to the following pictures. My sister-in-law, Mary Sue, dyed mommy’s shirt and Scott’s Mom did his:

tie dye baby

The burp cloths (made from cloth diapers) were colorful fun:

tie dye baby

The onsies look great (notice how Sommer and Trey’s monkeys did a bit of photo-bombing  🙂 ):

tie dye baby

and the terry cloth bibs will look great on baby. They won’t show a bit of drool, dribble or food:

tie dye baby

Everything is folded and ready to deliver with great expectations!

tie dye done

Can’t wait for our sweet little girl to arrive!

Tie Dye Baby 2

January 10, 2016 1 Comment

When our son and daughter-in-law were expecting Sommer, I had a “tie dye” baby shower for Betsy and her friends. We tie dyed bibs, burp cloths and onsies – and had a lot of fun! (click here to read that post).

Sommer is almost 4 now (I can’t believe how fast time flies!), and my niece is expecting her first child – a little girl. So my Mom, Betsy and I decided to throw a tie dye baby shower for Brianne this past Saturday! This time we really had fun with the theme. Betsy made wonderful decorations and we even found a local bakery that made us tie dyed cupcakes – inside and out!

tie dye cupcakes

tie dye cupcakes blog

They were as delicious as they were beautiful. After brunch we headed to Mike’s shed, put on our plastic garbage bags,  and the dying began!

dying - Betsy,Sommer blog
Betsy and Sommer
tie dyed baby shower
My Aunt and cousins
My Mom, Brianne and great grandchild #9

A lovely group of fabric dyers :-)

Everyone did a great job! I sure hope this little girl likes bright colors. Here’s what it all looked like when we were done:

dying done blog

These pieces were covered with plastic and left to set while we went in for gift opening. I’ll share the finished pieces, after they’re rinsed and dried. I can’t wait to see how they all turn out!

Here’s a parting shot that should make you smile. Mom and I did a baby shower idea search on the internet and a picture of a unique fruit salad made us laugh out loud. I had to make it. I’m sure Scott and Brianne’s baby will be much cuter  😀  !

baby melonhead shower fruit salad

Crazy Quilt Christmas Stocking

December 20, 2015 2 Comments

My daughter-in-law recently texted me this picture with the message “something seems to be missing :-)”.

crazy quilt christmas stockings

Well, the empty hook belongs to Trey and, since this is his first Christmas, grandma needs to get busy! I made Brad, Betsy and Sommer’s stockings using my own drawing of a stocking and “crazy piecing”, without all the thread embellishment typical of Crazy Quilting. The year after Sommer’s was made Betsy asked me to teach her how to do this, so she could make bone-shaped stockings for their dogs. She’s a quick study!

I thought some of you might like to know how to “crazy piece”. Here’s my version:

  •  Choose your favorite stocking pattern and cut out the basic shape, to size, from muslin or some undesirable fabric (like this pink stripe I attempted to snow dye in blue, with lousy results. It will be completely covered, so it works well here). I then gather up fabric scraps and leftover “pieced units” in appropriate colors.
  • To begin, pin a scrap or “pieced unit” with an odd shape and an odd number of sides to the fabric base – like the black/green/red “pieced unit” below. Lay a new scrap along one edge, right sides together, and stitch in place: CQS begin 1
  • Fold this new piece open and press. Since this process will be repeated many times, I like to use a wallpaper roller, instead of keeping an iron hot for the duration.crazy quilt stocking
  • Repeat this along all sides of your shape. Strips can be used, but it also adds interest to attach triangles and odd shaped pieced.Crazy quilt stockingCrazy quilt stocking
  • When edges get long, select a “pieced unit” again, or feel free to sew some smaller chunks together into “pieced units” and then add them to the crazy quilting. CQS adding pieced unitCQS pressing pieced unit
  • Continue in this manner until the base fabric is covered.
  • There may be times when things look a little ragged. Then just grab a long, wide strip, CQS adding cleaner upper 1lay it over everything and stitch, lay it over everything, fold back and press. crazy quilt stockingWhen you’ve covered a portion of an edge, it’s a good idea to stitch from the back, close to the outer edge of the base fabric, crazy quilt stocking

and then trim the excess away.crazy quilt stockingContinue until the base pattern is covered.

crazy quilt stocking

7.  Cut out a reverse pattern from backing fabric and two linings also (one and one reverse). Because mine has a cuff, it needs to be sewn between the stocking and lining pieces. The crazy quilt is sewn to one lining piece, and the backing fabric to the other.

crazy quilt stocking

8.  Then these pieces are put right sides together and sewn all the way around, leaving a 3″ opening somewhere in the lining for turning.

9.  Turn it right side out, stitch the opening closed, push the lining into the stocking and press. Add a hanging loop and you’re done!

#crazyquiltstocking, #crazyquilt, #stockingTrey’s stocking is now hanging with all the others – ready for Christmas.

crazy quilted christmas stockings, #Christmasstockings, #crazyquilt

*******************************

Christmas-2012

Each year I spend time focusing on the true meaning of Christmas – Jesus, the Savior of the world, who came to earth in human flesh to save humanity from the curse of sin. “For God so loved the world that He gave His only Son, that whoever believes in Him should not perish, but have eternal life” John 3:16. What an awesome gift! It gives meaning to everything else in our lives. My Christmas wish for you is that you may know Him as your Savior. Merry Christmas!

*******************************

PS Here’s just one last picture to make you smile:

Sommer cookies for web

  • « Go to Previous Page
  • Page 1
  • Interim pages omitted …
  • Page 53
  • Page 54
  • Page 55
  • Page 56
  • Page 57
  • Interim pages omitted …
  • Page 77
  • Go to Next Page »

Primary Sidebar

Archives

Recent Posts

  • Quilting in Bloomington ~ Part 2
  • The Indiana Heritage Quilt Show ~ 2026
  • Bird’s Eye View
  • The Birds
  • Sew Much Creativity

Recent Comments

  • Laurie Neubauer on Quilting in Bloomington ~ Part 2
  • judy raddatz on Quilting in Bloomington ~ Part 2
  • Kathy Wuhrmann on The Indiana Heritage Quilt Show ~ 2026
  • Doris Ast on The Indiana Heritage Quilt Show ~ 2026
  • judy raddatz on The Indiana Heritage Quilt Show ~ 2026

Categories

Footer

My Guide

Whatever you do, do your work heartily, as for the Lord rather than for men.

—  Colossians 3:23

Contact Chris!

  • Home
  • About
  • Gallery
  • Classes
  • Trips
  • Books
  • Blog
  • Contact
  • Sign Up For My Blog

Copyright © 2026 · Chris Quilts · Website by Adunate · Privacy Policy